Enabling enterprise Telemetry on AWS: Handling massive data backfills using ECS and Databricks wi...
17 June 2026 - 1 min. read
Keidi Xhafa

Nowadays we have a lot of workloads that are built on top of Docker and it is crucial to keep our Docker images secure and optimized for the cloud. We already covered Docker in our blog, you can dig further on the origins of Docker or see a use case with Wordpress.
In the next paragraphs, we will see a few tips on how we can avoid the most common security vulnerabilities and how to optimize the size of our Docker images.
But first, we need to understand one of the core concepts of Docker: the layering system.
The Dockerfile is the main file that defines how a Docker image is built. It defines the base image from which we start, the application’s dependencies, how the application is packaged and how it is run.
When we start the build process from a Dockerfile, the Docker engine creates a series of layers, one for each command in the Dockerfile. Every time we execute a command in the Dockerfile, a new layer containing the changes is created on top of the previous one. The Docker engine executes the commands sequentially and eventually combines all the layers to create the final image.
Keeping the size small generally means that it is faster to build, deploy and run. To achieve that, a good idea is to start from a base image that is itself very small. You can use `alpine:3.15` which is just about 5.6 MB instead of `ubuntu:20.04` which is (at the time of this article) 72 MB.
Alpine is a general-purpose Linux distribution built around musl libc and BusyBox that aims for simplicity, security, and resource efficiency. It contains only absolutely necessary packages because you know… if it’s not included it can’t break.
Keep in mind that it also has some drawbacks. For example, since Alpine is based on the musl C library, instead of the most widely used GNU C Library, you may encounter problems with some C-based dependencies.
Aside from using Alpine as a base image, another method for reducing the size of your images is using multistage builds. A multistage build consists of a single Dockerfile in which we define multiple FROM instructions and each one defines a new stage.
In each FROM we can start from a previous stage in order to take advantage of cached build artifacts or we can start from an entirely new base image and just copy some artifacts from the previous stage.
Let’s see a quick example:
# Base image with dependencies
FROM node:17.3.0-alpine3.12 AS base
WORKDIR /app
# Copy package.json and package-lock.json
COPY package*.json ./
# Install dependencies
RUN npm install


# Build Stage
FROM base AS build
WORKDIR /app
COPY . ./
# Build and bundle static files
RUN npm run build


# Release Stage
FROM node:17.3.0-alpine3.12 AS release
WORKDIR /app
COPY --from=base /app/package.json ./
# Install app dependencies
RUN npm install --only=production
COPY --from=build /app/dist/ ./
CMD [ "npm", "run", "start" ]
In this multi-stage Dockerfile we created a base image that has all the required dependencies, we then created a builder stage, and finally, for the actual runtime image, we started from a clean image, installed the production requirements, and selectively copied only the required artifacts.
By default, all stages are built but we can choose to build a specific stage with the flag `--target <stage-name>`
`docker build --target release --tag image .`
You can refer to the official docs for further details.
To fully take advantage of layer caching, write your Dockerfiles in a way that commands that will not change often are executed before others. That way the layers that are created first will be cached and reused. Although this will not change the final image size, it will make the builds faster.
Add temporary files, intermediate build artifacts, local development files and sensitive info to .dockerignore exclude them. Next time you start a build it will be faster because the build context of the Docker engine will be smaller.
Btw you should not commit sensitive info in your repository :)
Dive is a CLI tool that allows you to inspect the contents of each layer in a Docker Image. It can be very useful to see what has changed after each step in the dockerfile, because that way you can see if there are redundancies or unnecessary files in the image.
To see it in action just run `dive <image-name>`
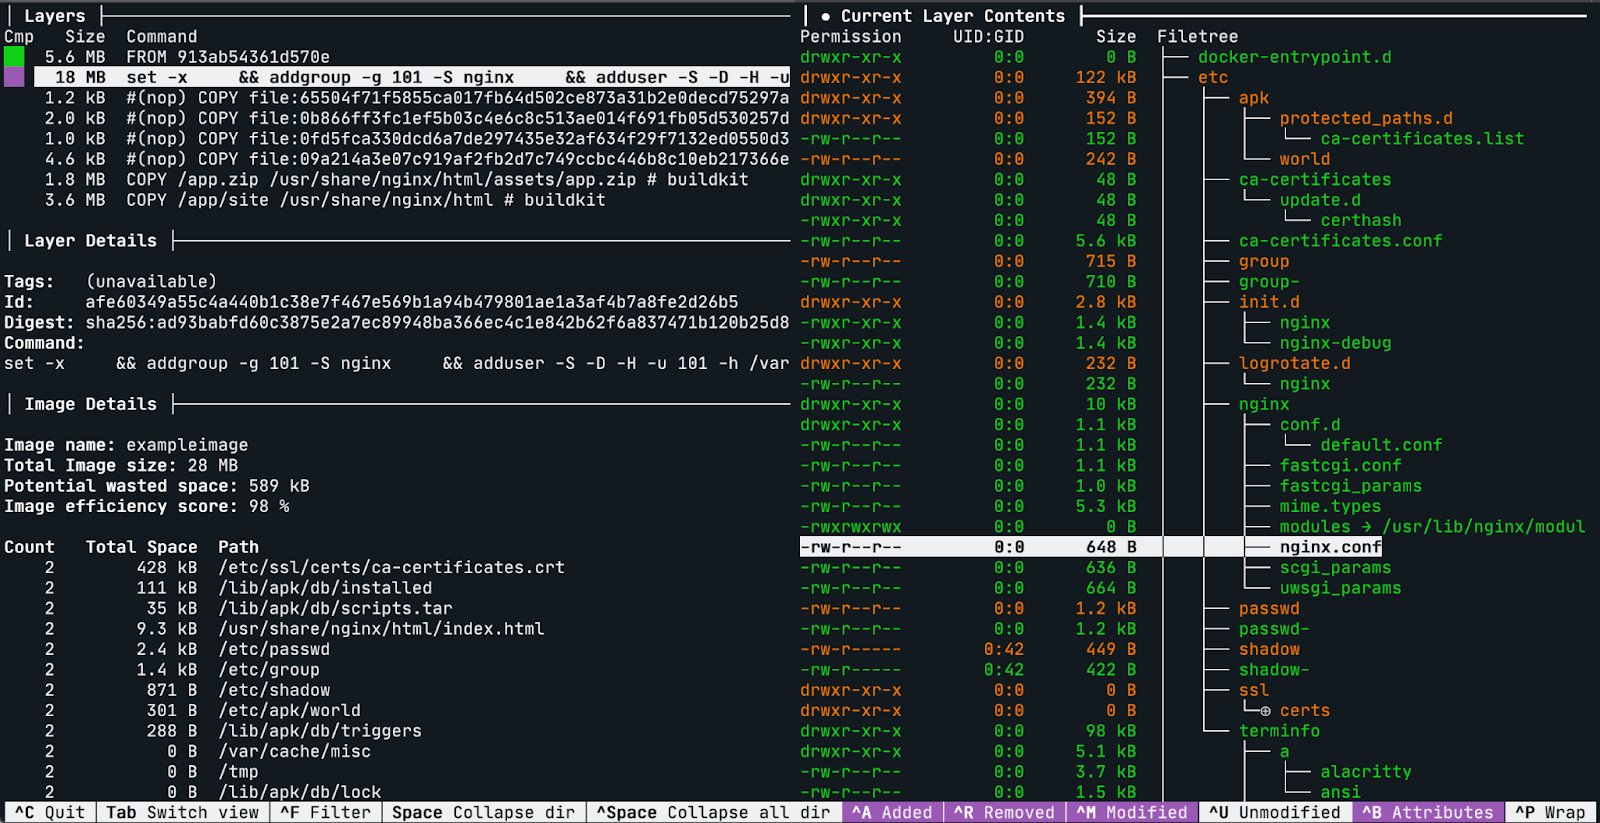
The main features of Dive are:
Show Docker image contents in each layer: It provides you a nice tree view of all the contents of the image in a specific layer of the image.
Filter by new, modified, and removed files only: with the handy shortcuts you can enable/disable the view of specific files.
Estimate image efficiency: An experimental feature that shows you how much space is being wasted.
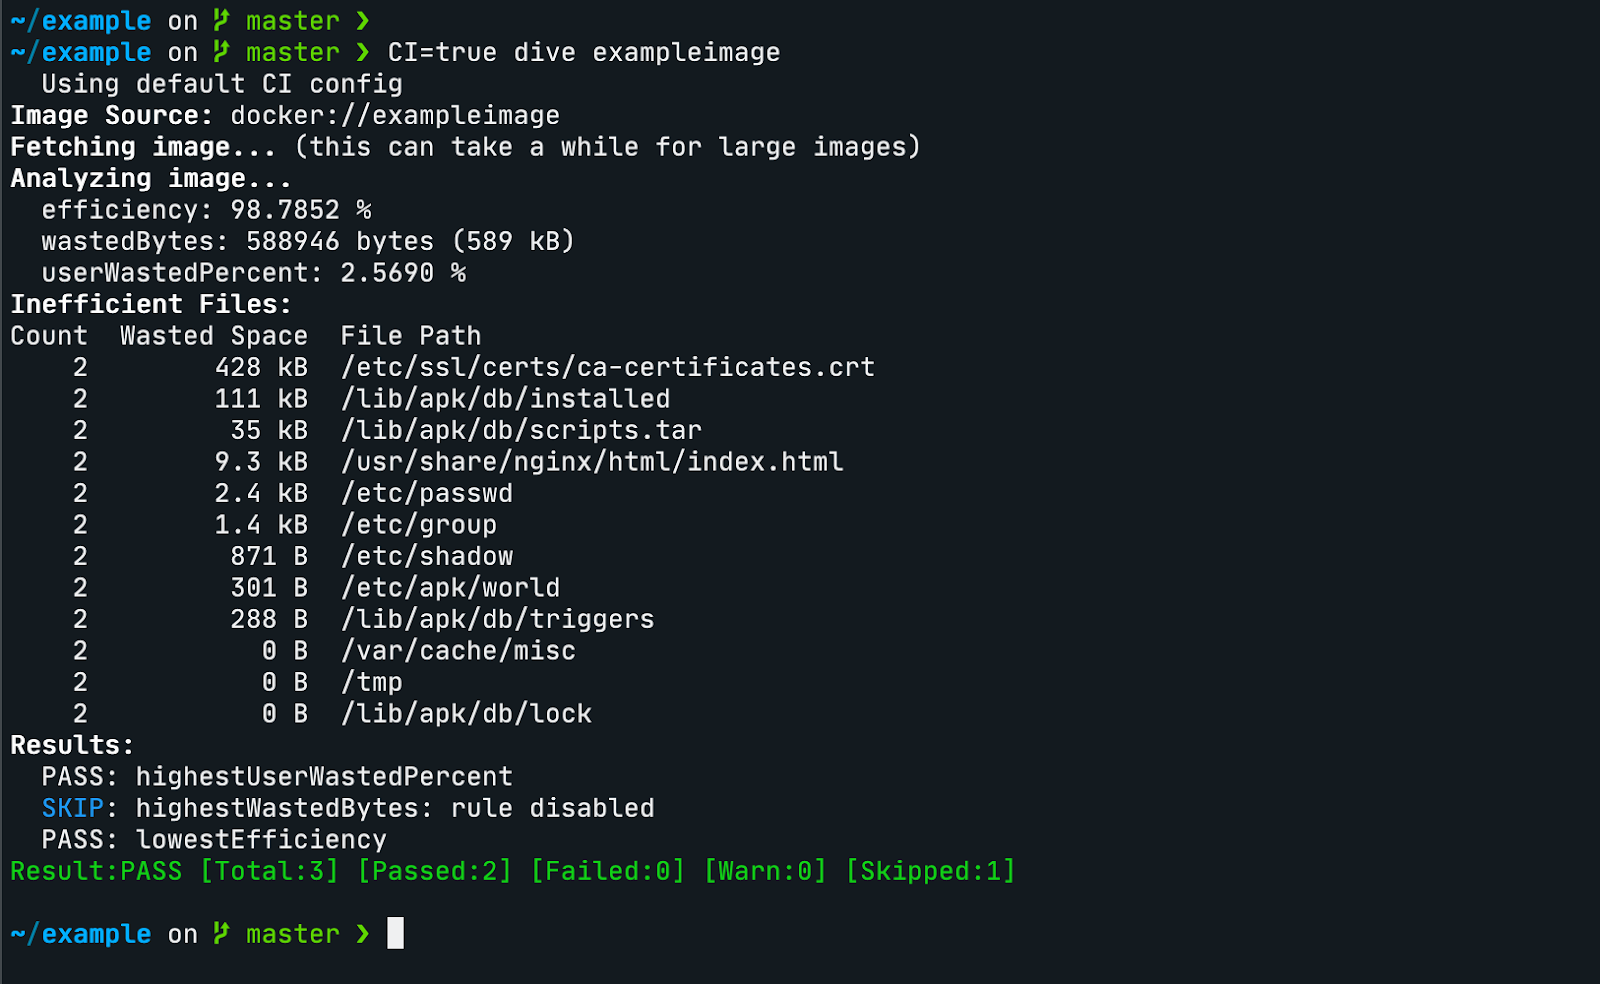
You can set the env variable `CI=true` to disable the interactive view and integrate it in a CI/CD pipeline.
You can create a .dive-ci file to customize three parameters for tests acceptance:
`lowestEfficiency`, `highestWastedBytes` and `highestUserWastedPercent`.
.dive-ci file:
rules:
 # Lowest allowed efficiency percentage (value range between 0-1).
 lowestEfficiency: 0.95

 # If the amount of wasted space is at least X or larger than X, mark as failed.
 # Expressed in B, KB, MB, and GB.
 highestWastedBytes: 20MB

 # If the amount of wasted space makes up for X% or more of the image, mark as failed.
 # Note: the base image layer is NOT included in the total image size.
 # Expressed as a ratio between 0-1; fails if the threshold is met or crossed.
 highestUserWastedPercent: 0.10
A basic rule of thumb is to start from the latest stable version of the base image. That way you will have the latest security patches for the native tools and libraries. The same rule also applies to the application-level dependencies.
Another basic rule is to reduce the attack surface: you should have only the minimum set of tools and libraries required to run the application. To achieve this you can start from a very small base image (something like Alpine) and then install the application-level dependencies on top of that.
One other good practice to follow is leveraging vulnerability scanning tools to check for known vulnerabilities in your Docker Images. Amazon’s Elastic Container Registry allows us to scan our images at no additional cost!
Amazon's Elastic Container Registry (ECR) is a fully managed container registry that, among other features, offers a way to scan your images for vulnerabilities.
Two scanning options are available
Allows manual and automatic scanning of images and is a free service. It uses the Common Vulnerabilities and Exposures (CVEs) database from the open-source Clair project.
Amazon ECR integrates with Amazon Inspector to provide automated scanning of the repositories. Your container images are continuously scanned and when new vulnerabilities appear Inspector notifies you through EventBridge.
You can scan an image manually through the AWS Console or you can use the following AWS CLI command:
aws ecr start-image-scan --repository-name nginx-test --image-id imageTag=base
{
	"registryId": "424242424242",
	"repositoryName": "nginx-test",
	"imageId": {
    	"imageDigest": "sha256:61191087790c31e43eb37caa10de1135b002f10c09fdda7fa8a5989db74033aa",
    	"imageTag": "base"
	},
	"imageScanStatus": {
    	"status": "IN_PROGRESS"
	}
}
and then use the following command to check the status of the scan:
aws ecr describe-image-scan-findings --repository-name nginx-test --image-id imageTag=base
{
	"imageScanFindings": {
    	"findings": [...],
    	"imageScanCompletedAt": "2021-12-22T11:44:55+01:00",
    	"vulnerabilitySourceUpdatedAt": "2021-12-22T01:26:43+01:00",
    	"findingSeverityCounts": {
        	"HIGH": 8,
        	"MEDIUM": 41,
        	"LOW": 23,
        	"UNDEFINED": 1,
        	"INFORMATIONAL": 67
    	}
	},
	"registryId": "4242424242424242",
	"repositoryName": "nginx-test",
	"imageId": {
    	"imageDigest": "sha256:61191087790c31e43eb37caa10de1135b002f10c09fdda7fa8a5989db74033aa",
    	"imageTag": "base"
	},
	"imageScanStatus": {
    	"status": "COMPLETE",
    	"description": "The scan was completed successfully."
	}
}
You can enable the ECR `ScanOnPush` feature on a specific repository or enable it on all your repositories by setting the Basic scanning configuration in the Console `Amazon ECR > Private registry > Scanning configuration`
By setting this feature you can also benefit from the AWS EventBridge integration. Since every scan emits an event, you can intercept them with Event Bridge and build for example an event-driven notification system to alert you in case of critical security issues in your images.
In this article, we covered some practices that you can adopt to optimize your Docker build process in multiple aspects.
In regard to image size and build duration we saw some Dockerfile tips & tricks, we learned how to use Dive to inspect the layers and how to integrate it in a pipeline. And finally we saw how you can leverage ECR scan to automate scanning of your Images.
If you're still curious about the topic, here are some useful links:
Contact us or write in comments to share your Docker experience! And see you in a few days for a new article on Proud2beCloud!