
When Serverless runs on servers: new options for AWS Lambda and AWS Fargate with Managed Instances
04 March 2026 - 13 min. read
Damiano Giorgi
DevOps Engineer

In the rapidly evolving landscape of artificial intelligence, creating intelligent agents that can interact with users and API- based systems has become increasingly important.
This tutorial will guide you through the process of building a Claude 3 agent using AWS Bedrock, exposing it via API Gateway and Lambda, and integrating it with a Pinecone knowledge base to leverage knowledge augmentation with RAG.
Furthermore, the system will leverage AWS Lambda through Bedrock agents to retrieve user information directly from a relational database and display it in the chat.
We'll be focusing on a real-world example: a fictional customer service agent that can handle queries about electrical connections in Rome, Italy.
This guide is designed for readers with a basic understanding of AWS services and some programming experience. By the end of this tutorial, you'll have a functional AI agent that can assist customers with services, retrieve invoice information, and even send emails with attachments.
Before we dive into the implementation, let's briefly discuss the key technologies we'll be using:
2. AWS API Gateway and Lambda: API Gateway is a fully managed service that makes it easy for developers to create, publish, maintain, monitor, and secure APIs at any scale. Lambda is AWS's serverless computing service that lets you run code without provisioning or managing servers. Together, they provide a scalable and cost-effective way to expose our AI agent to the world
3. Pinecone: Pinecone is a vector database that allows for efficient storage and retrieval of high-dimensional vectors, making it perfect for semantic search applications.
Designed specifically for storing, managing, and searching vector embeddings, Pinecone offers a powerful solution for developers and data scientists working on AI projects.
At its core, Pinecone excels in managing vector embeddings, which are numerical representations of data commonly used in machine learning models. These embeddings can represent a wide variety of information, from text and images to audio and user behavior patterns. The service's ability to efficiently store and query billions of these vectors sets it apart in the realm of data management for AI applications.
One of Pinecone's most notable features is its scalability. The service can effortlessly handle billions of vectors and process thousands of queries per second, making it an ideal choice for large-scale applications that demand high performance. This scalability is complemented by Pinecone's low latency, with query times typically measured in milliseconds, enabling real-time applications that require instant responses.
The heart of Pinecone's functionality lies in its advanced similarity search capabilities. By leveraging sophisticated indexing techniques, including approximate nearest neighbor (ANN) search, Pinecone allows users to quickly find the most similar vectors to a given query vector, which is crucial for applications such as recommendation systems, semantic search, and image or audio similarity detection and obviously to prepare RAGs for LLMs. As a Cloud-native solution, Pinecone offers the advantages of a fully managed serverless service. This approach significantly reduces users' operational overhead, allowing them to focus on developing their applications rather than managing infrastructure. The service provides a straightforward API that integrates seamlessly with various programming languages and frameworks, making it accessible to a wide range of developers.
Pinecone's versatility is further enhanced by its support for metadata filtering: users can attach additional information to their vectors and use this metadata to refine search results, which is very important in scenarios where contextual information plays a crucial role in determining relevance.
The service also offers robust data management capabilities, including upsert operations that allow for easy updates and insertions of vector data.
Its combination of speed, scalability, and advanced search capabilities makes it an invaluable tool for organizations looking to harness the full potential of their vector data.
In our case, we'll use it to store and query tokenized information about a customer of ours's electrical services taken from the institutional website.
4. Aurora Serverless PostgreSQL v2: Aurora Serverless is an on-demand, auto-scaling configuration for Amazon Aurora. We'll use it with PostgreSQL compatibility to store and retrieve customer data efficiently and Aurora Data APIs for database interaction. The Aurora Data API is a secure HTTPS API that allows you to run SQL queries against an Amazon Aurora database without needing database drivers or managing connections.
Here are some key reasons why you should consider using the Aurora Data API:

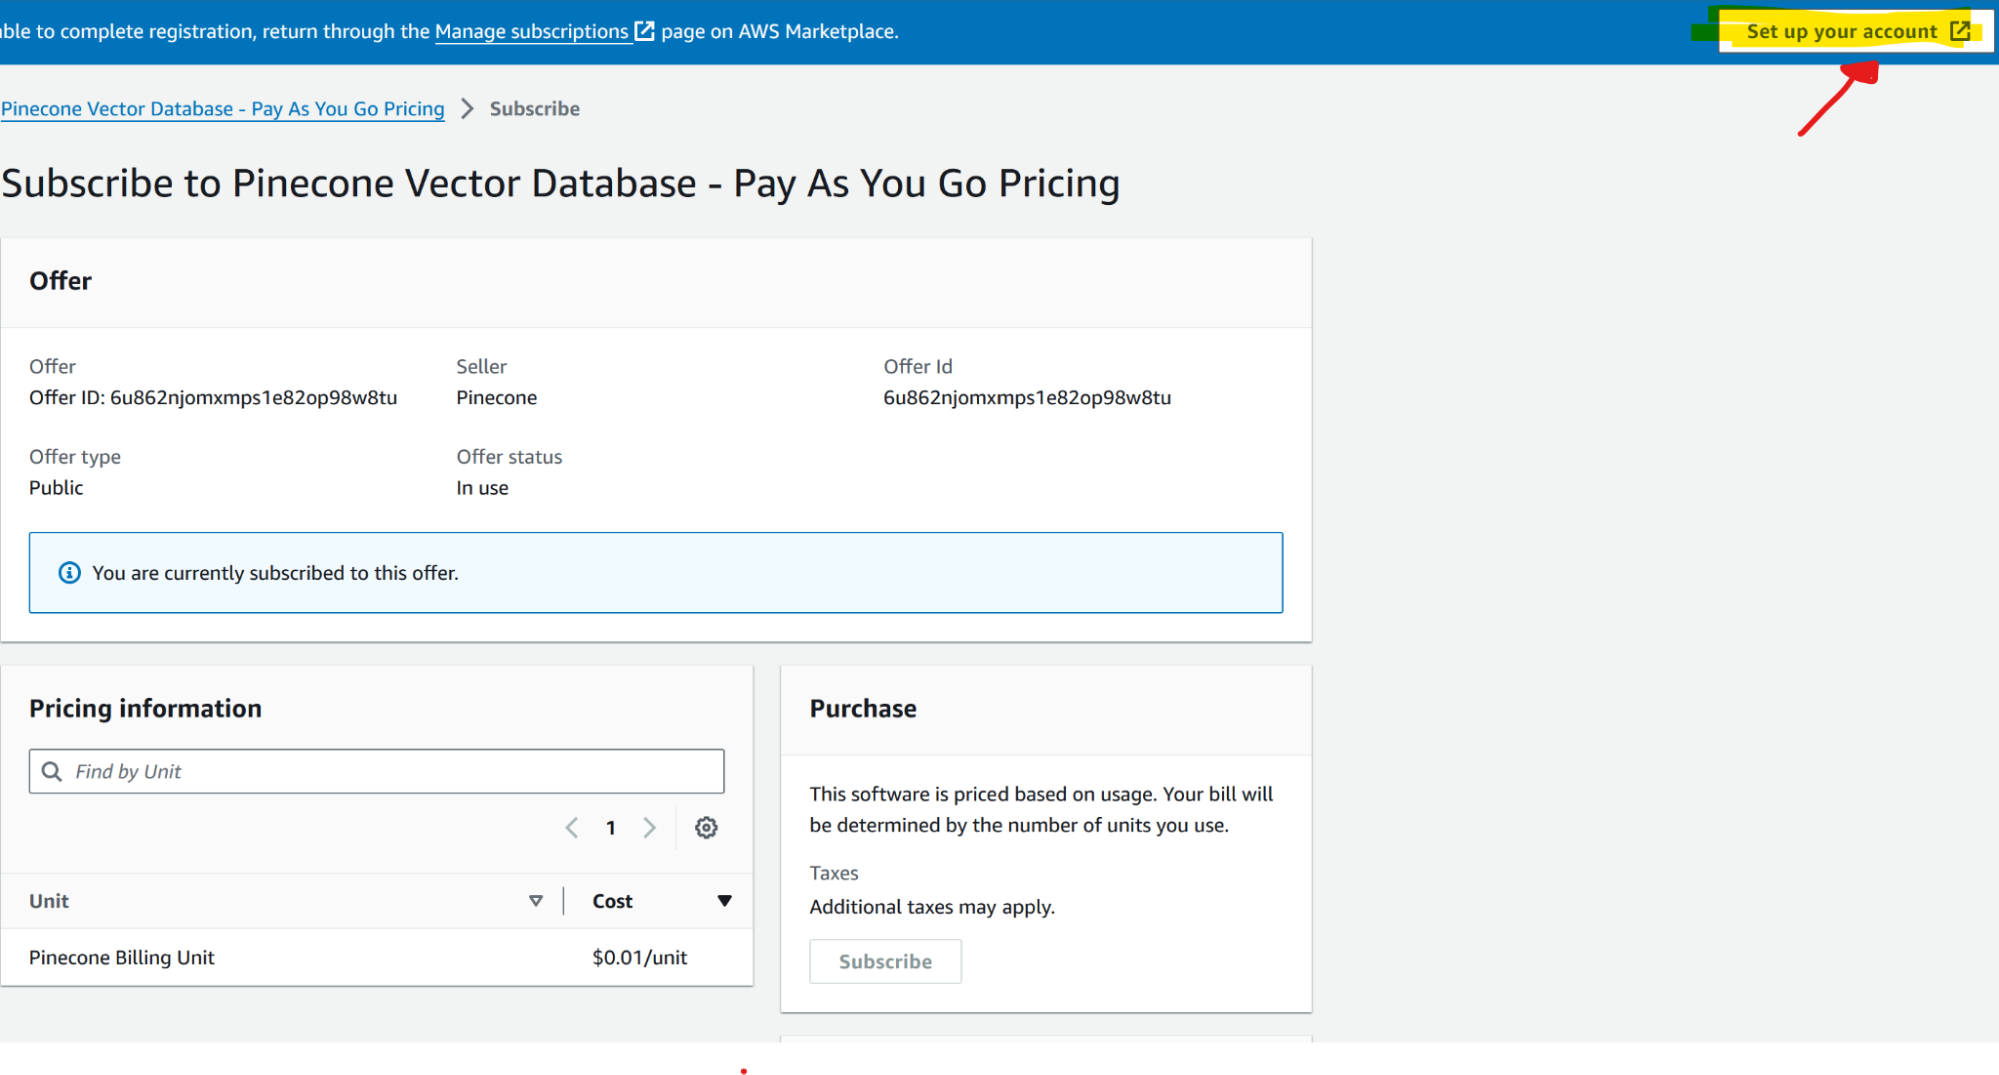
To subscribe to Pinecone from AWS Marketplace, follow these steps:
After subscribing, you can access and use Pinecone from within your AWS account: got to Marketplace > Manage subscriptions > Set Up Product (pinecone entry) > Set Up Account
3. Aurora Serverless PostgreSQL v2: Setup Create an Aurora Serverless PostgreSQL cluster in your AWS account. Configure the necessary tables for data. (See the guide)
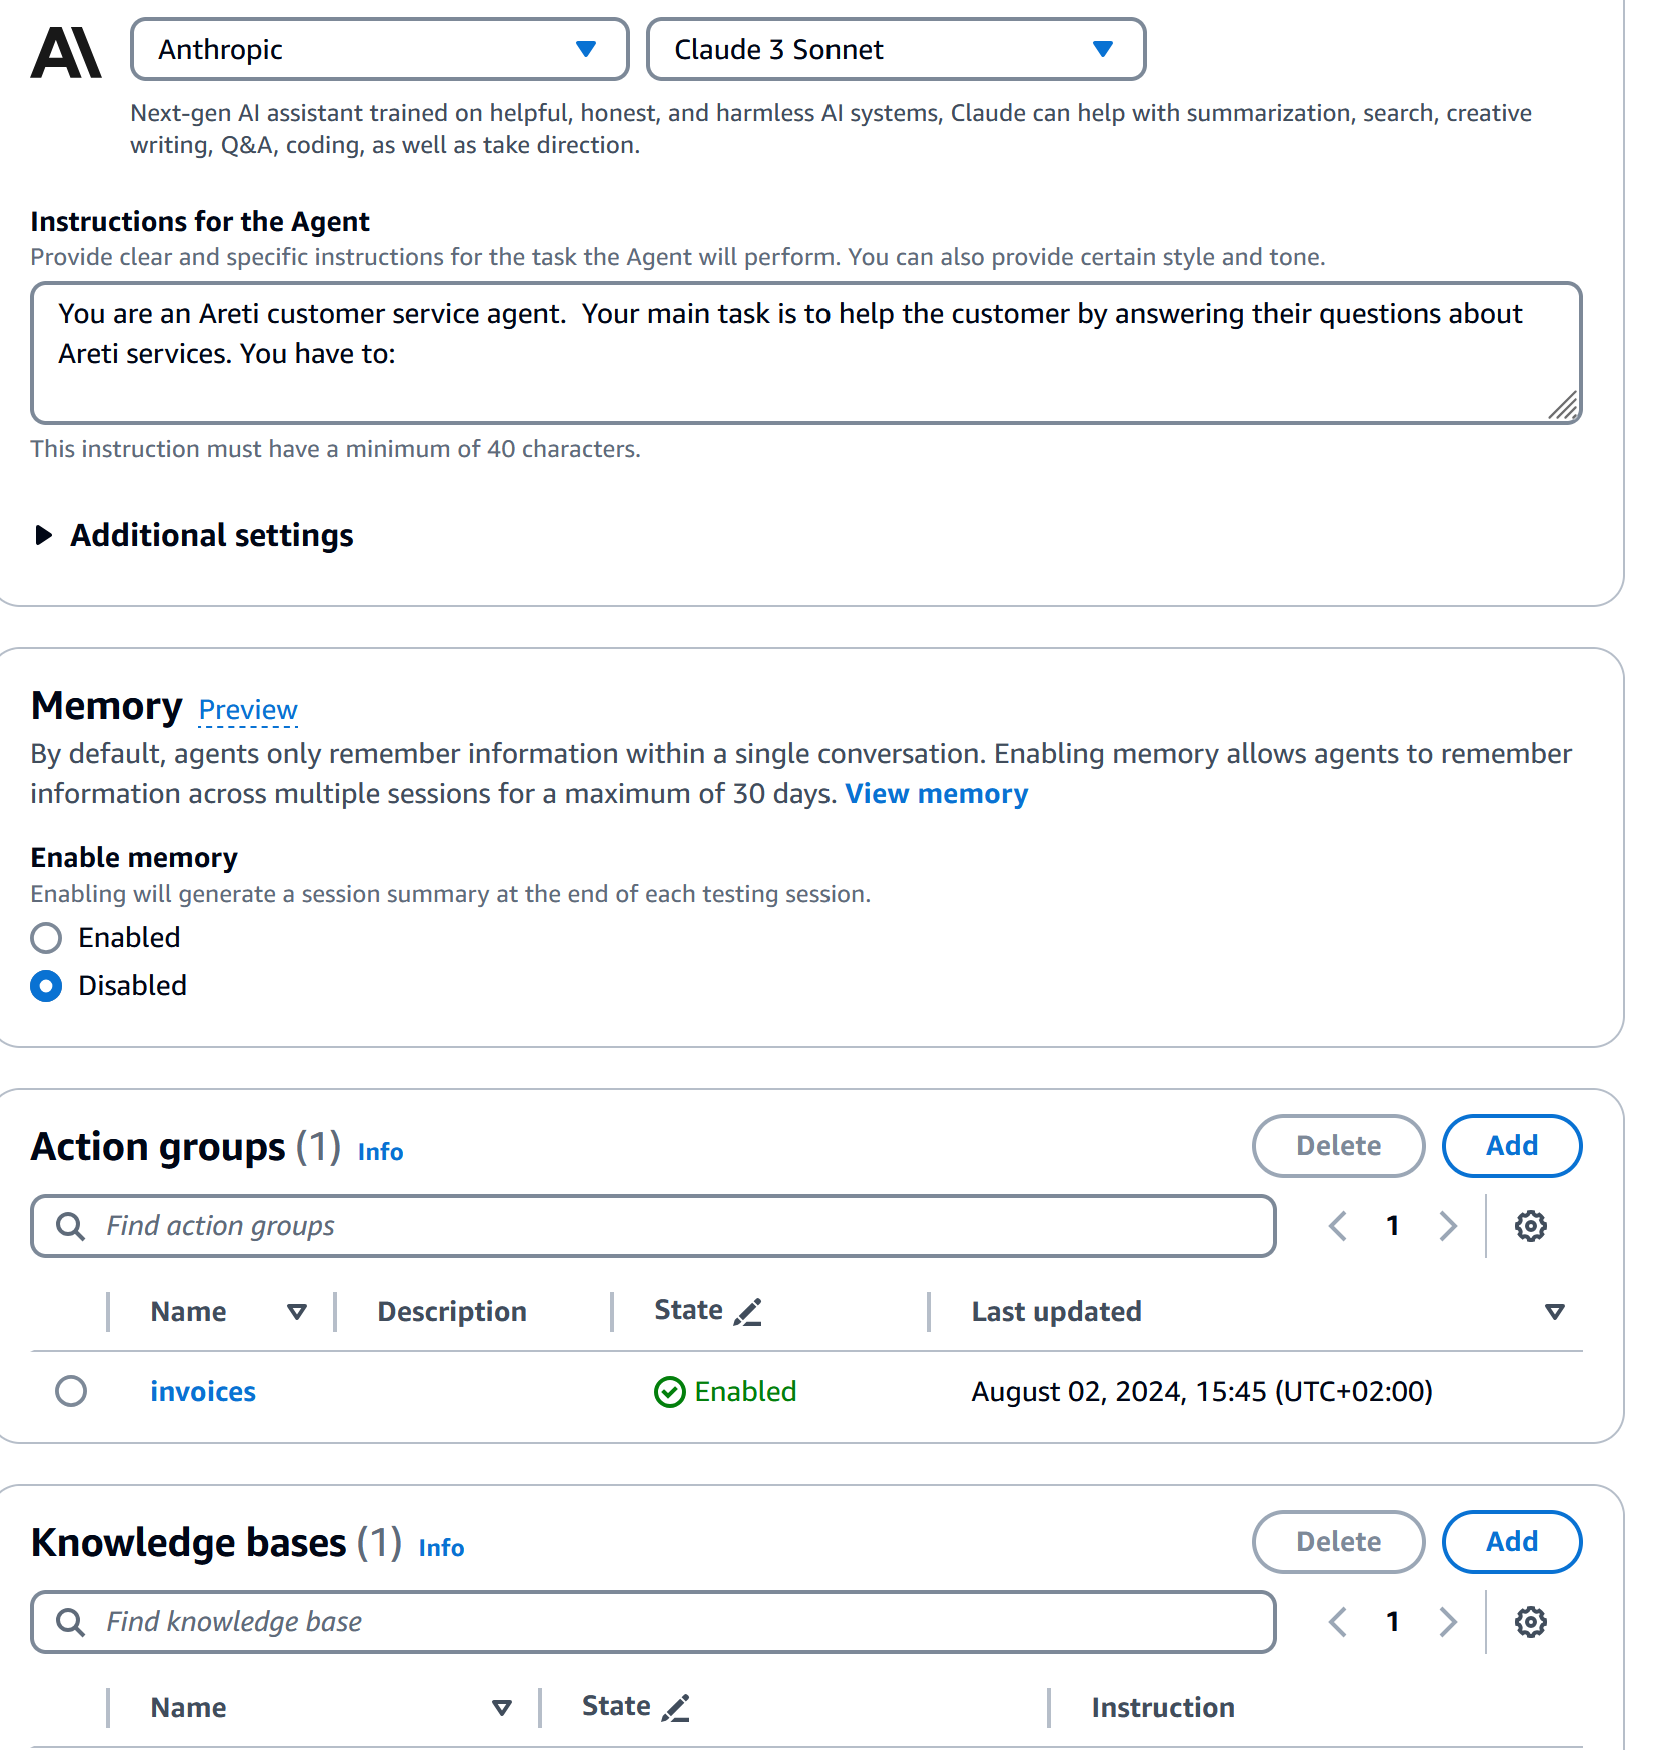
4. Creating the Claude 3 Agent with AWS Bedrock: Accessing AWS Bedrock Navigate to the AWS Bedrock console and request access to the Claude 3 model: go to this link; select relevant models and request access. This may take some time for approval.
After model is approved (e.g. Antropic Sonnet 3) you'll need to create an agent: visit this link and create an agent with the name you prefer.
5. Setup Bedrock Knowledge Base: visit this link to create a KB, select pinecone when prompted. Use this guide for reference. At some point, you’ll need to create to Secrets Manager to store the Pinecone secret. After everything is set, you can populate the KB with data. To do so we just downloaded the text from the relevant Customer webpages but you can upload all the documents you think will be useful in the KB, supported formats are text and PDF. If you go for Opensearch Serverless (the AWS native vector DB) you can also connect internal enterprise data sources directly, such as Sharepoint, Confluence, Salesforce, and generic web crawlers.
6. Defining the Agent's Behavior: Using the following metaprompt, or similar, define the agent's behavior. This includes specifying its role as a customer's customer service agent, outlining its main tasks, and setting guidelines for interaction.
Example metaprompt:
You are a Customer customer service agent.  Your main task is to help the customer by answering their questions about services. You have to:

1. Provide information about these services: Interventi sul punto di fornitura, Illuminazione cimiteriale, Allaccio alla rete elettrica. You can find the information in your knowledge base.

2. List all the customer's invoice. The customer has to provide numero utenza and tipo utenza (bollette energia oppure bolletta illuminazione cimiteriale) in the prompt.

3. Get all the information of a single invoice. The customer has to provide numero bolletta in the prompt.

4. Send mail with a single invoice attached. The customer has to provide numero bolletta and email address in the prompt.

You need to have all the required parameters to invoke the action group. Don't complete the missing parameters. Ask the customer to provide the missing one.

If the provided email is formally wrong you have to ask the customer to insert a valid email

If you have found invoices that match the user's criteria print them in a user friendly format.  Always reply in italian.

If you can't find any invoice on the criteria provided by the user, use a polite tone to let him know that you were unable to find any invoices that met the user's search criteria.  Ask them to try again and give them guidance on what criteria their missing to get results that best meet their criteria.  You also need to be flexible. If it doesn't match their exact criteria, you can still state other invoices you have in the desired period.

When you provide answers don't link any vector db source reference.
Don't answer to other topic questions.
7. Implementing the Agent Logic: Create a new Lambda function that will serve as the backend for our agent. This function will allow Claude to execute operations defined in the OpenAPI file you need to upload to the agent in the action group. A simple code example for the lambda is the following:
import json
import boto3

# Replace these with your actual ARNs
db_clust_arn = "your_database_cluster_arn"
db_secret_arn = "your_database_secret_arn"

rds_data = boto3.client("rds-data")
s3_client = boto3.client("s3")


def lambda_handler(event, context):
	print(event)

	agent = event["agent"]
	action_group = event["actionGroup"]

	# Flatten parameters for easier access
	flattened_params = {param["name"]: param["value"] for param in event["parameters"]}

	print(flattened_params)

	parameters = event.get("parameters", [])
	print(parameters)
	invoice_number = parameters[0].get("value")
	receiver_email = parameters[1].get("value")

	# Construct SQL query
	get_invoice_information_sql = f"""
    	SELECT *
    	FROM invoices
    	WHERE account_number = '{flattened_params['account_number']}'
	"""

	if flattened_params.get("account_type"):
    	get_invoice_information_sql += (
        	f" AND account_type = '{flattened_params['account_type']}'"
    	)

	print(get_invoice_information_sql)

	# Execute SQL query
	response = rds_data.execute_statement(
    	resourceArn=db_clust_arn,
    	secretArn=db_secret_arn,
    	database="your_database_name",
    	sql=get_invoice_information_sql,
	)

	print(response)

	records = response.get("records")
	print(records)

	# Prepare response
	response_body = {"TEXT": {"body": f"{records}"}}

	action_response = {
    	"actionGroup": action_group,
    	"functionResponse": {
        	"responseState": "REPROMPT",
        	"responseBody": response_body,
    	},
	}

	session_attributes = event["sessionAttributes"]
	prompt_session_attributes = event["promptSessionAttributes"]

	# Construct final Lambda response
	lambda_response = {
    	"response": action_response,
    	"messageVersion": event["messageVersion"],
    	"sessionAttributes": session_attributes,
    	"promptSessionAttributes": prompt_session_attributes,
	}

	return lambda_response
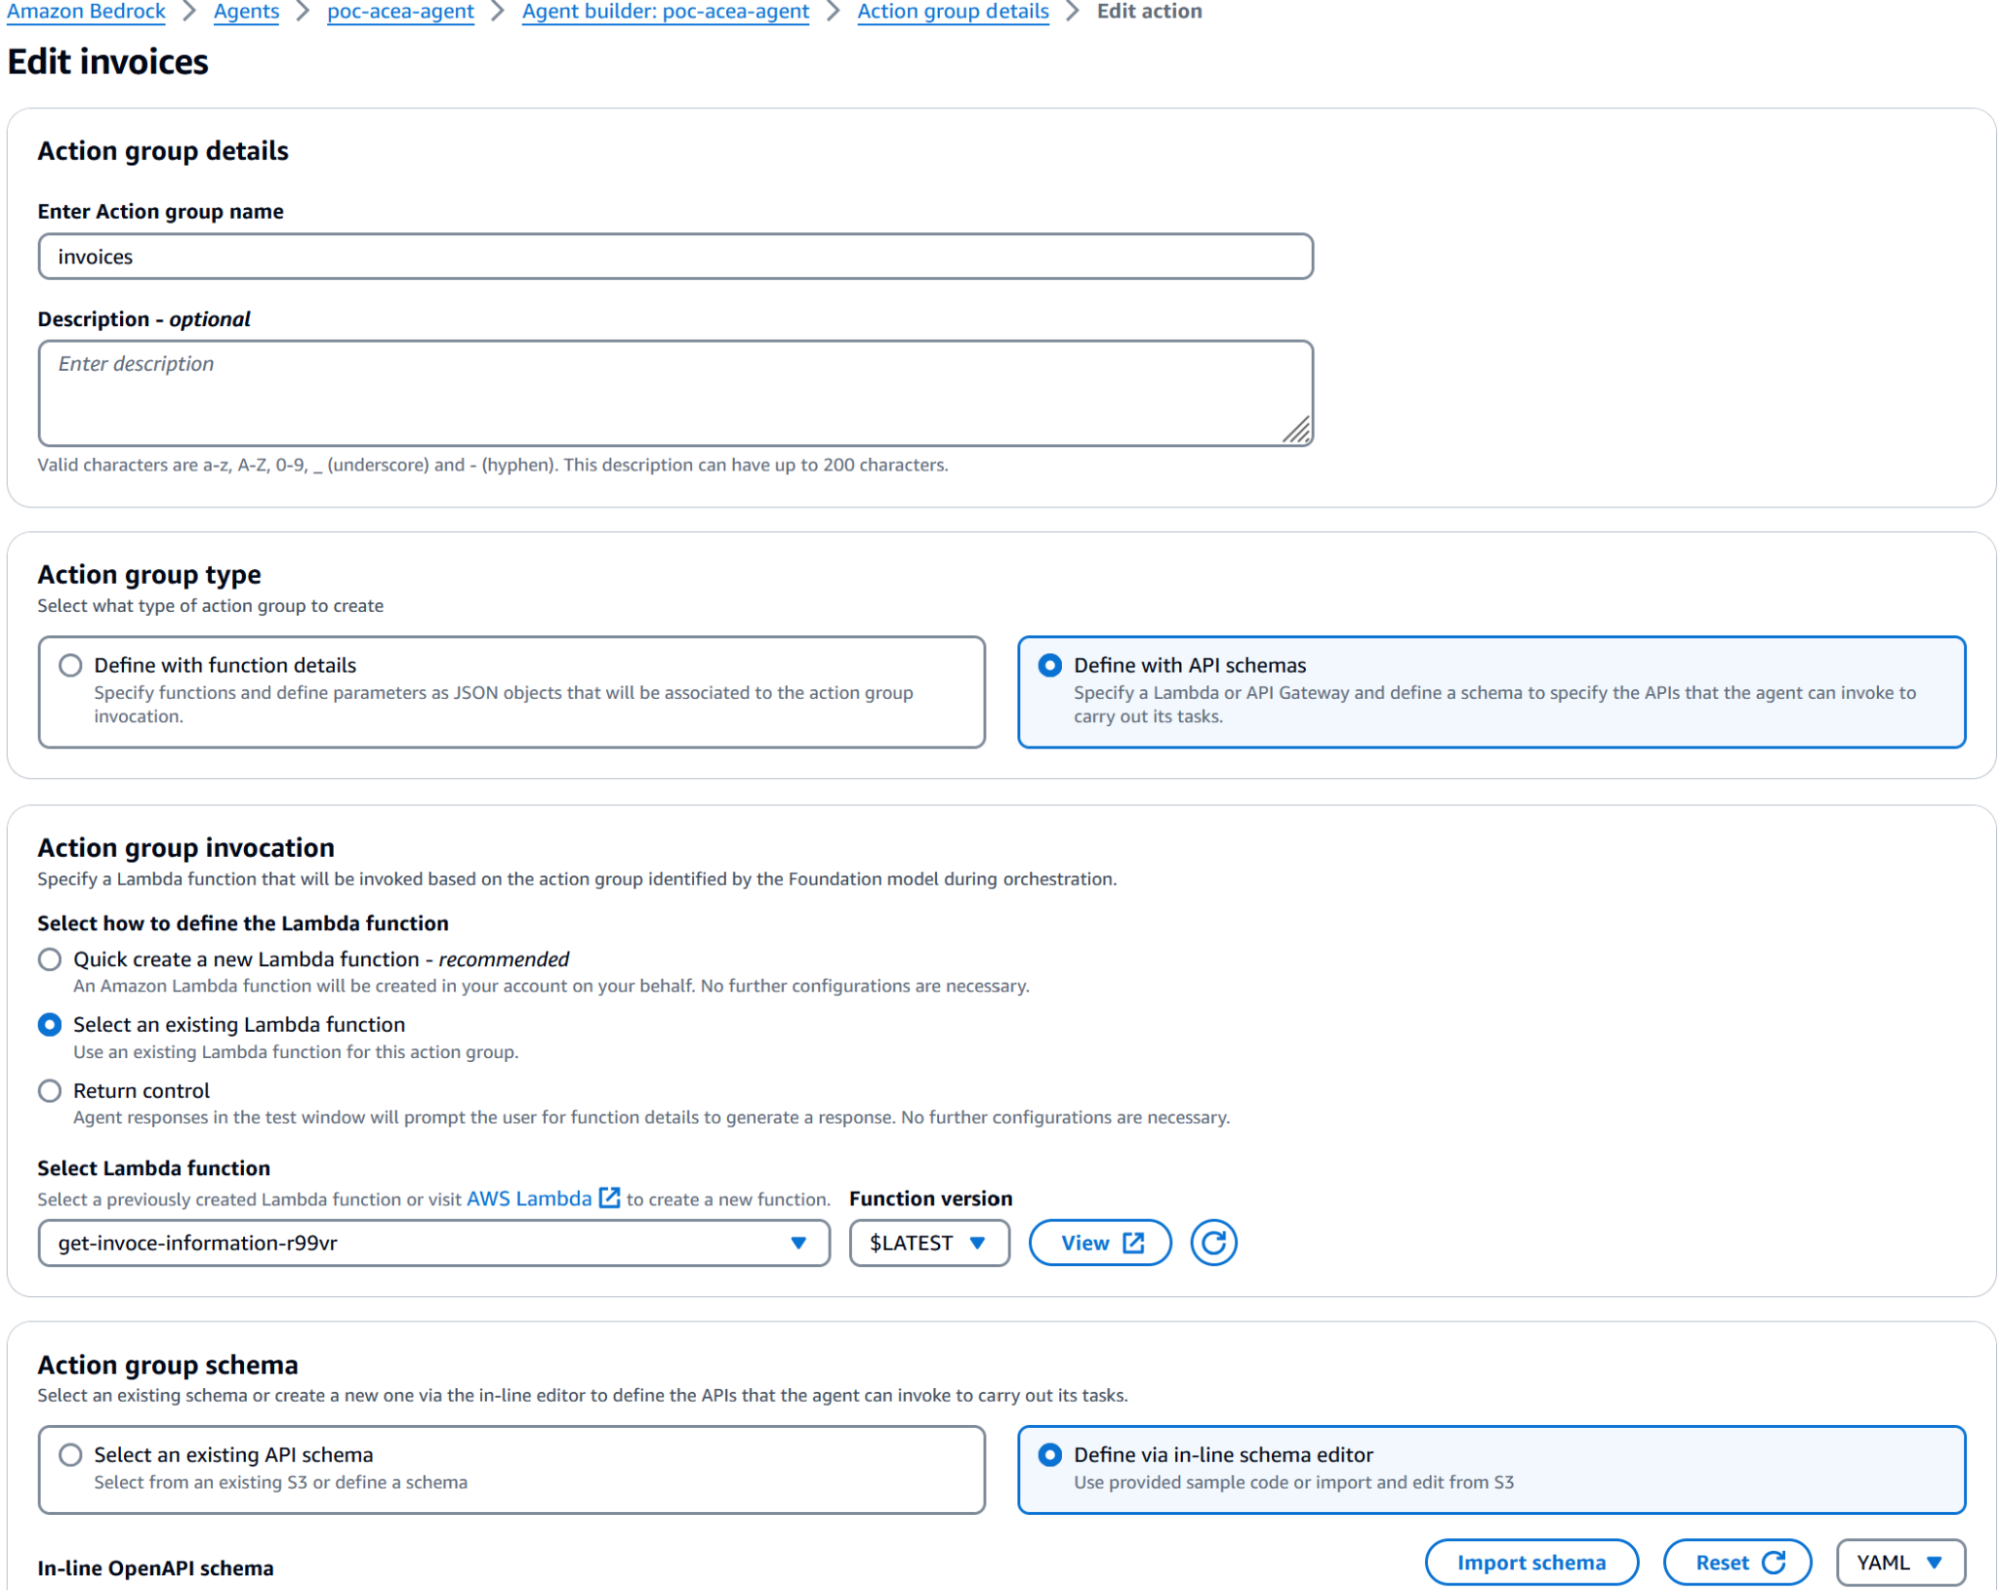
Now that we have the Lambda function we can go on and add the Api actions and register the KB in the agent we created before: go back to the agent dashboard and edit the agent by adding the knowledge base and adding a new action group.
You can add a new action group by adding instructions and an openapi swagger YAML, here is our example:
openapi: 3.0.0
info:
  title: Customer invoices service
  version: 1.0.0
  description: APIs for retrieving customer's invoices
paths:
  /list-invoices/:
	get:
  	summary: recupera la lista di bollette dati numero utenza e tipo utenza
  	description: recupera la lista di bollette, quindi numero bolletta, periodo e importo, dati numero utenza e tipo utenza
  	operationId: listInvoices
  	parameters:
    	- name: numero_utenza
      	in: path
      	description: Numero di utenza dell'utente che fa la richesta, è necessario che sia fornito dall'utente
      	required: true
      	schema:
        	type: string
    	- name: tipo_utenza
      	in: path
      	description: Tipo di utenza dell'utente che fa la richiesta, valori ammessi "Energia Elettrica" e "Illuminazione Cimiteriale"
      	required: false
      	schema:
        	type: string
        	enum:
          	- Energia Elettrica
          	- Illuminazione Cimiteriale
  	responses:
    	"200":
      	description: recupera la lista di bollette dati numero utenza e tipo utenza
      	content:
        	application/json:
          	schema:
            	type: array
            	items:
              	type: object
              	properties:
                	numero_utenza:
                  	type: string
                  	description: Numero di utenza dell'utente che fa la richesta
                	tipo_utenza:
                  	type: string
                  	description: Tipo di utenza dell'utente che fa la richiesta
                	link_pdf_bolletta:
                  	type: string
                  	description: S3 URI del pdf della/delle bolletta/e richieste
  /get-invoices/:
	get:
  	summary: Recupera tutti i dettagli di una singola bolletta, dato il numero di bolletta
  	description: Recupera tutti i dettagli di una singola bolletta, dato il numero di bolletta
  	operationId: getInvoices
  	parameters:
    	- name: numero_bolletta
      	in: path
      	description: Numero della bolletta, è necessario che sia fornito dall'utente
      	required: true
      	schema:
        	type: string
  	responses:
    	"200":
      	description: Recupera tutti i dettagli di una singola bolletta, dato il numero di bolletta
      	content:
        	application/json:
          	schema:
            	type: array
            	items:
              	type: object
              	properties:
                	numero_utenza:
                  	type: string
                  	description: Numero di utenza dell'utente che fa la richesta
                	tipo_utenza:
                  	type: string
                  	description: Tipo di utenza dell'utente che fa la richiesta
                	link_pdf_bolletta:
                  	type: string
                  	description: S3 URI del pdf della/delle bolletta/e richieste
  /list-readings/:
	get:
  	summary: Recupera tutti le letture per codice contratto
  	description: Recupera tutte le letture per codice contratto
  	operationId: listReadings
  	parameters:
    	- name: codice_contratto
      	in: path
      	description: codice contratto, è necessario che sia fornito dall'utente
      	required: true
      	schema:
        	type: string
  	responses:
    	"200":
      	description: Recupera tutti le letture tramite codice contratto
      	content:
        	application/json:
          	schema:
            	type: array
            	items:
              	type: object
              	properties:
                	codice_contratto:
                  	type: string
                  	description: Codice del contratto utenza

  /send-mail/:
	get:
  	summary: Inviare una mail con allegata la bolletta richiesta, dato il numero bolletta e l'indirizzo email del cliente
  	description: Inviare una mail con allegata la bolletta richiesta, dato il numero bolletta e l'indirizzo email del cliente
  	operationId: sendMail
  	parameters:
    	- name: numero_bolletta
      	in: path
      	description: Numero della bolletta, è necessario che sia fornito dall'utente
      	required: true
      	schema:
        	type: string
    	- name: email
      	in: path
      	description: Inviare una mail con allegata la bolletta richiesta, dato il numero bolletta e l'indirizzo email del cliente
      	required: true
      	schema:
        	type: string
  	responses:
    	"200":
      	description: Recupera tutti i dettagli di una singola bolletta, dato il numero di bolletta
      	content:
        	application/json:
          	schema:
            	type: array
            	items:
              	type: object
              	properties:
                	numero_utenza:
                  	type: string
                  	description: Numero di utenza dell'utente che fa la richesta
                	tipo_utenza:
                  	type: string
                  	description: Tipo di utenza dell'utente che fa la richiesta
                	link_pdf_bolletta:
                  	type: string
                  	description: S3 URI del pdf della/delle bolletta/e richieste
Below you can find the configuration we set in the action group section:
After this has been set you should be able to invoke the agent through the integrated testing environment, just remember to save and publish the agent before trying. Should something fails you can find the error in the integrated environment, a very common mistake is not setting the correct lambda resource policy:
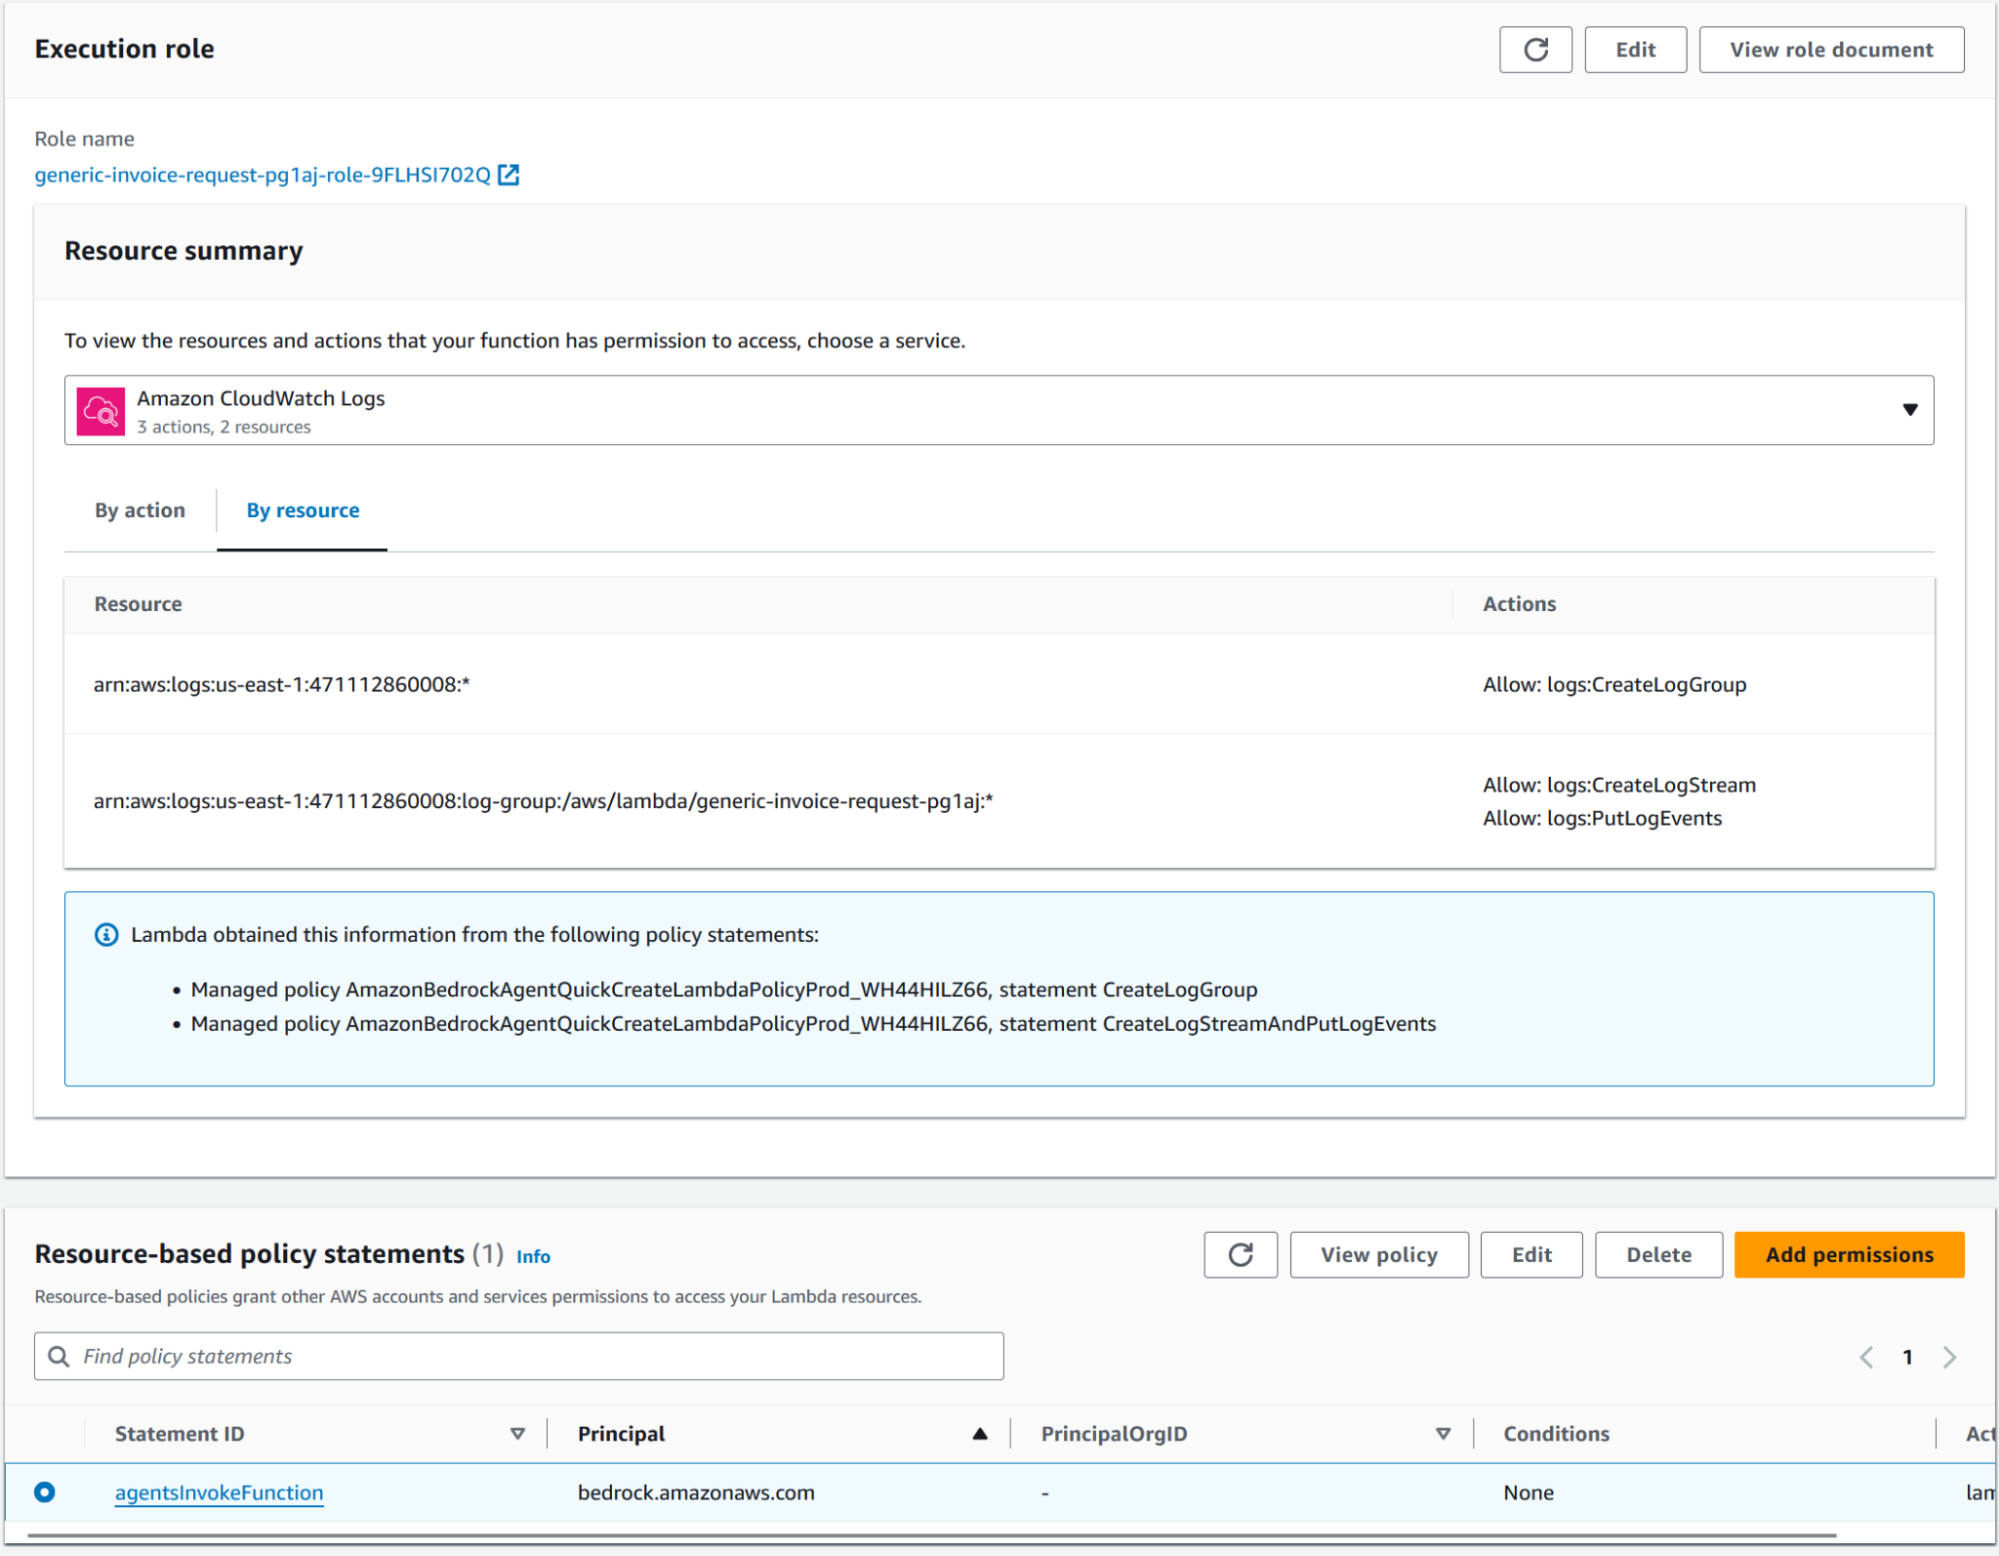
The resource based agentsInvokeFunction statement should be similar to this:
{
  "Version": "2012-10-17",
  "Id": "default",
  "Statement": [
	{
  	"Sid": "agentsInvokeFunction",
  	"Effect": "Allow",
  	"Principal": {
    	"Service": "bedrock.amazonaws.com"
  	},
  	"Action": "lambda:invokeFunction",
  	"Resource": "arn:aws:lambda:us-east-1:471112860008:function:generic-invoice-request-pg1aj"
	}
  ]
}
8. Setting Up Logging: to set up logging in AWS Bedrock:
Consider using CloudWatch Insights to analyze your Bedrock logs for patterns or issues. You should also enable logging for the Knowledge base.
9. Exposing the Agent via API Gateway: in the lambda console, create a new lambda function in python. The lambda will use boto3 to invoke the Bedrock agent with the user prompt, here is our simple example:
import boto3
import json
import random
import string

# Replace these with your actual Agent IDs
AGENT_ID = "YOUR_AGENT_ID"
AGENT_ALIAS_ID = "YOUR_AGENT_ALIAS_ID"

bedrock_agent_runtime = boto3.client("bedrock-agent-runtime")


def lambda_handler(event, context):
	print(event)

	# Parse the incoming event body
	body = json.loads(event["body"])
	print(body)

	session_id = body["sessionId"]
	input_text = body["message"]
	client_code = body["clientCode"]

	# Invoke the Bedrock agent
	response = bedrock_agent_runtime.invoke_agent(
    	enableTrace=True,
    	agentId=AGENT_ID,
    	agentAliasId=AGENT_ALIAS_ID,
    	sessionId=session_id,
    	inputText=input_text,
	)

	print(response)

	# Process the response chunks
	resp_text = ""
	for chunk in response["completion"]:
    	print(chunk)
    	if "chunk" in chunk:
        	decoded_chunk = chunk["chunk"]["bytes"].decode()
        	print(decoded_chunk)
        	resp_text += decoded_chunk

	# Prepare the response
	response = {
    	"statusCode": 200,
    	"headers": {
        	"Content-Type": "application/json",
        	"Access-Control-Allow-Origin": "*",
        	"Access-Control-Allow-Credentials": True,
    	},
    	"body": resp_text,
	}

	return response
In the API Gateway console, create a new REST API. Set up a resource and POST method that will trigger your Lambda function then configure the integration between API Gateway and your Lambda function. Ensure that the necessary permissions are in place for API Gateway to invoke Lambda. Deploy your API to a stage (e.g., "prod") and note down the invocation URL, this is what clients will use to interact with your agent.
10. Testing and Refinement
Use tools like Postman or curl to send requests to your API endpoint and verify that the agent is responding correctly and test various scenarios, including:
Refine your agent's behavior by adjusting the metaprompt, fine-tuning the Claude 3 model parameters, or modifying your Lambda function logic.
Implement appropriate caching strategies and optimize your code to minimize costs.
One of the advantages of this serverless architecture is its inherent scalability. However, be mindful of any rate limits or quotas, especially for the Bedrock and Pinecone services.
In this tutorial, we've walked through the process of creating a Claude 3 agent using AWS Bedrock and exposing it via API Gateway and Lambda. We've integrated it with a Pinecone knowledge base for a Customer services information and connected it to Aurora Serverless for customer data retrieval. This setup provides a powerful, scalable, and cost-effective solution for building AI-powered customer service agents. By leveraging AWS's serverless offerings, you can focus on refining your agent's capabilities without worrying about infrastructure management. As you continue to develop and improve your agent, remember to regularly review its performance, gather user feedback, and stay updated with the latest developments in AI and cloud technologies.
We hope this content will boost your creativity (and business, too!). Were you already familiar with the topic?
Let us know in the comments!
See you in 14 days on our blog Proud2beCloud!
Proud2beCloud is a blog by beSharp, an Italian APN Premier Consulting Partner expert in designing, implementing, and managing complex Cloud infrastructures and advanced services on AWS. Before being writers, we are Cloud Experts working daily with AWS services since 2007. We are hungry readers, innovative builders, and gem-seekers. On Proud2beCloud, we regularly share our best AWS pro tips, configuration insights, in-depth news, tips&tricks, how-tos, and many other resources. Take part in the discussion!