Quando il Serverless “gira” sui server: nuove opzioni per AWS Lambda e AWS Fargate co...
04 Marzo 2026 - 14 min. read
Damiano Giorgi
DevOps Engineer


 La diffusione capillare del Cloud computing ha portato, negli ultimi anni, ad una adozione massiva del paradigma di sviluppo applicativo “a microservizi”. La rifattorizzazione di applicazioni monolitiche in microservizi permette infatti di sfruttare al meglio alcune caratteristiche intrinseche del Cloud stesso, tra le quali la presenza di molti servizi di tipo managed, utili a demandare al Cloud provider la gestione e l’affidabilità di task critici, ma non facenti parte del core applicativo.beSharp non fa eccezione: questo processo di rifattorizzazione, infatti, ha coinvolto anche Noovolari Smart Backup - il nostro prodotto per la gestione del Backup e Disaster Recovery di infrastrutture AWS. A tal proposito è stato particolarmente interessante il refactoring del sistema di notifiche interne all’applicazione, che vengono “pushate” all’interno dell’interfaccia web al verificarsi di specifici eventi, come ad esempio la conclusione di un backup job o l’apertura di una sessione di file-level recovery.La soluzione monolitica era basata su Ruby/ActionCable e Redis e accentrava la gestione degli invii di notifiche in un controller dell’applicazione. Approfittando del recente rilascio da parte di AWS delle API Websocket per API Gateway, abbiamo deciso di rifattorizzare l’engine di gestione delle notifiche in un microservizio completamente serverless, utilizzando SQS per disaccoppiare l’invio e la ricezione dei messaggi.Sempre recentemente sono stati introdotti i Lambda Layers e la possibilità di scrivere funzioni Lambda in Ruby (il linguaggio principale con cui è sviluppato Noovolari Smart Backup); grazie a queste due feature abbiamo potuto riutilizzare buona parte del codice backend originale, mantenendolo pulito e facilmente integrabile in altre applicazioni.Questo approccio ci ha dato diversi spunti tecnici che abbiamo deciso di condividere in questo articolo, creando un piccolo tutorial su come realizzare un microservizio di notifiche completamente Serverless basato sui servizi AWS.
 <script> $(document).ready(function () { //Setup notification system noovolari.smartbackup.notifications.websocket.connect( '<%= Rails.env %>', '<%= Notification::NotificationAuthorizer.check_token(user_id: current_user.id, company_code: current_user.companies.first.code) %>' ); </script>Questa funzione è così implementata nel dettaglio:
noovolari.smartbackup.notifications.websocket.connect = function(stage, token) {
       var socketUrl = 'wss://<WEBSOCKET_URL>/'+stage+'?token='+token;

       // connecting to the websocket url and retrieve function for connect and disconnect
      noovolari.smartbackup.notifications.websocket =  new WebSocket(socketUrl);

      noovolari.smartbackup.notifications.websocket.onopen = function () {
          console.info('socket connection opened properly with...');
      };

     noovolari.smartbackup.notifications.websocket.onclose = function () {
          // websocket is closed.
         console.info("Connection closed...");

     };

     noovolari.smartbackup.notifications.websocket.onmessage = function (evt) {
         var notification = JSON.parse(evt.data);
         var message = notification.data;
         noovolariUiToolkit.notifications.subscribers.forEach(function(subscriber) {
             if(subscriber.type === message.type) {
                 subscriber.callback(message.data);
             }
          });
      };
};
Andiamo ad analizzare il codice passo-passo.Con questa funzione andiamo a definire tutti e tre i metodi necessari ad implementare l’interfaccia dell’oggetto WebSocket di Javascript; si nota che dall’esterno passiamo sia la variabile “stage” che identifica per quale ambiente di lavoro vogliamo aprire la comunicazione, sia esso development che production, sia la variabile token che, per sicurezza, viene generata da codice Ruby in modo da non dare la possibilità di fare inspect della funzione (gli inspector dei browser possono sempre mostrare il codice Javascript, invece in questo modo il token ci arriva già generato dal back-end).Le callback di apertura e chiusura della connessione WebSocket vengono gestite direttamente da AWS, vedremo poi come.Sulla ricezione del messaggio invece cicliamo sul numero di “subscriber”, che abbiamo registrato prima dell’apertura del canale, per rappresentare il messaggio con una callback dello stesso tipo del messaggio stesso (ad esempio: un messaggio di informazione, uno di allerta, uno di pericolo, etc.) Il token è un JWT Token crittografato con SHA512, il secret condiviso è gestito mediante variabile d’ambiente nella nostra applicazione e su AWS.Vediamo come viene costruito (il linguaggio di riferimento è Ruby):
def self.generate_token(user_id:, company_code:)
token = compose_token(user_id: user_id, company_code: company_code)
payload = { user_id: user_id, room_id:company_code, token:token,exp: Time.now.to_i + EXPIRATION_TIME_IN_SECONDS }
JWT.encode payload, Configuration.load_secrets['bernie']['notification_key'], 'HS512'
End
def self.compose_token(user_id:, company_code:)
     dynamo = get_dynamo_client()
     token = "#{user_id}#{Configuration.load_secrets['bernie']['notification_passcode']}#{company_code}"
     token = Digest::SHA256.hexdigest(token)
dynamo.put_item({
  table_name: Configuration.load_secrets['bernie']['notification_table'],
  item: {
    'user_id' => user_id.to_s,
    'room_id' => company_code,
    'token' => BCrypt::Password.create(token)
  }
       })
      return token
end
La funzione “generate_token” non solo crea il nostro token mediante la libreria di JWT ma salva anche il token crittografato con il segreto condiviso su DynamoDB, questo ci permette di avere due livelli di sicurezza, il primo dato da JWT che crittografa con SHA512 e il secondo dato da noi con BCrypt.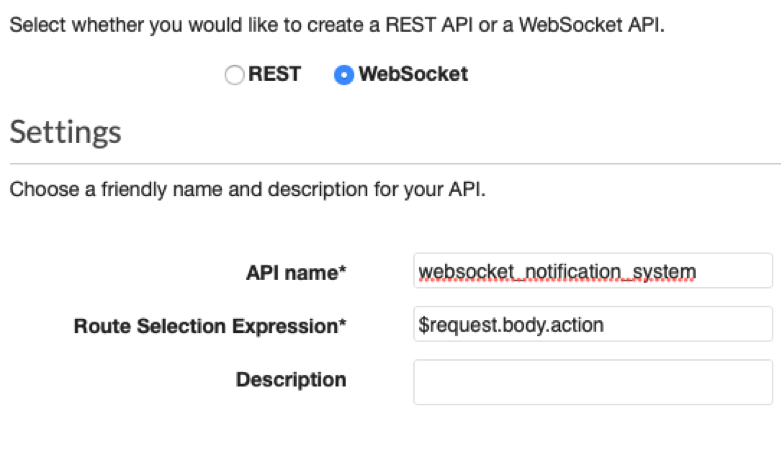 Utilizziamo questi parametri:- WebSocket: si usa per passare dalla creazione di una API Http standard ad una di tipo WebSocket.- API name: possiamo utilizzare il nome che vogliamo ma ricordiamoci di annotarlo, ci servirà.- $request.body.action: fa riferimento al nome della chiave JSON che conterrà l’azione da chiamare per inviare un messaggio sul canale WebSocket. Ad esempio: "action":"sendMessage" utilizzerà action come da parametro specificato ed invocherà “sendMessage” come lambda per la gestione del messaggio. Non appena l’API è creata sotto la voce “Routes” troveremo $connect, $disconnect e $default; le prime due sono molto importanti perchè con esse andremo a gestire le fasi di connessione e disconnessione del canale WebSocket sia lato AWS (con le lambda function) sia lato client (come abbiamo visto negli script precedenti).Clicchiamo su $connect e settiamo i parametri come nell’immagine sottostante:
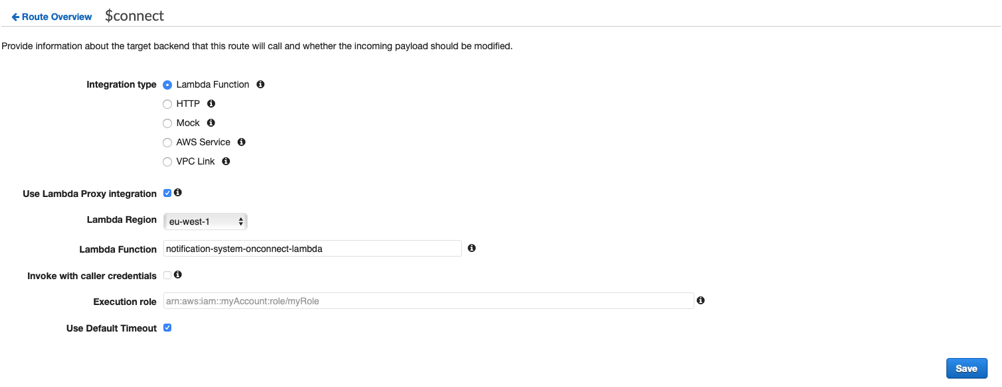 Vogliamo collegare la fase di $connect con una funzione lambda, quindi la spuntiamo alla voce “Integration type”; spuntiamo anche “Lambda Proxy Integration” perchè vogliamo che la nostra variabile context contenga la lista completa delle proprietà della chiamata ad API Gateway.La Regione va settata secondo le proprie esigenze, nel nostro caso eu-west-1, “lambda function” rappresenta il nome della lambda da richiamare, possiamo caricarlo dal menù a tendina. Usiamo il valore di default e salviamo.Facciamo lo stesso per $disconnect e sendMessage puntando alle rispettive funzioni Lambda. Se avete eseguito i passaggi correttamente vi ritroverete nella seguente situazione:
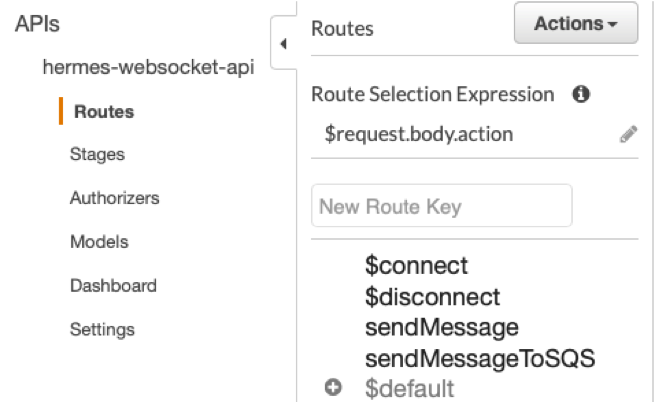 Ora abbiamo quattro rotte configurate con le corrispondenti Lambda, dobbiamo creare i ruoli IAM per farle comunicare con i servizi necessari. Oltre a ciò creiamo anche le tabelle di DynamoDB.
  Diamogli il nome che preferiamo; per utilizzare la funzione di OnConnect abbiamo bisogno di un “LambdaBasicExecutionRole” e una “custom policy” con questo json:
{
"Statement": [
     {
         "Action": [
             "dynamodb:GetItem",
             "dynamodb:DeleteItem",
             "dynamodb:PutItem",
             "dynamodb:Scan",
             "dynamodb:Query",
             "dynamodb:UpdateItem",
             "dynamodb:BatchWriteItem",
             "dynamodb:BatchGetItem",
             "dynamodb:DescribeTable"
         ],
         "Resource": [
                "arn:aws:dynamodb:eu-west-1:<ACCOUNT_ID>:table/hermesConnections",
                "arn:aws:dynamodb:eu-west-1:<ACCOUNT_ID>:table/hermesConnections/index/*"
         ],
         "Effect": "Allow"
     }
]
}
Ricordiamoci di cambiare <ACCOUNT_ID> con il nostro account id e di prendere nota del fatto che “hermesConnections” rappresenta la nostra tabella di dynamodb. Per “OnDisconnect”:
{
"Statement": [
     {
         "Action": [
             "dynamodb:GetItem",
             "dynamodb:DeleteItem",
             "dynamodb:PutItem",
             "dynamodb:Scan",
             "dynamodb:Query",
             "dynamodb:UpdateItem",
             "dynamodb:BatchWriteItem",
             "dynamodb:BatchGetItem",
             "dynamodb:DescribeTable"
         ],
         "Resource": [
                "arn:aws:dynamodb:eu-west-1:<ACCOUNT_ID>:table/hermesConnections",
             "arn:aws:dynamodb:eu-west-1:<ACCOUNT_ID>:table/hermesConnections/index/*"
         ],
         "Effect": "Allow"
     }
]
}
Per “SendMessage” utilizziamo ancora un “LambdaBasicExecutionRole”, AWSLambdaSQSQueueExecutionRole e tre custom policies:
{
"Statement": [
     {
         "Action": [
             "dynamodb:GetItem",
             "dynamodb:DeleteItem",
             "dynamodb:PutItem",
             "dynamodb:Scan",
             "dynamodb:Query",
             "dynamodb:UpdateItem",
             "dynamodb:BatchWriteItem",
             "dynamodb:BatchGetItem",
             "dynamodb:DescribeTable"
         ],
         "Resource": [
             "arn:aws:dynamodb:eu-west-1:<ACCOUNT_ID>:table/hermesConnections",
             "arn:aws:dynamodb:eu-west-1:<ACCOUNT_ID>:table/hermesConnections/index/*"
         ],
         "Effect": "Allow"
     }
]
}
Quest’altra:{ "Statement": [ { "Action": [ "sqs:ChangeMessageVisibility", "sqs:ChangeMessageVisibilityBatch", "sqs:DeleteMessage", "sqs:DeleteMessageBatch", "sqs:GetQueueAttributes", "sqs:ReceiveMessage" ], "Resource": "arn:aws:sqs:eu-west-1:<ACCOUNT_ID>:hermes-messageQueue", "Effect": "Allow" } ] }Infine:
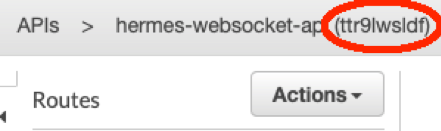
{
"Statement": [
     {
         "Action": [
                "execute-api:ManageConnections"
         ],
         "Resource": [
                "arn:aws:execute-api:eu-west-1:<ACCOUNT_ID>:<API_CODE>/*"
         ],
         "Effect": "Allow"
     }
]
}
La voce <API_CODE> può essere recuperata dalla schermata di API Gateway in alto a sinistra:
 Ora possiamo creare la tabella di DynamoDB per salvare le connectionID che ci vengono fornite da API Gateway durante la $connect. Questo parametro è molto importante perchè identificano l’utente che ha aperto la connessione. Vedremo poi come autenticare la richiesta di apertura della connessione, ma anche come filtrare l’invio dei messaggi per ROOM.
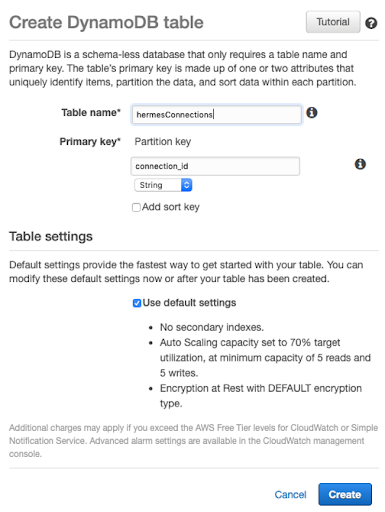 Settiamo come nome lo stesso che abbiamo impostato negli IAM role precedentemente, in questo caso “hermesConnections”; come partition key settiamo connetion_id di tipo stringa, per i settaggi della tabella lasciamo la spunta di default.La tabella verrà creata in pochi secondi, man mano che gli utenti si collegheranno ad API Gateway la funzione associata a $connect creerà delle tuple in questa tabella.Ora passiamo a definire le nostre funzioni lambda a partire dalle rotte create precedentemente su API Gateway.
 Diamo il nome che abbiamo utilizzato all’atto di creazione della rotta di $connect, poi impostiamo i seguenti valori come da figura:app.js
var AWS = require("aws-sdk");
AWS.config.update({ region: process.env.AWS_REGION });
var DDB = new AWS.DynamoDB({ apiVersion: "2012-10-08" });
exports.handler = function (event, context, callback) {
  // based on query string parameter on the connection websocket add the connection in the dynamo table with the selected room_id and user_id
  console.log(event.requestContext.stage);
  let table = event.requestContext.table_name;
  var putParams = {
    TableName: process.env[table],
    Item: {
      room_id: {S: event.requestContext.authorizer.room_id},
      connection_id: { S: event.requestContext.connectionId },
      user_id: {S: event.requestContext.authorizer.user_id}
    }
  };
DDB.putItem(putParams, function (err) {
    callback(null, {
      statusCode: err ? 500 : 200,
      body: err ? "Failed to connect: " + JSON.stringify(err) : "Connected."
    });
  });
};
package.json{ "name": "onConnect", "version": "1.0.0", "description": "OnConnect function for WebSockets on API Gateway", "main": "src/app.js", "author": "SAM CLI", "license": "MIT", "dependencies": { "aws-sdk": "^2.434.0" } }Come environment variables inseriamo il nome della tabella delle connessioni:
 Aggiungiamo anche la Lambda di Authorizer:index.js
exports.handler = async (event) => {
    try {
        console.log(event.requestContext.stage);
        // Query string parameters you can use to validate the connection
        // We verify the json Web Token
        let jwt = require('jsonwebtoken');
        let secret_environment = 'JWT_SECRET';
        let table_environment = 'TABLE_NAME';
        let decoded = jwt.verify(event.queryStringParameters.token, process.env[secret_environment]);
        let userId = decoded.user_id;
        let roomId = decoded.room_id;
        let token  = decoded.token;
        // The principal id  can be anything, in this case we used
        let principalId = userId;
        const AWS = require('aws-sdk');
        const ddb = new AWS.DynamoDB({ apiVersion: '2012-08-10' });
let db_token, db_user_id, db_room_id, db_expire_date;
        let params = {
            TableName: process.env[table_environment],
            Key: {
                user_id: { S: userId.toString() },
                room_id: { S: roomId.toString() }
            }
        };
        await ddb.getItem(params, function(err, data) {
        if (err) {
        /* an error occurred */
        console.log(err, err.stack);
        } else {
            // successful response
            db_user_id = data.Item.user_id.S;
            db_room_id = data.Item.room_id.S;
            db_token = data.Item.token.S;
        }
        }).promise();
let bcrypt = require("bcryptjs");
        let compare_hash = bcrypt.compareSync(token, db_token);
        let compare_user_and_room = db_room_id.toString() === roomId.toString() && db_user_id.toString() === userId.toString();
        let effect = (compare_hash && compare_user_and_room) ? 'Allow' : 'Deny'; // Set 'Allow' or 'Deny' to decide if one can connect or not
        console.log(effect);
        return generatePolicy(principalId, effect, event.methodArn, userId, roomId);
    } catch(e) {
     console.log(e.stack);
     return null;
    }
};
let generatePolicy = function(principalId, effect, resource, user_id, room_id) {
   // Required output:
   var authResponse = {};
    authResponse.principalId = principalId;
   if (effect && resource) {
       var policyDocument = {};
        policyDocument.Version = '2012-10-17'; // default version
       policyDocument.Statement = [];
       var statementOne = {};
       statementOne.Action = 'execute-api:Invoke'; // default action
       statementOne.Effect = effect;
       statementOne.Resource = resource;
       policyDocument.Statement[0] = statementOne;
       authResponse.policyDocument = policyDocument;
    }
   // Optional output with custom properties of the String, Number or Boolean type.
   authResponse.context = {
       room_id: room_id,
       user_id: user_id
    };
   return authResponse;
}
package.json
{
  "name": "authorizer",
  "version": "1.0.0",
  "description": "Authorizer function for WebSockets on API Gateway",
  "main": "index.js",
  "author": "beSharp",
  "license": "MIT",
  "dependencies": {
    "bcryptjs": "^2.4.3",
    "jsonwebtoken": "^8.5.1"
  }
}
E le variabili di ambiente:
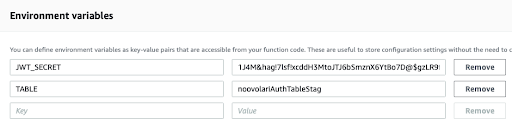 La Lambda di autorizzazione accede al JWT Token inviato attraverso API Gateway, lo decodifica, ottiene il token crittografato con BCrypt sull’applicazione client che ha aperto la connessione, quindi lo confronta con il token crittografato salvato su DynamoDB, se coincidono, l’authorizer da il permesso di aprire la connessione mediante la creazione di una policy IAM di autorizzazione ad hoc. Ritorniamo alla schermata di API Gateway e cliccando su $connect andiamo ad editare il campo authorizer aggiungendo la lambda appena creata.
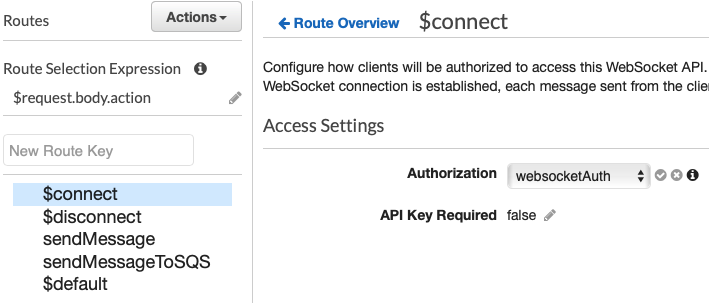 Dove “websocketAuth” è il nome che abbiamo dato alla Lambda di autorizzazione.Ora dobbiamo aggiungere le lambda di $disconnect, sendMessage; procediamo dunque ad aggiungerle partendo da $disconnect che è molto semplice:app.js
 var AWS = require("aws-sdk"); AWS.config.update({ region: process.env.AWS_REGION }); var DDB = new AWS.DynamoDB({ apiVersion: "2012-10-08" });
exports.handler = function (event, context, callback) {
  console.log(event.requestContext.stage);
  let table_environment = 'TABLE_NAME_' + event.requestContext.stage.toUpperCase();
  var deleteParams = {
    TableName: process.env[table_environment],
    Key: {
      connection_id: { S: event.requestContext.connectionId }
    }
  };
DDB.deleteItem(deleteParams, function (err) {
    callback(null, {
      statusCode: err ? 500 : 200,
      body: err ? "Failed to disconnect: " + JSON.stringify(err) : " Disconnected."
    });
  });
};
In pratica ogni qualvolta API Gateway deve scollegare un utente dal canale, invoca la funzione associata alla $disconnect che provvede ad eliminare la riga corrispondente alla connection_id dalla tabella delle connessioni di DynamoDB.Passiamo ora all’invio dei messaggi con sendMessage:
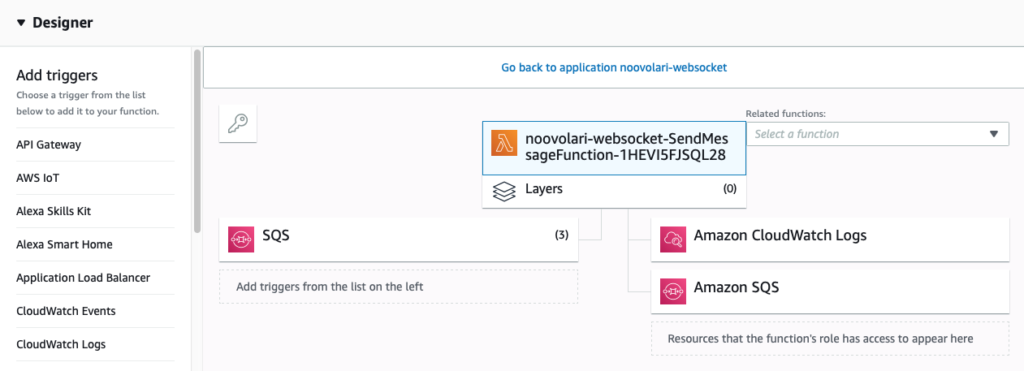 Per prima cosa in questa funzione dobbiamo aggiungere SQS come trigger perchè verrà richiamata non solo da API Gateway ma anche da SQS. Aggiungiamo SQS come da figura.Fatto questo passiamo al codice della funzione:index.js
const AWS = require('aws-sdk');
require('./patch.js');
const ddb = new AWS.DynamoDB.DocumentClient({ apiVersion: '2012-08-10' });
const dynamodb = new AWS.DynamoDB({apiVersion: '2011-12-05'});
const { ENDPOINT } = process.env;
exports.handler = async (event, context,callback) => {
  let environment =undefined;
  let table = process.env.TABLE_NAME;
let user_id= undefined;
  let room_id = undefined;
  let postData = undefined;
  let messageBody = {};
 // if there are records we re in the sqs trigger put the event from the message of the SQS message received.
  if (event.Records != undefined) {
    let body = JSON.parse(event.Records[0].body);
    user_id = body.user_id;
    room_id = body.room_id;
    messageBody = {user_id: user_id };
    postData = body.data;
  } else {
    postData = JSON.parse(event.body).data;
    const  connection_sender =  event.requestContext.connectionId;
    // get sender info on dynamo db table of connections
 let params = {
      Key: {  HashKeyElement:  { S: connection_sender } },
      TableName:  table
    };
    let sender_item = undefined;
 //get the row of dynamo referred to the connection_id sender.
    await dynamodb.getItem(params, function(err, data) {
      if (err) console.log(err, err.stack); // an error occurred
      else    {
        sender_item = data;
        user_id = sender_item.Item.user_id.S;
        room_id = sender_item.Item.room_id.S;
        // adding in the messageBody the user_id of the sender
        messageBody = {user_id: user_id };
        }  // successful response
    }).promise();
  }
//retrieve all connection for the selected room_id.
  let connectionData;
  try {
    let scanParam = { TableName: table, ProjectionExpression: 'connection_id, user_id',
       FilterExpression: '#roomId = :roomId',
      ExpressionAttributeNames: {
          '#roomId': 'room_id',
      },
      ExpressionAttributeValues: {
          ':roomId': room_id,
      }
    };
    connectionData = await ddb.scan(scanParam).promise();
  } catch (e) {
    return { statusCode: 500, body: e.stack };
  }
 let url = (ENDPOINT === "") ? event.requestContext.domainName + '/' +
 event.requestContext.stage : ENDPOINT + "/"+ environment.toLowerCase();
console.log(url);const apigwManagementApi = new AWS.ApiGatewayManagementApi({ apiVersion: '2018-11-29', endpoint: url });
 // for each connection send a message through apigwManagementApi
  const postCalls = connectionData.Items.map(async ({ connection_id }) => {
 try {
      messageBody.data = postData;
      await apigwManagementApi.postToConnection({ ConnectionId: connection_id, Data: JSON.stringify(messageBody)}).promise();
      console.log("posted");
    } catch (e) {
      console.error(e);
      //if the connection in a stale status, the connection will be closed, and the connection_id will be removed from the dynamoDB table
      if (e.statusCode === 410) {
        console.log(`Found stale connection, deleting ${connection_id}`);
        var deleteParams = {
            TableName: table,
            Key: {
              connection_id: { S: connection_id }
          }
        };
        await ddb.deleteItem(deleteParams, function (err) {
          callback(null, {
            statusCode: err ? 500 : 200,
            body: err ? "Failed to disconnect: " + JSON.stringify(err) : " Disconnected."
        }).promise();
  });
      } else {
         return { statusCode: 500, body: e.stack };
      }
    }
  });
try {
    await Promise.all(postCalls);
  } catch (e) {
    return { statusCode: 500, body: e.stack };
  }
eturn { statusCode: 200, body: 'Data sent.' };
};
Passiamo ora ad aggiungere le variabili d’ambiente:
 In questa funzione Lambda il codice è in grado di distinguere le chiamate provenienti da SQS o quelle da API Gateway; sulla base di questa informazione, il corpo del messaggio e le informazioni relative all’utente vengono ricostruite. Sulla base della room_id ricaviamo gli user_id e i connection_id dalla tabella delle connessioni di DynamoDB. Quindi procediamo a spedire il messaggio a tutti gli utenti così trovati.Nel caso in cui ci sia un problema di connessione la Lambda provvede a cancellare la riga relativa sempre dalla tabella delle connessioni.Una volta aggiunte tutte queste funzioni verifichiamo che i nomi utilizzati per descriverle siano coerenti con quelli indicati rispettivamente in $connect, $disconnect e sendMessage. A passaggi ultimati l’architettura del nostro sistema di notifiche è completata, possiamo testarla direttamente immettendo un messaggio con questo esempio:
sqs = Aws::SQS::Client.new(region: region)
payload = JSON.generate(user_id: user_id, room_id: room_id, data: message)
params = {
 message_body: payload,
 queue_url: config.queue_url
}
sqs.send_message(params)Altrimenti lato client si può utilizzare questo esempio:
function sendMessage(){ ws.send(JSON.stringify( {“action”: “sendMessage”, “data” : “message” } ); }Con questo si conclude il nostro tutorial su come sviluppare un microservizio di gestione notifiche basato sui servizi AWS, completo di autenticazione tramite API Gateway, DynamoDB, SQS e Lambda.Uno degli aspetti più interessanti della soluzione è sicuramente la sua compattezza - tutta la logica è implementata in sole quattro funzioni Lambda piuttosto semplici - mantenendo al contempo una certa versatilità.Nel caso si voglia gestire il lifecycle dell’infrastruttura secondo il paradigma dell’Infrastructure-as-Code, ad esempio tramite un SAM template, un ultimo accorgimento potrebbe essere la creazione di un record ALIAS di Route53 per disaccoppiare l’URL chiamato dal client da quello di API Gateway che, essendo generato in maniera programmatica, cambia ad ogni deploy.Vuoi saperne di più su questa soluzione e su come beSharp può aiutarti nello sviluppo di applicazioni Serverless e Cloud-native su AWS? Contattaci!