Enabling enterprise Telemetry on AWS: Handling massive data backfills using ECS and Databricks wi...
17 June 2026 - 1 min. read
Keidi Xhafa


In recent years, the widespread diffusion of Cloud computing has led to a massive adoption of the "microservices" application development paradigm. Refactoring of monolithic applications in microservices allows getting the most out of some intrinsic features of the Cloud itself, including the use of many “managed” services, useful for delegating to the Cloud provider the management and reliability of critical tasks which aren’t part of the application core.beSharp is no exception: this refactoring process, in fact, also involved Noovolari Smart Backup - our product for the management of Backup and Disaster Recovery of AWS infrastructures.In this regard, the refactoring of the application’s notifications system, which are shown in the web interface upon the occurrence of specific events (such as the conclusion of a backup job or the opening of a file-level recovery session), is of particular interest.The old monolithic solution was based on Ruby/ActionCable and Redis and centralized the operations for sending notifications in a single application controller.By taking advantage of the recent release of the API Websocket for Gateway by AWS, we decided to refactor the notifications’ management engine in a microservice, completely serverless, using SQS to decouple the sending and receiving of messages.The introduction of Lambda Layers and the possibility of writing Lambda functions in Ruby (the main language with which Noovolari Smart Backup is developed) is also recent; thanks to these two features we were able to re-use most of the original backend code, thus keeping the code clean and easy to integrate in other future applications.This approach has given us several technical ideas that we decided to share in this article, creating a small tutorial on how to create a fully serverless notifications microservice based on AWS services.
<script> $(document).ready(function () { //Setup notification system noovolari.smartbackup.notifications.websocket.connect( '<%= Rails.env %>', '<%= Notification::NotificationAuthorizer.check_token(user_id: current_user.id, company_code: current_user.companies.first.code) %>' ); </script>This is how the function is implemented in detail:
noovolari.smartbackup.notifications.websocket.connect = function(stage, token) {
       var socketUrl = 'wss://<WEBSOCKET_URL>/'+stage+'?token='+token;

         // connecting to the websocket url and retrieve function for connect and disconnect
       noovolari.smartbackup.notifications.websocket =  new WebSocket(socketUrl);

        noovolari.smartbackup.notifications.websocket.onopen = function () {
           console.info('socket connection opened properly with...');
       };

      noovolari.smartbackup.notifications.websocket.onclose = function () {
           // websocket is closed.
          console.info("Connection closed...");

      };

      noovolari.smartbackup.notifications.websocket.onmessage = function (evt) {
          var notification = JSON.parse(evt.data);
          var message = notification.data;
          noovolariUiToolkit.notifications.subscribers.forEach(function(subscriber) {
              if(subscriber.type === message.type) {
                  subscriber.callback(message.data);
              }           });
       };
 };
Let's analyse the code step by step.With this function we define three methods needed for implementing the Javascript WebSocket object interface; is worth noting that as parameters, we pass both the "stage" variable, that identifies the working environment in which we want to open the communication channel, whether it is development or production, and the token variable which, for security, is generated by Ruby so the possibility to have the function inspected is negated (the browser inspectors can always show the Javascript code instead, this way, the token is already generated by the back-end).The opening and closing callbacks of the WebSocket connection are managed directly by AWS; we'll see later how this is accomplished.Upon the receiving of a message we cycle on the number of "subscribers", registered before the opening of the channel, to represent the message using a callback depending on the same type of the message itself (for example an information message, an alert message, a danger message, etc.)The token is a JWT Token encrypted with SHA512; the shared secret is managed by an environment variable in both our application and AWS.Let's see how the token is built (the reference language is Ruby):
def self.generate_token(user_id:, company_code:)
token = compose_token(user_id: user_id, company_code: company_code)
payload = { user_id: user_id, room_id:company_code, token:token,exp: Time.now.to_i + EXPIRATION_TIME_IN_SECONDS }
JWT.encode payload, Configuration.load_secrets['bernie']['notification_key'], 'HS512'
End

def self.compose_token(user_id:, company_code:)
     dynamo = get_dynamo_client()
     token = "#{user_id}#{Configuration.load_secrets['bernie']['notification_passcode']}#{company_code}"
     token = Digest::SHA256.hexdigest(token)

dynamo.put_item({
  table_name: Configuration.load_secrets['bernie']['notification_table'],
  item: {
    'user_id' => user_id.to_s,
    'room_id' => company_code,
    'token' => BCrypt::Password.create(token)
 }
      })
      return token
end
The "generate_token" function not only creates our token through the JWT library but also saves the encrypted token with the shared secret on DynamoDB; this allows us to have two security levels: the first given by JWT that encrypts with SHA512; the second given by us with BCrypt.AWS side implementation API GATEWAY Let’s access our AWS account and look for the API Gateway service. We open the service page and create a new API.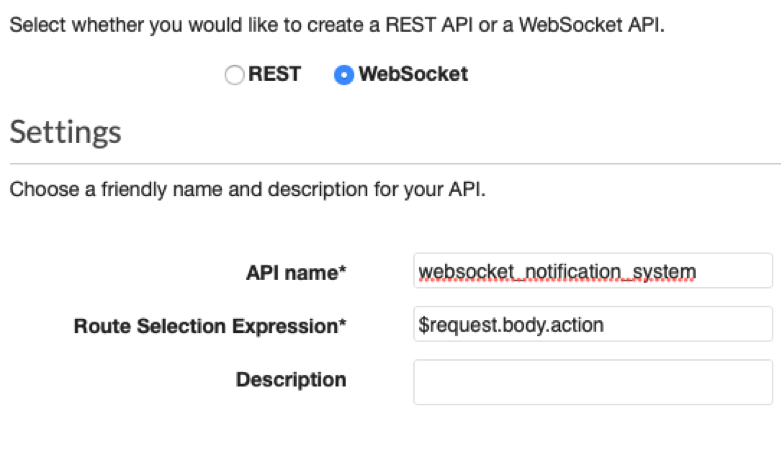 We set the parameters as follows:
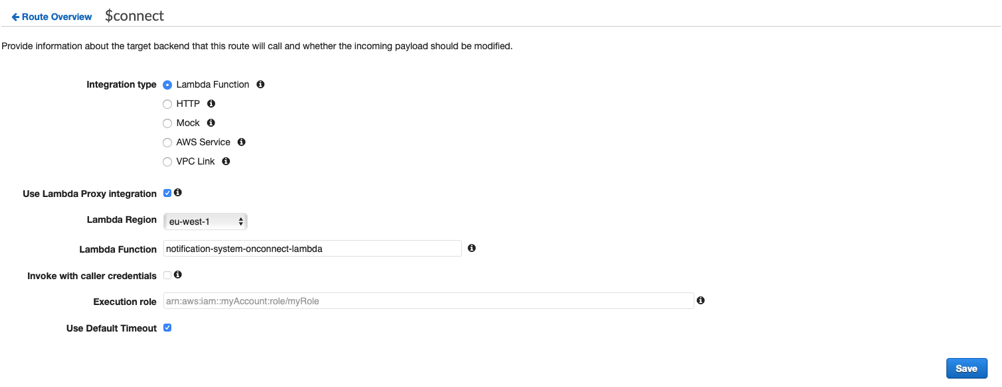 We want to link the $connect phase with an appropriate lambda function, so we check it under "Integration type"; we also check "Lambda Proxy Integration" because we want our context variable to contain the complete list of properties of the API Gateway call.The Region must be set according to your needs, in our case eu-west-1; "lambda function" represents the name of the lambda to be called which we can load from the drop-down menu. For this, we use the default value and press save.We do the same for $disconnect and sendMessage, pointing to the respective Lambda functions.If you have completed these steps correctly you will find yourself in the following situation:
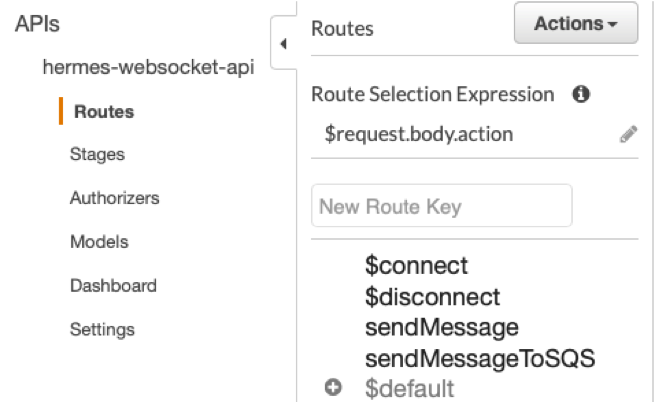 Now we have four routes configured with the corresponding Lambdas; we have to create IAM roles to let them communicate with the necessary services. In addition to this, we also create DynamoDB tables.IAMFirst of all we create four IAM roles: OnConnectFunctionRole, OnDisconnectFunctionRole, SendMessageFunctionRole.
 Let's give them the name we prefer; to use the OnConnect function we need a "LambdaBasicExecutionRole"; and a "custom policy" with this json:
{
"Statement": [
     {
         "Action": [
             "dynamodb:GetItem",
             "dynamodb:DeleteItem",
             "dynamodb:PutItem",
             "dynamodb:Scan",
             "dynamodb:Query",
             "dynamodb:UpdateItem",
             "dynamodb:BatchWriteItem",
             "dynamodb:BatchGetItem",
             "dynamodb:DescribeTable"
         ],
         "Resource": [
                "arn:aws:dynamodb:eu-west-1:<ACCOUNT_ID>:table/hermesConnections",
                "arn:aws:dynamodb:eu-west-1:<ACCOUNT_ID>:table/hermesConnections/index/*"
         ],
         "Effect": "Allow"
     }
]
}
Remember to change <ACCOUNT_ID> with our account id and take note that “hermesConnections” represents our dynamodb table.For "OnDisconnect":{
"Statement": [
{
"Action": [
"dynamodb:GetItem",
"dynamodb:DeleteItem",
"dynamodb:PutItem",
"dynamodb:Scan",
"dynamodb:Query",
"dynamodb:UpdateItem",
"dynamodb:BatchWriteItem",
"dynamodb:BatchGetItem",
"dynamodb:DescribeTable"
],
"Resource": [
"arn:aws:dynamodb:eu-west-1:<ACCOUNT_ID>:table/hermesConnections",
"arn:aws:dynamodb:eu-west-1:<ACCOUNT_ID>:table/hermesConnections/index/*"
],
"Effect": "Allow"
}
]
}For "SendMessage" we still use a "LambdaBasicExecutionRole", AWSLambdaSQSQueueExecutionRole and three custom policies:{
"Statement": [
{
"Action": [
"dynamodb:GetItem",
"dynamodb:DeleteItem",
"dynamodb:PutItem",
"dynamodb:Scan",
"dynamodb:Query",
"dynamodb:UpdateItem",
"dynamodb:BatchWriteItem",
"dynamodb:BatchGetItem",
"dynamodb:DescribeTable"
],
"Resource": [
"arn:aws:dynamodb:eu-west-1:<ACCOUNT_ID>:table/hermesConnections",
"arn:aws:dynamodb:eu-west-1:<ACCOUNT_ID>:table/hermesConnections/index/*"
],
"Effect": "Allow"
}
]
}This one:{
"Statement": [
{
"Action": [
"sqs:ChangeMessageVisibility",
"sqs:ChangeMessageVisibilityBatch",
"sqs:DeleteMessage",
"sqs:DeleteMessageBatch",
"sqs:GetQueueAttributes",
"sqs:ReceiveMessage"
],
"Resource": "arn:aws:sqs:eu-west-1::hermes-messageQueue",
"Effect": "Allow"
}
]
}And finally:{
"Statement": [
{
"Action": [
"execute-api:ManageConnections"
],
"Resource": [
"arn:aws:execute-api:eu-west-1::/*"
],
"Effect": "Allow"
}
]
}The variable can be retrieved from the API Gateway dashboard inspecting the top left corner: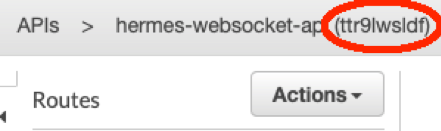 Now we can create the DynamoDB table to save the connectionIDs provided to us by API Gateway during the $connect phase. This parameter is very important because it identifies the user who opened the connection. We will then see how to authenticate the request to open the connection, but also how to filter the messages on a per ROOM basis.DYNAMODBLet's connect to the DynamoDB service and click on "create table"; we'll find ourselves in the following situation:
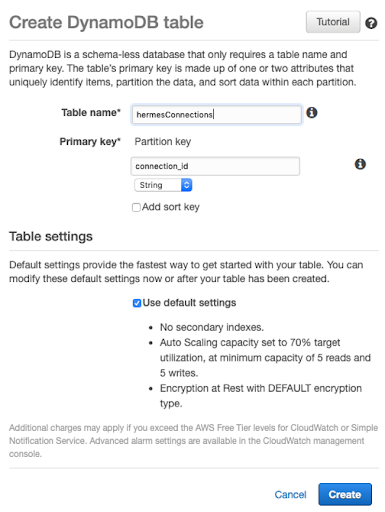 We set the same name as we set in the IAM role previously, in this case, "hermesConnections"; as partition key, we set connection_id of type string; leave the rest of the table settings with the default values.The table will be created in a few seconds; as users connect to API Gateway, the function associated with $connect will create tuples in this table.Now let's define our lambda functions starting from the routes previously created on API Gateway.
 We give the name we used when we created the $connect route, then we set the other values as shown below:
app.js

var AWS = require("aws-sdk");
AWS.config.update({ region: process.env.AWS_REGION });
var DDB = new AWS.DynamoDB({ apiVersion: "2012-10-08" });
exports.handler = function (event, context, callback) {
  // based on query string parameter on the connection websocket add the connection in the dynamo table with the selected room_id and user_id
  console.log(event.requestContext.stage);
  let table = event.requestContext.table_name;
  var putParams = {
    TableName: process.env[table],
    Item: {
      room_id: {S: event.requestContext.authorizer.room_id},
      connection_id: { S: event.requestContext.connectionId },
      user_id: {S: event.requestContext.authorizer.user_id}
    }
  };
DDB.putItem(putParams, function (err) {
    callback(null, {
      statusCode: err ? 500 : 200,
      body: err ? "Failed to connect: " + JSON.stringify(err) : "Connected."
    });
  });
};
package.json

{
  "name": "onConnect",
  "version": "1.0.0",
  "description": "OnConnect function for WebSockets on API Gateway",
  "main": "src/app.js",
  "author": "SAM CLI",
  "license": "MIT",
  "dependencies": {
    "aws-sdk": "^2.434.0"
  }
}
Under environment variables we insert the name of the connection table: We also add the Authorizer Lambda:
index.js

exports.handler = async (event) => {
    try {
        console.log(event.requestContext.stage);
        // Query string parameters you can use to validate the connection
        // We verify the json Web Token
        let jwt = require('jsonwebtoken');
        let secret_environment = 'JWT_SECRET';
        let table_environment = 'TABLE_NAME';
        let decoded = jwt.verify(event.queryStringParameters.token, process.env[secret_environment]);
        let userId = decoded.user_id;
        let roomId = decoded.room_id;
        let token  = decoded.token;
        // The principal id  can be anything, in this case we used
        let principalId = userId;
        const AWS = require('aws-sdk');
        const ddb = new AWS.DynamoDB({ apiVersion: '2012-08-10' });
let db_token, db_user_id, db_room_id, db_expire_date;
        let params = {
            TableName: process.env[table_environment],
            Key: {
                user_id: { S: userId.toString() },
                room_id: { S: roomId.toString() }
            }
        };
        await ddb.getItem(params, function(err, data) {
        if (err) {
        /* an error occurred */
        console.log(err, err.stack);
        } else {
            // successful response
            db_user_id = data.Item.user_id.S;
            db_room_id = data.Item.room_id.S;
            db_token = data.Item.token.S;
        }
        }).promise();
let bcrypt = require("bcryptjs");
        let compare_hash = bcrypt.compareSync(token, db_token);
        let compare_user_and_room = db_room_id.toString() === roomId.toString() && db_user_id.toString() === userId.toString();
        let effect = (compare_hash && compare_user_and_room) ? 'Allow' : 'Deny'; // Set 'Allow' or 'Deny' to decide if one can connect or not
        console.log(effect);
        return generatePolicy(principalId, effect, event.methodArn, userId, roomId);
    } catch(e) {
     console.log(e.stack);
     return null;
    }
};
let generatePolicy = function(principalId, effect, resource, user_id, room_id) {
   // Required output:
   var authResponse = {};
    authResponse.principalId = principalId;
   if (effect && resource) {
       var policyDocument = {};
        policyDocument.Version = '2012-10-17'; // default version
       policyDocument.Statement = [];
       var statementOne = {};
       statementOne.Action = 'execute-api:Invoke'; // default action
       statementOne.Effect = effect;
       statementOne.Resource = resource;
       policyDocument.Statement[0] = statementOne;
       authResponse.policyDocument = policyDocument;
    }
   // Optional output with custom properties of the String, Number or Boolean type.
   authResponse.context = {
       room_id: room_id,
       user_id: user_id
    };
   return authResponse;
}
package.json
{
"name": "authorizer",
"version": "1.0.0",
"description": "Authorizer function for WebSockets on API Gateway",
"main": "index.js",
"author": "beSharp",
"license": "MIT",
"dependencies": {
"bcryptjs": "^2.4.3",
"jsonwebtoken": "^8.5.1"
}
}And the relative environment variables: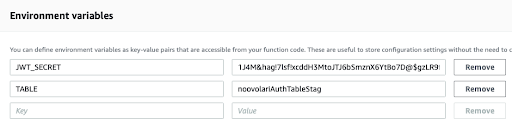 The authorization Lambda accesses the JWT Token sent through API Gateway, decodes it, obtains the token encrypted with BCrypt by the client application that opened the connection, then compares it with the encrypted one saved on DynamoDB; if they coincide, the authorizer grants permission to open the connection by creating an ad hoc IAM authorization policy.We return to the API Gateway screen and click on $connect, so we can edit the authorizer field, adding the lambda we have just created.
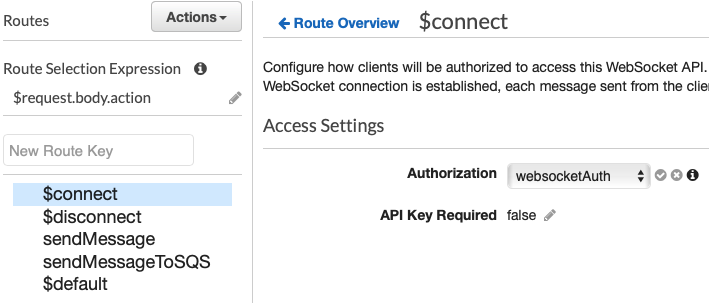 Where “websocketAuth” is the name we gave to the authorisation Lambda.Now we need to add the $disconnect and sendMessage lambdas; so let's proceed to add them starting with $disconnect which is very simple:
app.js

var AWS = require("aws-sdk");
AWS.config.update({ region: process.env.AWS_REGION });
var DDB = new AWS.DynamoDB({ apiVersion: "2012-10-08" });
exports.handler = function (event, context, callback) {
  console.log(event.requestContext.stage);
  let table_environment = 'TABLE_NAME_' + event.requestContext.stage.toUpperCase();
  var deleteParams = {
    TableName: process.env[table_environment],
    Key: {
      connection_id: { S: event.requestContext.connectionId }
    }
  };
DDB.deleteItem(deleteParams, function (err) {
    callback(null, {
      statusCode: err ? 500 : 200,
      body: err ? "Failed to disconnect: " + JSON.stringify(err) : " Disconnected."
    });
  });
};
In practice, whenever API Gateway has to disconnect a user from the channel, it invokes the function associated with the $disconnect lambda which, in return, deletes the line corresponding to the specified connection_id from the DynamoDB connection table.We can now move on to the send message part, creating the sendMessage lambda: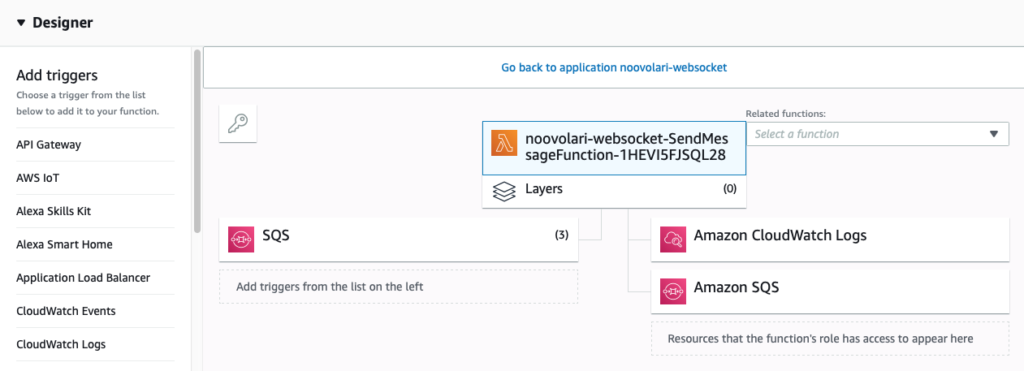 First of all in this function we need to add SQS as a trigger because it will be called not only by API Gateway but also by SQS. We add this trigger as shown below.Then we can see the function code:
index.js

const AWS = require('aws-sdk');
require('./patch.js');
const ddb = new AWS.DynamoDB.DocumentClient({ apiVersion: '2012-08-10' });
const dynamodb = new AWS.DynamoDB({apiVersion: '2011-12-05'});
const { ENDPOINT } = process.env;
exports.handler = async (event, context,callback) => {
  let environment =undefined;
  let table = process.env.TABLE_NAME;
let user_id= undefined;
  let room_id = undefined;
  let postData = undefined;
  let messageBody = {};
 // if there are records we re in the sqs trigger put the event from the message of the SQS message received.
  if (event.Records != undefined) {
    let body = JSON.parse(event.Records[0].body);
    user_id = body.user_id;
    room_id = body.room_id;
    messageBody = {user_id: user_id };
    postData = body.data;
  } else {
    postData = JSON.parse(event.body).data;
    const  connection_sender =  event.requestContext.connectionId;
    // get sender info on dynamo db table of connections
 let params = {
      Key: {  HashKeyElement:  { S: connection_sender } },
      TableName:  table
    };
    let sender_item = undefined;
 //get the row of dynamo referred to the connection_id sender.
    await dynamodb.getItem(params, function(err, data) {
      if (err) console.log(err, err.stack); // an error occurred
      else    {
        sender_item = data;
        user_id = sender_item.Item.user_id.S;
        room_id = sender_item.Item.room_id.S;
        // adding in the messageBody the user_id of the sender
        messageBody = {user_id: user_id };
        }  // successful response
    }).promise();
  }
//retrieve all connection for the selected room_id.
  let connectionData;
  try {
    let scanParam = { TableName: table, ProjectionExpression: 'connection_id, user_id',
       FilterExpression: '#roomId = :roomId',
      ExpressionAttributeNames: {
          '#roomId': 'room_id',
      },
      ExpressionAttributeValues: {
          ':roomId': room_id,
      }
    };
    connectionData = await ddb.scan(scanParam).promise();
  } catch (e) {
    return { statusCode: 500, body: e.stack };
  }
 let url = (ENDPOINT === "") ? event.requestContext.domainName + '/' +
 event.requestContext.stage : ENDPOINT + "/"+ environment.toLowerCase();
console.log(url);
const apigwManagementApi = new AWS.ApiGatewayManagementApi({
    apiVersion: '2018-11-29',
    endpoint: url
  });
 // for each connection send a message through apigwManagementApi
  const postCalls = connectionData.Items.map(async ({ connection_id }) => {
 try {
      messageBody.data = postData;
      await apigwManagementApi.postToConnection({ ConnectionId: connection_id, Data: JSON.stringify(messageBody)}).promise();
      console.log("posted");
    } catch (e) {
      console.error(e);
      //if the connection in a stale status, the connection will be closed, and the connection_id will be removed from the dynamoDB table
      if (e.statusCode === 410) {
        console.log(`Found stale connection, deleting ${connection_id}`);
        var deleteParams = {
            TableName: table,
            Key: {
              connection_id: { S: connection_id }
          }
        };
        await ddb.deleteItem(deleteParams, function (err) {
          callback(null, {
            statusCode: err ? 500 : 200,
            body: err ? "Failed to disconnect: " + JSON.stringify(err) : " Disconnected."
        }).promise();
  });
      } else {
         return { statusCode: 500, body: e.stack };
      }
    }
  });
try {
    await Promise.all(postCalls);
  } catch (e) {
    return { statusCode: 500, body: e.stack };
  }
eturn { statusCode: 200, body: 'Data sent.' };
};
Now let's add the environment variables: In this Lambda function, the code is able to distinguish the calls coming from SQS by those from API Gateway; based on this information, the body of the message and information about the user are reconstructed. Using the room_id we obtain the user_id and connection_id from the DynamoDB connection table. Then we proceed to send the message to all the users found this way.If there is a connection problem with a user, the Lambda will delete the relevant line from the connection table.Once all these functions have been added, we verify that the names used to describe them are consistent with those indicated in $connect, $disconnect and sendMessage respectively. Once done, the architecture of our notification system is completed and we can test it directly by entering a message following this example:
sqs = Aws::SQS::Client.new(region: region)
payload = JSON.generate(user_id: user_id, room_id: room_id, data: message)
params = {
 message_body: payload,
 queue_url: config.queue_url
}
sqs.send_message(params)
Referring to the Client instead, the following will be a good example:function sendMessage(){ ws.send(JSON.stringify( {“action”: “sendMessage”, “data” : “message” } ); }This concludes our tutorial on how to develop a notification system’s microservice based on AWS services, complete with authentication via API Gateway, DynamoDB, SQS, and Lambda.One of the most interesting aspects of the solution is certainly its compactness - all the logic is implemented in just four rather simple Lambda functions - while maintaining a certain versatility.In the event that you want to manage the infrastructure lifecycle according to the Infrastructure-as-Code paradigm, for example through a SAM template, a viable expedient could be the creation of a Route53 ALIAS record to decouple the URL called by the client from that of API Gateway which, being generated programmatically, changes with each deployment.Want to learn more about this solution and how beSharp can help you develop Serverless and Cloud-native applications on AWS? Contact us!