Democratize data access through a self-service Data Platform using AWS LakeFormation – Part 3
20 May 2025 - 9 min. read
Matteo Goretti
DevOps Engineer

Nowadays, the hybrid cloud model is a very common schema used in many organizations to securely connect the on-premises environment with the public Cloud.
The scope of this article is to illustrate a way to build centralized networking on the AWS side by using AWS Transit Gateway. This service is also mainly used to connect on-premises to Cloud, usually with a VPN or a Direct Connect. In our previous blog post, we presented how to choose the proper connection. However, this will not be the focus of this article.
Instead, we will focus on how to share the same NAT gateway in multiple environments through the Transit.
Before diving deep into the topic, let us analyze Transit Gateway characteristics and how to set up the networking following the AWS best practices.
Transit Gateway was presented in 2018 with the purpose of connecting VPCs and on-premises networks through a central hub.
In the past, the VPCs inter-connections were only possible through VPC peering, which led to complex network architecture in case of a high number of resources to be connected since it cannot support transitivity.
So, the first advantage of using the transit gateway is having transitivity, and - as shown in the image below - this characteristic simplifies the infrastructure.

Another important aspect is that we can use one main account to control the networking over the cloud; this means that if an additional connection is needed, it can be set up just in the Transit configuration without worrying about the environment linked to it. We can give granular permissions to the networking team and centralize the connection over one account with a significant cost reduction. Since we have a central hub as a router for all the connections, we can share the same NAT gateway for all the environments and, if necessary, create just one VPN connection.
In this article, we will not detail on-premises connection. However, it is important to know that we can use the transit gateway to connect a direct connection and go in all environments through the transitivity.
A common approach is to create three layers of networking, each one with three subnets in order to use all the availability zones of the region:
As described above, NAT Gateway is the resource that provides the connection to the internet. If it is not appropriately architected, it could easily become a bottleneck for our infrastructure.
AWS provides a managed service to implement NAT gateway. It supports 5 Gbps of bandwidth and automatically scales up to 45 Gbps.
According to the High Availability principles, we need to create a NAT instance for each AZ. In this way, we can also have more bandwidth since the resource could be split into multiple AZ, each one with its NAT.
Note: Pay attention to the cost. Each NAT costs 30$/month, so 90$/month for 3 NAT in HA. Moreover, if we have multiple environments, these costs are replicated. N.B. When we create the attachments, it is crucial to select the right subnet associations since the attachment will use the route table of these subnets to redirect the traffic. The right ones are the natted subnets. Otherwise, it will not be possible to go out to the internet with the private resources because they would not pass through NAT.
Now let's see how to use the same NAT Gateways for all environments and reduce the networking cost.
We will set up a Landing Zone composed of one main Account and two sub-accounts, development and production. For the sake of simplicity, we will call them M (main account), A (production account), and B (development account). The structure of the VPC is pretty the same for all the accounts. The main difference is in the main account where we configure the transit gateway with the NATs.
We start to configure account M.

As illustrated in the image, we set up a VPC with the three layers of networking and 3 NAT Gateway for High Availability as described before. The NATs will be shared with all the accounts using the transit gateway. The next step is to create the transit gateway and share it with the other accounts using the AWS service Resource Access Manager (RAM). Finally, the last resources to be created are the transit gateway attachments. These are the unique resources we have to set up in all the accounts.
Note: When we create the attachments, it is crucial to select the right subnet associations since the attachment will use the route table of these subnets to redirect the traffic. The right ones are the natted subnets. Otherwise, it will not be possible to go out to the internet with the private resources because they would not pass through NAT.
We configure the VPC in the same way for accounts A and B, but we don’t have NAT gateway and transit gateway anymore: just the three layers of subnets with the transit gateway attachment. We will use the same NAT and transit of account M.
Now that the networking structure is built, the final step is to build the route tables for each subnet and the route tables for the transit gateway.
The transit gateway’s route tables are present only in account M, and we subdivided them into two types:
The first one is associated only with the transit gateway attachment of account M. This defines the path that the traffic needs to follow when arriving on the VPC of account M. The routes inside it redirect the traffic to VPC of the account M, A and B on the relative attachments TM, TA, and TB.
The second one is associated with the transit gateway attachment of account A and B. Inside it, we define the route to redirect all the traffic to the attachment M and three blackhole routes for all the private addresses. In this way, we avoid that one sub-account can reach another sub-account unless you add a more specific route to the sub-account.
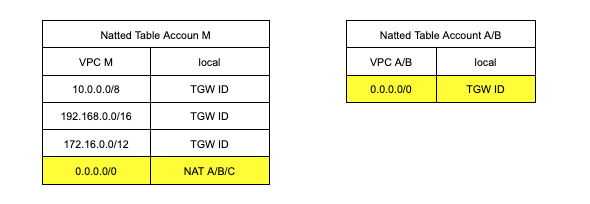
Let's move to the subnets side. Till now, we have just created them without defining if they are public, natted, or private. The elements that define this property are the routes inside a route table. The public table has the route to the internet through the internet gateway, the natted table has the route to the internet through the nat gateway, while the private table has no route to the internet. All of them redirect the traffic for private addresses to the transit gateway to delegate their management to it. The subnet tables are basically the same for all the accounts except for the route table of the natted subnet. Here we define the routes so that the NATs gateway of account M, are shared across all the accounts.

The natted table for account M has the route to the internet through the nat, while the natted table for account A and B has the route to the internet through the transit. For the first one, we also need to redirect the traffic for the private addresses to the transit, while for the second, we don’t need them since all the traffic is redirected by default to the transit.
That’s it!
In this way, we are using the same NAT gateway for all the environments linked to the transit gateway. So, if we want to make a test, we can try to start an ec2 instance in a natted subnet on sub-account A or B and try to ping 8.8.8.8 to see if we can reach the internet. The picture below shows the configuration of the infrastructure described above

This article presented how to use AWS Transit Gateway to centralize the NAT in a single environment, also taking advantage of a Landing Zone-based approach. This configuration allows us to have only one hub point in which all the network is configured. The replication of the networking resources is avoided, and both costs and architecture complexity are reduced.
How do manage advanced networking configurations? Tell us about your experiences!