Enabling enterprise Telemetry on AWS: Handling massive data backfills using ECS and Databricks wi...
17 June 2026 - 1 min. read
Keidi Xhafa


On Amazon Web Services the Serverless computational service par excellence remains Lambda, a must-have service when talking about this paradigm.
AWS Lambda allows you to use computational power without worrying about the management of the underlying servers, patches, software updates, or unexpected machine shutdowns. Using this paradigm, we can focus entirely on our application.
To date, AWS Lambda offers several runtime engines. Anyway, it is possible to create your own if you need to use a programming language not yet supported by AWS.
The great aspect is: it’s up to us to choose the technology that best fits our needs when writing AWS Lambda Functions (FaaS): we can choose the programming language we are most familiar with, allowing us to reach our goals faster.
In this article, we will cover how to develop a serverless backend quickly and effectively using TypeScript as a programming language.
The application will leverage Express, a web application framework used for developing web services for Node.js. Node.js is the runtime environment - already supported by AWS - in which our TypeScript code, compiled in JavaScript, will run on, on Lambda.
After the Analysis, the proposed solution will be deployed on our AWS account. This project can be consulted and downloaded from GitHub!
Let's start by proposing the architectural scheme of our Serverless application.
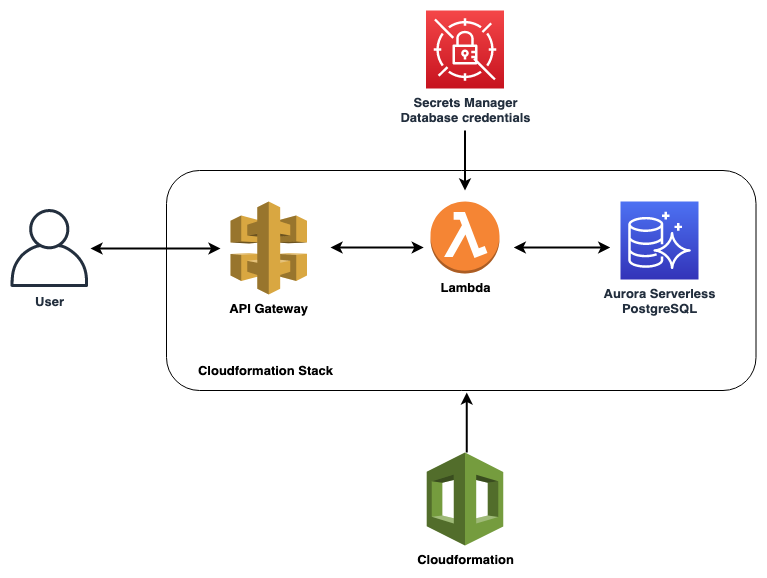
The code will be released on an AWS Lambda function, whose invocation will only be possible through an API Gateway.
Obviously, a Data Source cannot be missing in a backend application. As we aim to take full advantage of the Serverless paradigm, Aurora Serverless will be involved as a relational database to save and retrieve our data.
In summary, we are going to use the following cloud services:
Nowadays, several tools are available for DevOps engineers to efficiently manage infrastructures, for example, the AWS CLI, the console, or one of the frameworks available online, such as Troposphere, Terraform, or AWS SAM.
As explained above, our goal is to build a backend application quickly: that’s why we chose the Serverless framework.
Serverless is a framework written in Node.js allowing us to manage the lifecycle of our serverless applications. It supports several Cloud Providers and features.
As for AWS, Serverless will allow us to create and manage the resources we need on our account using the Cloudformation stack.
Before starting to work on the project, the following requirements need to be met:
Since we're going to write an application in TypeScript, Node.js will be the runtime environment on which we're going to run our code, compiled in JavaScript.
In order to deploy the Cloudformation stack on AWS, it is necessary to have the Serverless framework installed on the machine. To do so, run the npm install -g serverless command, and configure the AWS CLI credentials properly.
At this point we are ready to start: download the project from our GitHub repository and check its structure.
Let's start by cloning the project:
git clone https://github.com/besharpsrl/blog-serverless-backend-nodejs
Enter the blog-serverless-backend-nodejs folder and run the npm install command to install all the necessary dependencies.
Here are some clarification:
You will find all these (and other) utility dependencies in the package.json file. In addition, it contains commands necessary for running and testing our APIs locally, as well as for releasing them on the AWS account.
By opening the project on your IDE, you will notice a scaffolding similar to the following:
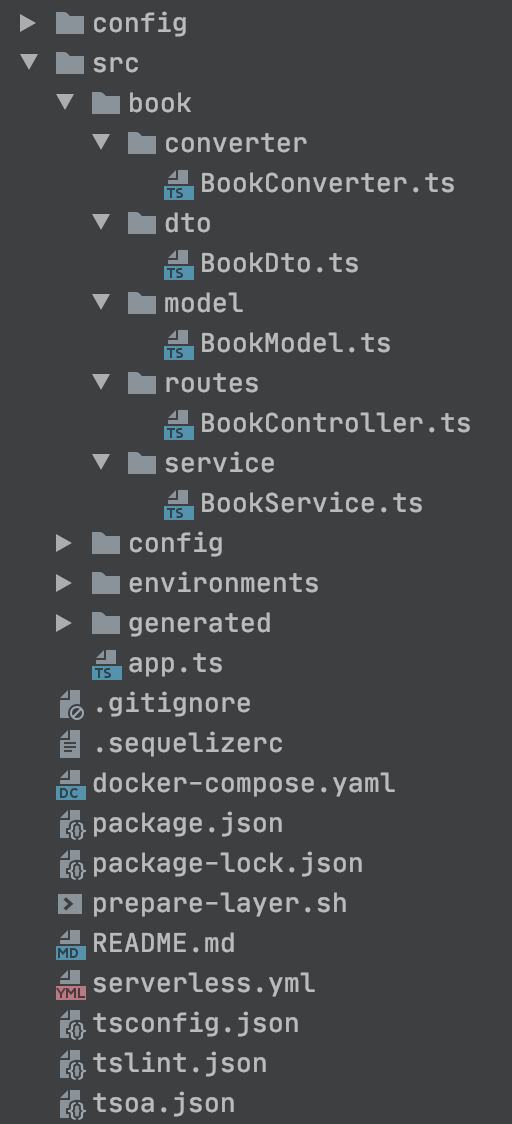
Let’s dive deep into the application logics.
We are going to describe a very simple use case: simple REST APIs offering CRUD functions to manage books in a library.
The logic resides under the book directory. Here is defined the tsoa Controller, the Service carrying both the business logic and the sequelize models.
In the app.ts file, instead, we will record the Express routes (autogenerated by tsoa starting from the Controllers), and then export a module that will be used as a handler for our Lambda function.
Everything is made possible through the statement:
module.exports.handler = sls(app)
Through this command we are invoking a Serverless framework function able to create a wrapper around the Express routes. In this way, the handler of our AWS Lambda function will then know which Express route to route the REST API calls to.
Finally, we just have to analyze the serverless.yml file:
service: express-serverless
provider:
  name: aws
  runtime: nodejs12.x
  region: eu-west-1
  stage: ${env:NODE_ENV}
  environment:
    NODE_ENV: ${env:NODE_ENV}
  iamRoleStatements:
    - Effect: 'Allow'
      Action:
        - 'secretsmanager:GetSecretValue'
      Resource:
        - '*'

package:
  exclude:
    - node_modules/**
    - defer" defer" defer" defer" defer" defer" defer" defer" defer" defer" defer" defer" defer" defer" defer" defer" defer" defer" src/**

layers:
  nodeModules:
    path: layer
    compatibleRuntimes:
      - nodejs12.x

…..

functions:
  app:
    handler: dist/app.handler
    layers:
      - {Ref: NodeModulesLambdaLayer}
    events:
      - http:
          path: /api
          method: ANY
          cors: true
      - http:
          path: /api/{proxy+}
          method: ANY
          cors: true
    vpc:
      securityGroupIds:
        - {Ref: LambdaSecurityGroup}
      subnetIds:
        - "subnet-1"
        - "subnet-2"
        - "subnet-3"

plugins:
  - serverless-offline
Note that in this file all the essential parts of the infrastructure are defined, such as the Cloud Provider on which we are going to deploy our Lambda function, its handler (the module we exported to the app.ts file) and the Lambda Layers to attach the function to.
With this configuration, in fact, we will create a Lambda Layer containing all the node modules. By doing so, we considerably reduce the size of our function, obtaining performance advantages during its execution.
Let’s go ahead: how is the Lambda function invoked? Through the http events defined in the Serverless file! This allows the creation of an API Gateway with which it will be possible to call our function.
The resource with path /api/{proxy+} will be the one that will proxy the backend routes. We have thus created a single resource on the API Gateway side that allows us to invoke all the REST APIs.
Not everyone knows that it is possible to test APIs without necessarily having to release them on AWS Lambda every time you make changes in the source code. That’s the great advantage of the Node.js package called serverless-offline!
It is a Serverless plugin that emulates AWS Lambda and API Gateway on your machine allowing you to speed up development activities.
Before you can use it, however, you will need to locally create a Postgres database and run the Sequelize migrations:
From the root of the project we execute the command
docker-compose up -d
And then:
npm run migrate-db-local
At this point, we can test APIs. Run the npm run start command to compile our TypeScript code in JavaScript and emulate the Lambda via the serverless-offline plugin.
As soon as the command is executed, you should see the following output on the terminal:
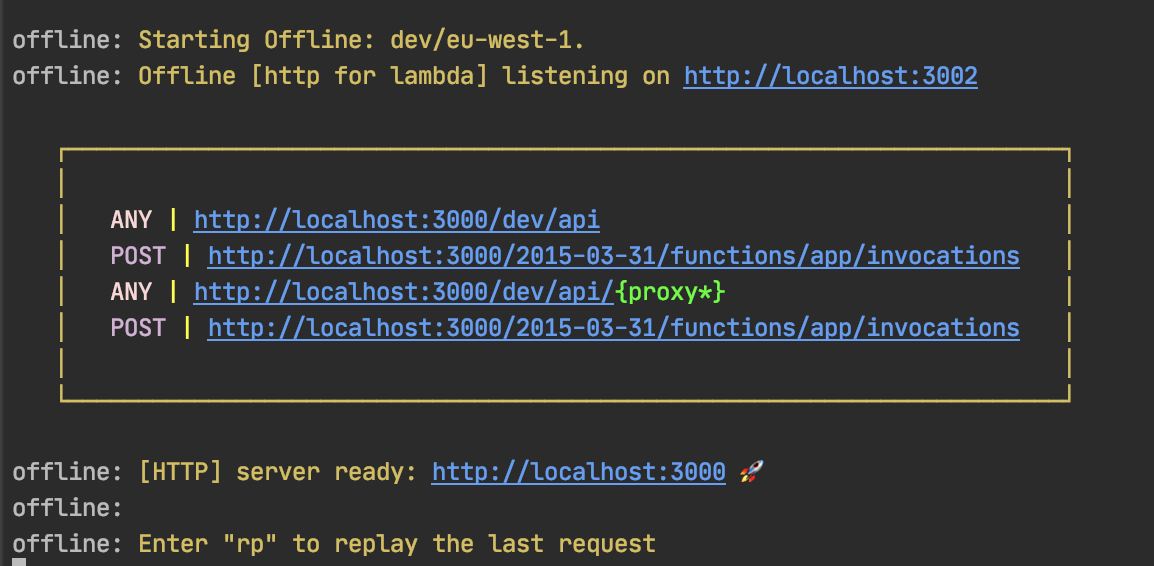
At this point we are ready to test the API with the tool we are most familiar with (Postman, Curl). For example, using the curl command we can execute the command from the terminal:
curl http://localhost:3000/dev/api/book/
Go ahead and take the last step: the application deploy.
Running the npm run deploy-dev command will start the release process. The first time the following output will appear:
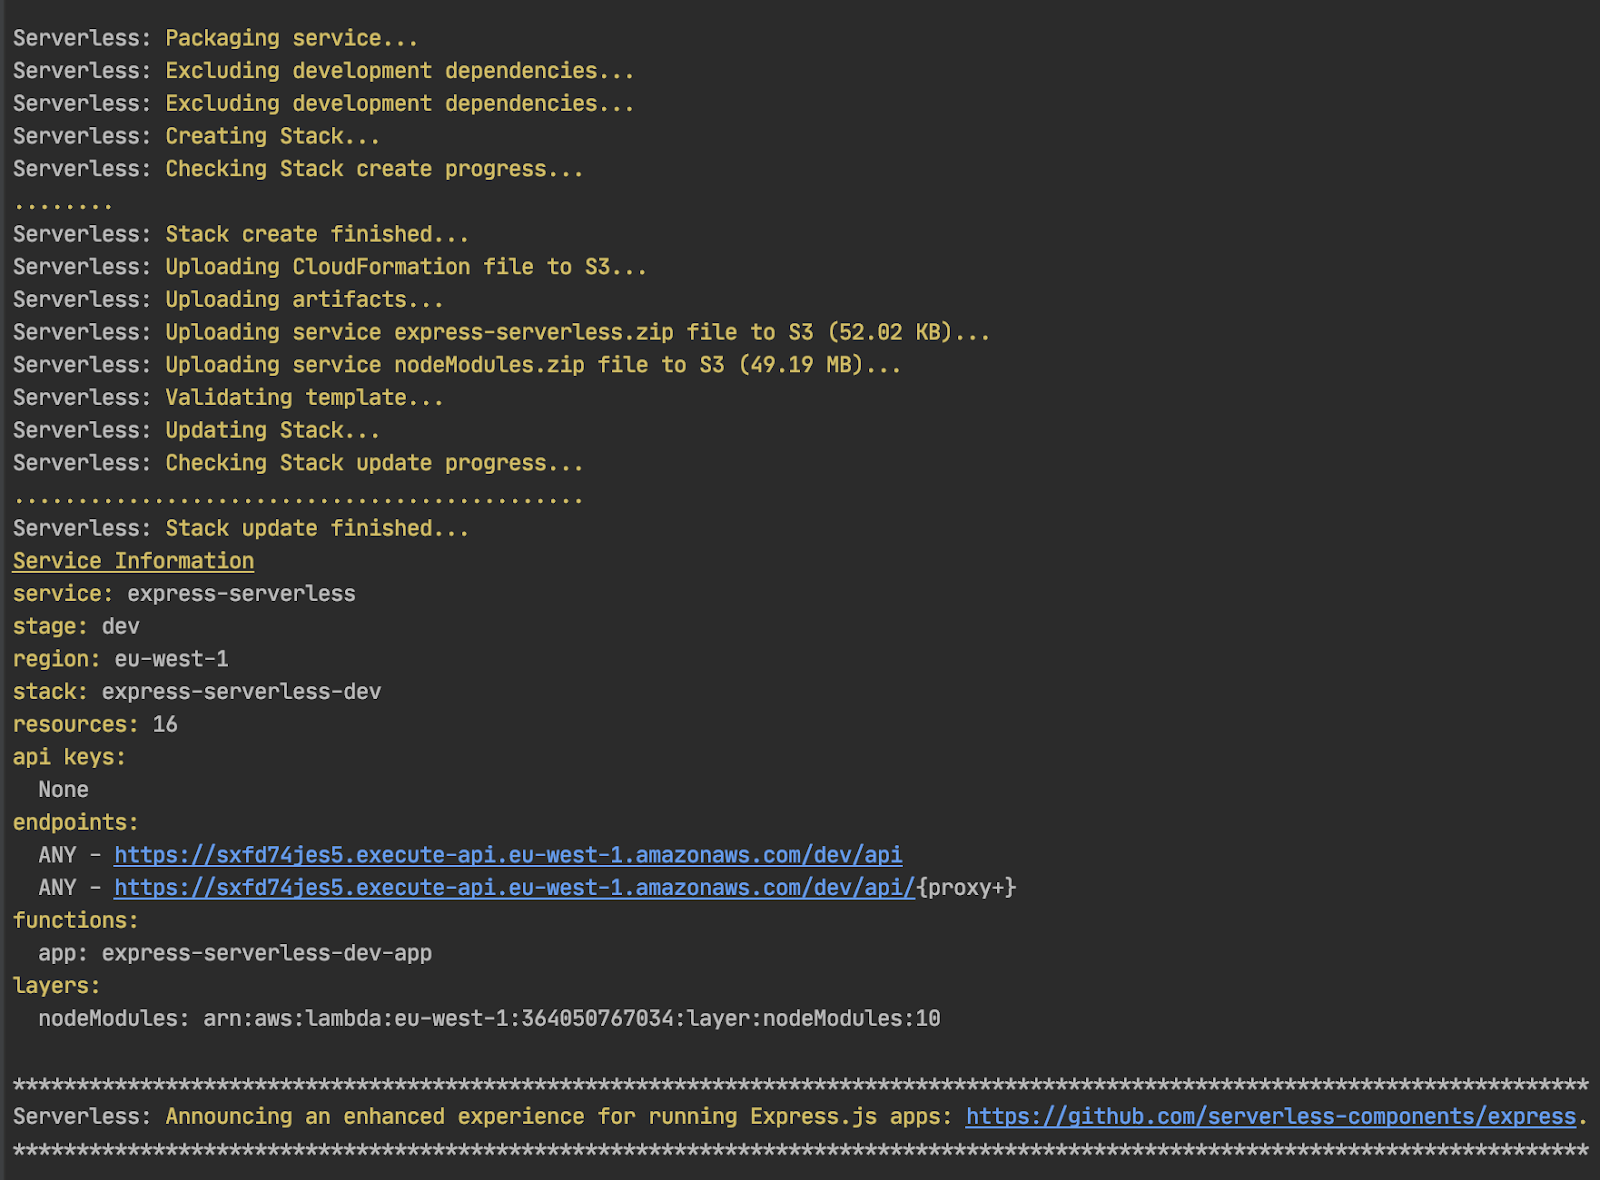
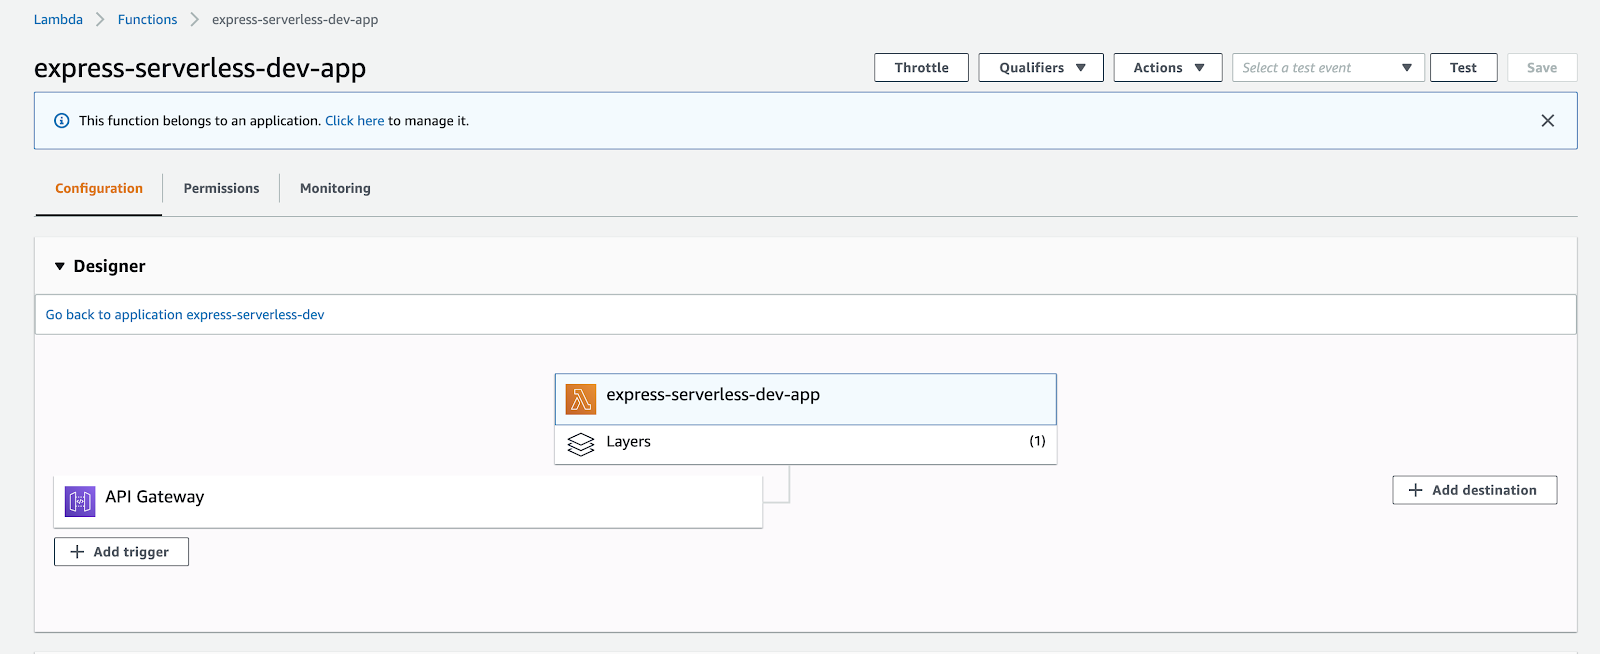
On the AWS account a Cloudformation stack containing the resources we need has been generated.
By accessing the console, we will find the just-created Lambda function among the list of Lambda functions available
Before testing the APIs it is necessary to run the Sequelize migrations to create tables on the Aurora Serverless database.Be sure you are able to connect to the database on AWS. To do this, it will be necessary to create a bastion machine on our AWS account and divert traffic from ours to the bastion. Use the sshuttle command:
sshuttle --dns -r ubuntu@EC2_BASTION_IP YOUR_VPC_CIDR --ssh-cmd 'ssh -i YOUR_PEM_KEY'
At this point,launch the migration by running the following command:
npm run migrate-dev
Once the migrations on Aurora Serverless are completed, testing the APIs through API Gateway is the only thing left to do.
The API Gateway endpoint has already been printed in the output of the npm run deploy-dev command. Let's try it:
curl https://sxfd74jes5.execute-api.eu-west-1.amazonaws.com/dev/api/book/
The release process of our Serverless infrastructure on the AWS account is completed!
To conclude, in this article we discussed how to create a Serverless application on AWS Lambda using Node.js as the runtime engine.
We decided to write the proposed project with TypeScript to have the advantage of using a transpiled, widely supported, and known language.
The choice of using Node.js as a runtime engine allows for a very limited Cold Start time as JavaScript is directly interpreted by the underline engine. Moreover, thanks to the configuration used, the source code is separated from the dependencies - saved on Lambda Layer, instead - drastically reducing the size of our source and improving startup performance.
Happy with this solution? :)
If you are interested in this topic, keep reading in our serverless section, or check out this resource on how to build a Node.js/TypeScript REST API with Express.js.
See you in 15 days on #Proud2beCloud for a new article!