Enabling enterprise Telemetry on AWS: Handling massive data backfills using ECS and Databricks wi...
17 June 2026 - 1 min. read
Keidi Xhafa


Internet of things (IoT) is constantly evolving, and there is more and more talk of connectable devices for the general public and in the industrial, energy, and Smart City sectors.
While in IoT products made for end users it is common to find devices directly connected to the Internet via WiFi or 4G networks, a whole series of applications less visible to consumers can benefit from an architecture composed of two distinct network stacks.
In these cases, a group of IoT devices constitutes a local network using protocols that may be very different from those used on the Internet.
The main benefit is the opportunity to operate networks of connected devices even in areas not served by the 3/4/5G network or where it is impossible to connect every device to the Internet. Also, those devices are usually much cheaper to buy and mass produce.
Within these networks, a particular node is often identified, which acts as the network's coordinator, and which, if necessary, can act as a bridge to put the network in communication with the external world via the Internet.
ZigBee protocol is a wireless communication standard based on the IEEE 802.15.4 specification and is one of the most popular stacks for building a local area network of wireless devices.
During the time we are allowed to spend researching and investigating new services, we created a playground for experimenting with Zigbee and AWS IoT Greengrass. We developed a PoC to test both Zigbee communication and various aspects of AWS IoT Greengrass.
This article is a journal on how we created an edge device based on AWS IoT Greengrass and used it to process data collected by a network of sensors locally, leveraging AWS IoT core features to ingest the collected data into our cloud-native application.
To set the stage, we quickly and frugally developed a wireless sensor using an XBEE module, a voltage regulator, and a photoresistor.
XBee uses the Zigbee standard, adds some features, and wraps it up in its neat little package; plus, the module is much cheaper and easy to get quickly using our current suppliers.
So what we had in mind was something like the following diagram shows:
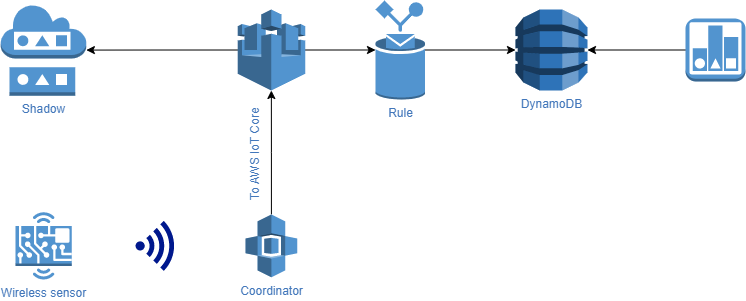
The sensor polls the voltage derived from the photoresistor about 2 times per second and transmits it over the ZigBee network to the coordinator node.
The coordinator node, which includes AWS IoT Greengrass, reads data from the serial port, parses the packet, and extracts the value transmitted by the sensor. Since the value is just an integer and is noisy, we wanted to buffer and process data points locally, calculate the average value for a predefined time slot, and relay the output AWS IoT Core.
The cleaned data is then stored both on the Thing shadow, and in a database to feed a visualization tool.
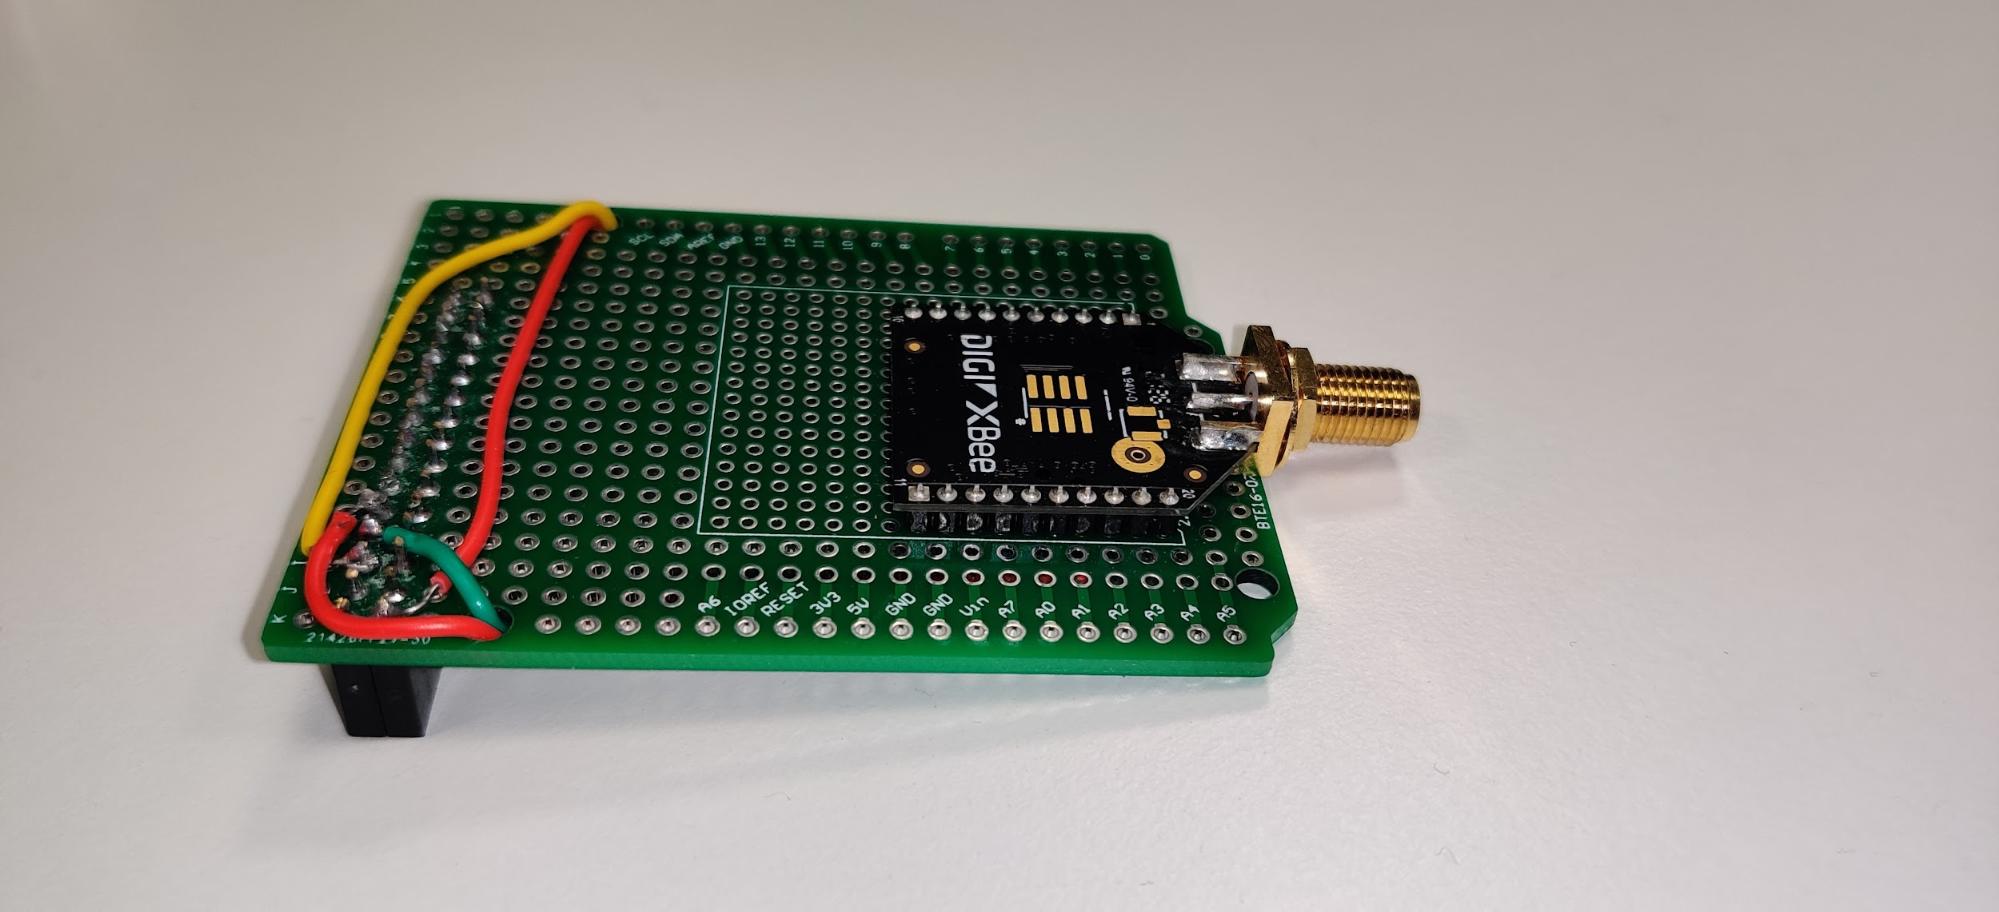
For the sensor device, we just built a prototype board with just a power supply stage, made using a voltage regulator and an XBee module.
The module has all we need to fulfill our requirements. It has a built-in ADC and, of course, is capable of joining or forming a Zigbee network and sending data over it.
Surprisingly, there is no need for an external microcontroller, the XBee module can be configured using XCTU. This tool is a free application that enables developers to interact with Digi RF modules through a simple-to-use graphical interface. We’ll show you how we used it to configure the XBee modules.
The following is the schema of the sensor device, featuring a power supply unit (the voltage regulator), the photoresistor voltage divider, and a reset circuit for the module.
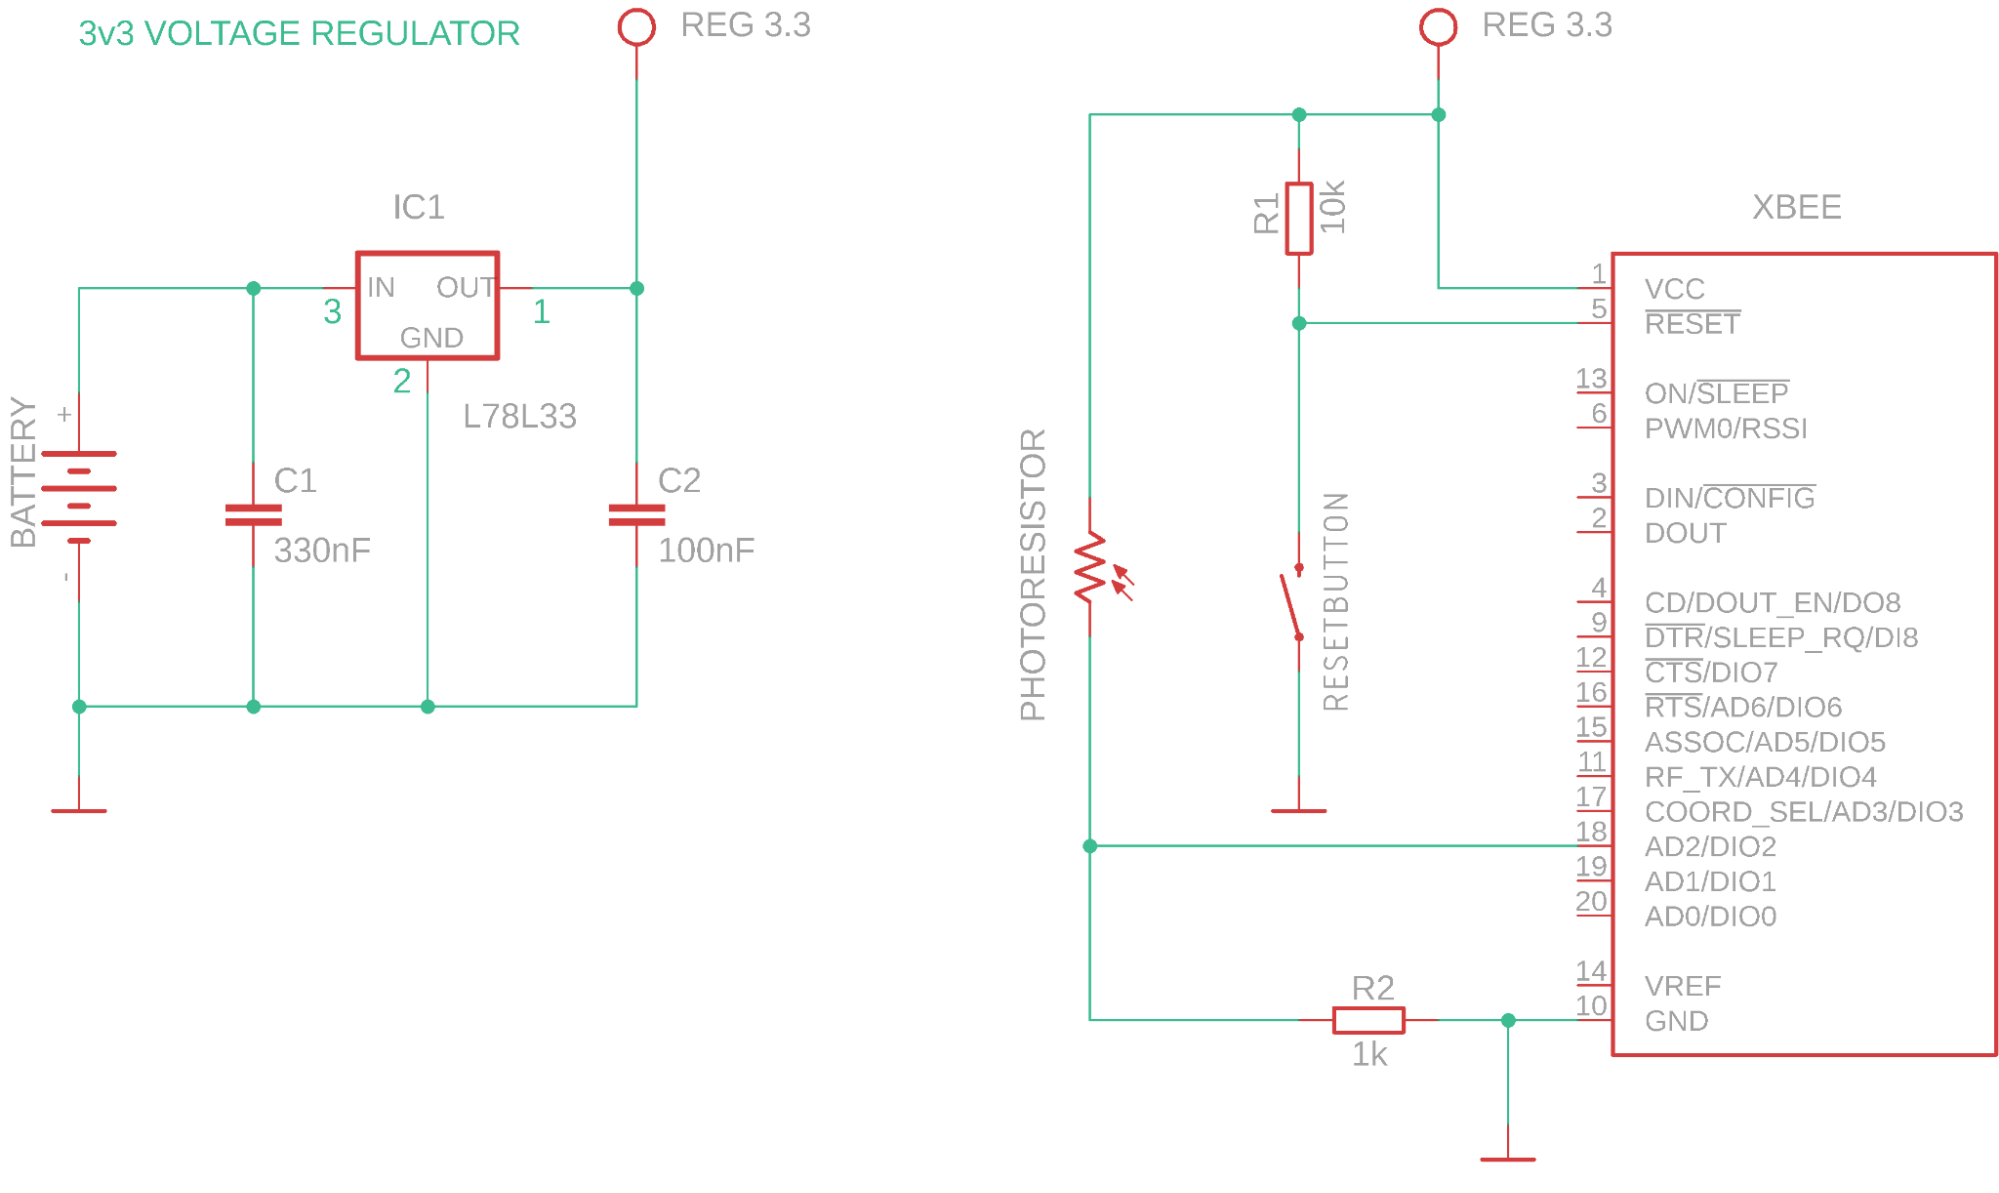
We opted to power the board using a 9v battery because we have some of them around the office and because they are compact, safe, and easy to find in any store.
Since this is only a PoC, we didn’t fancy building something powered with lithium batteries. For the purpose of this project, our voltage regulator and a standard 9v battery did the trick.
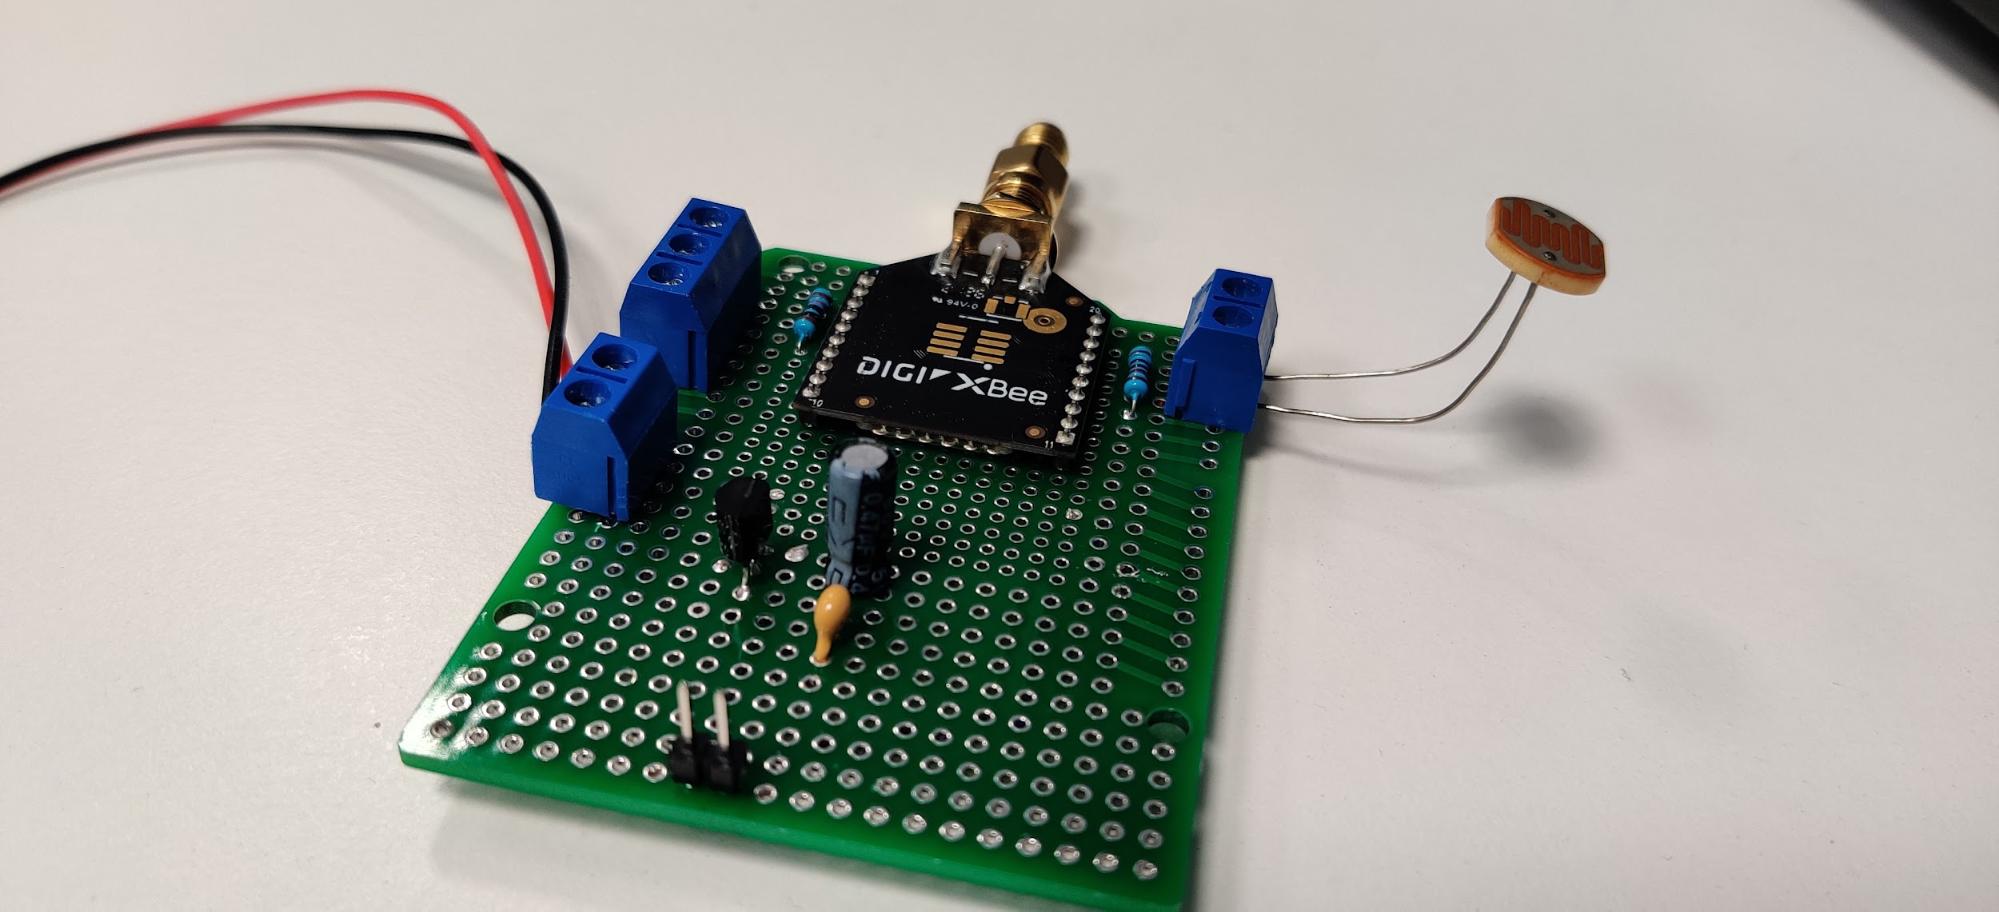
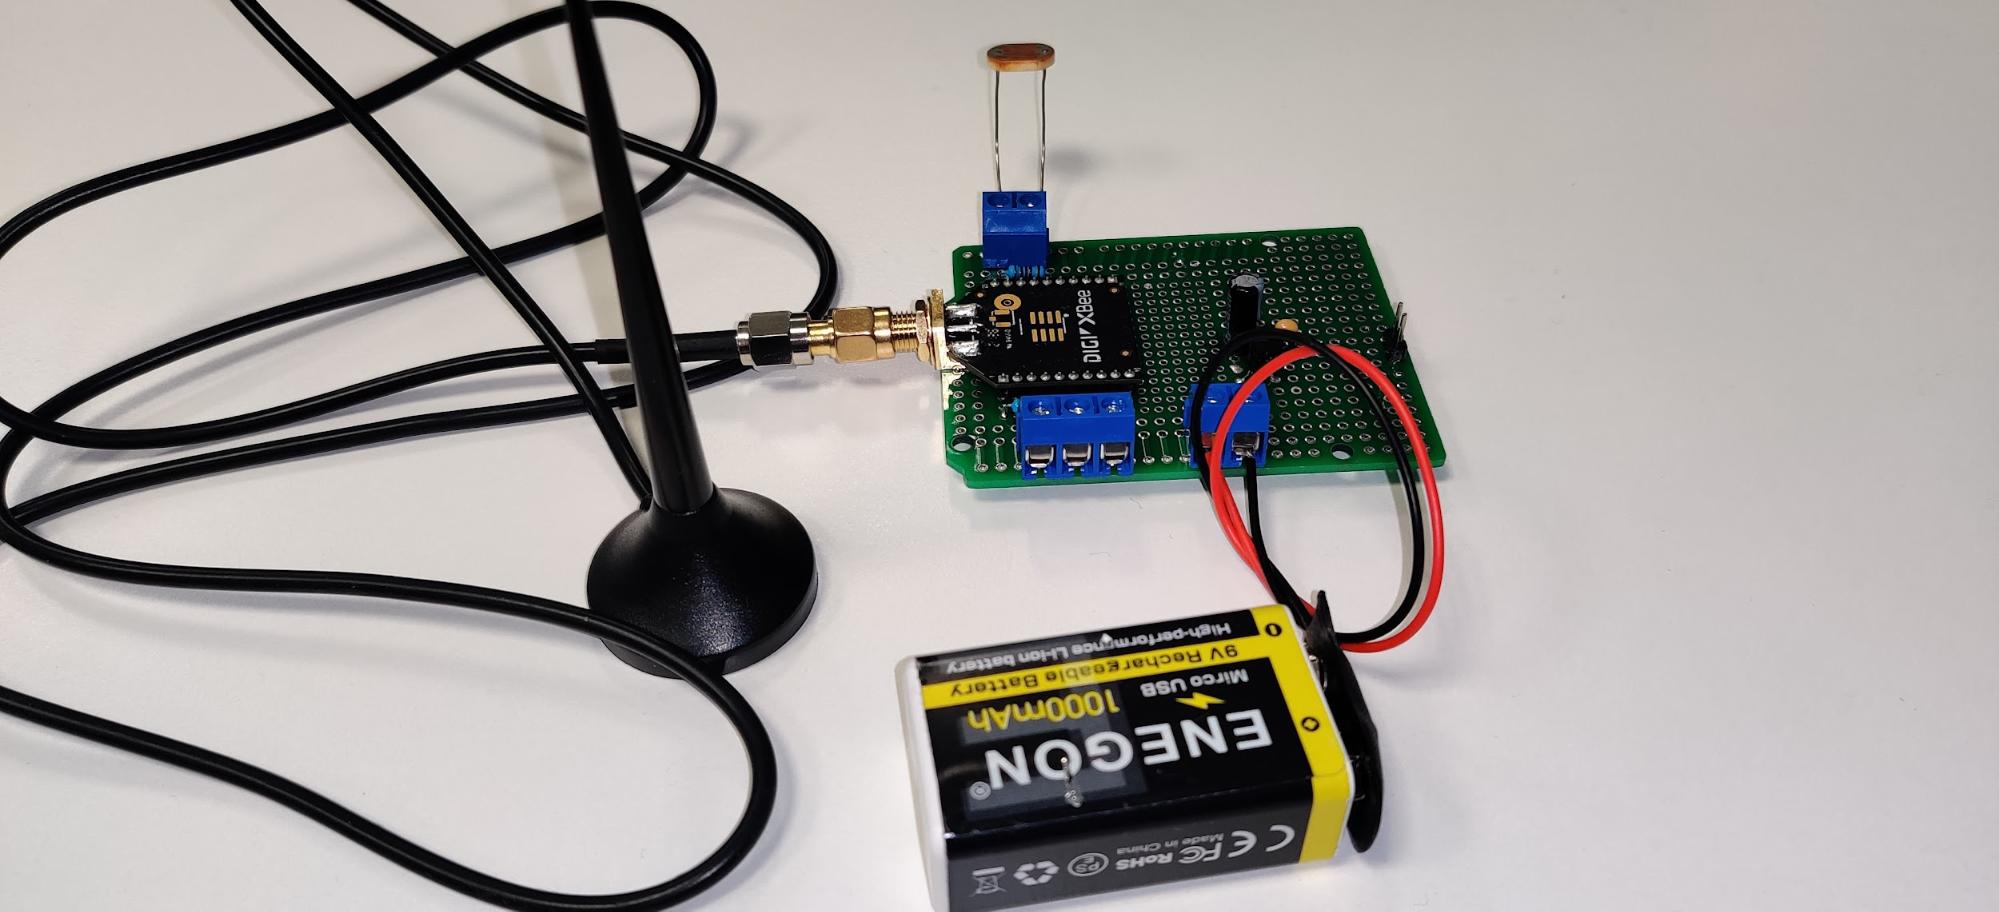
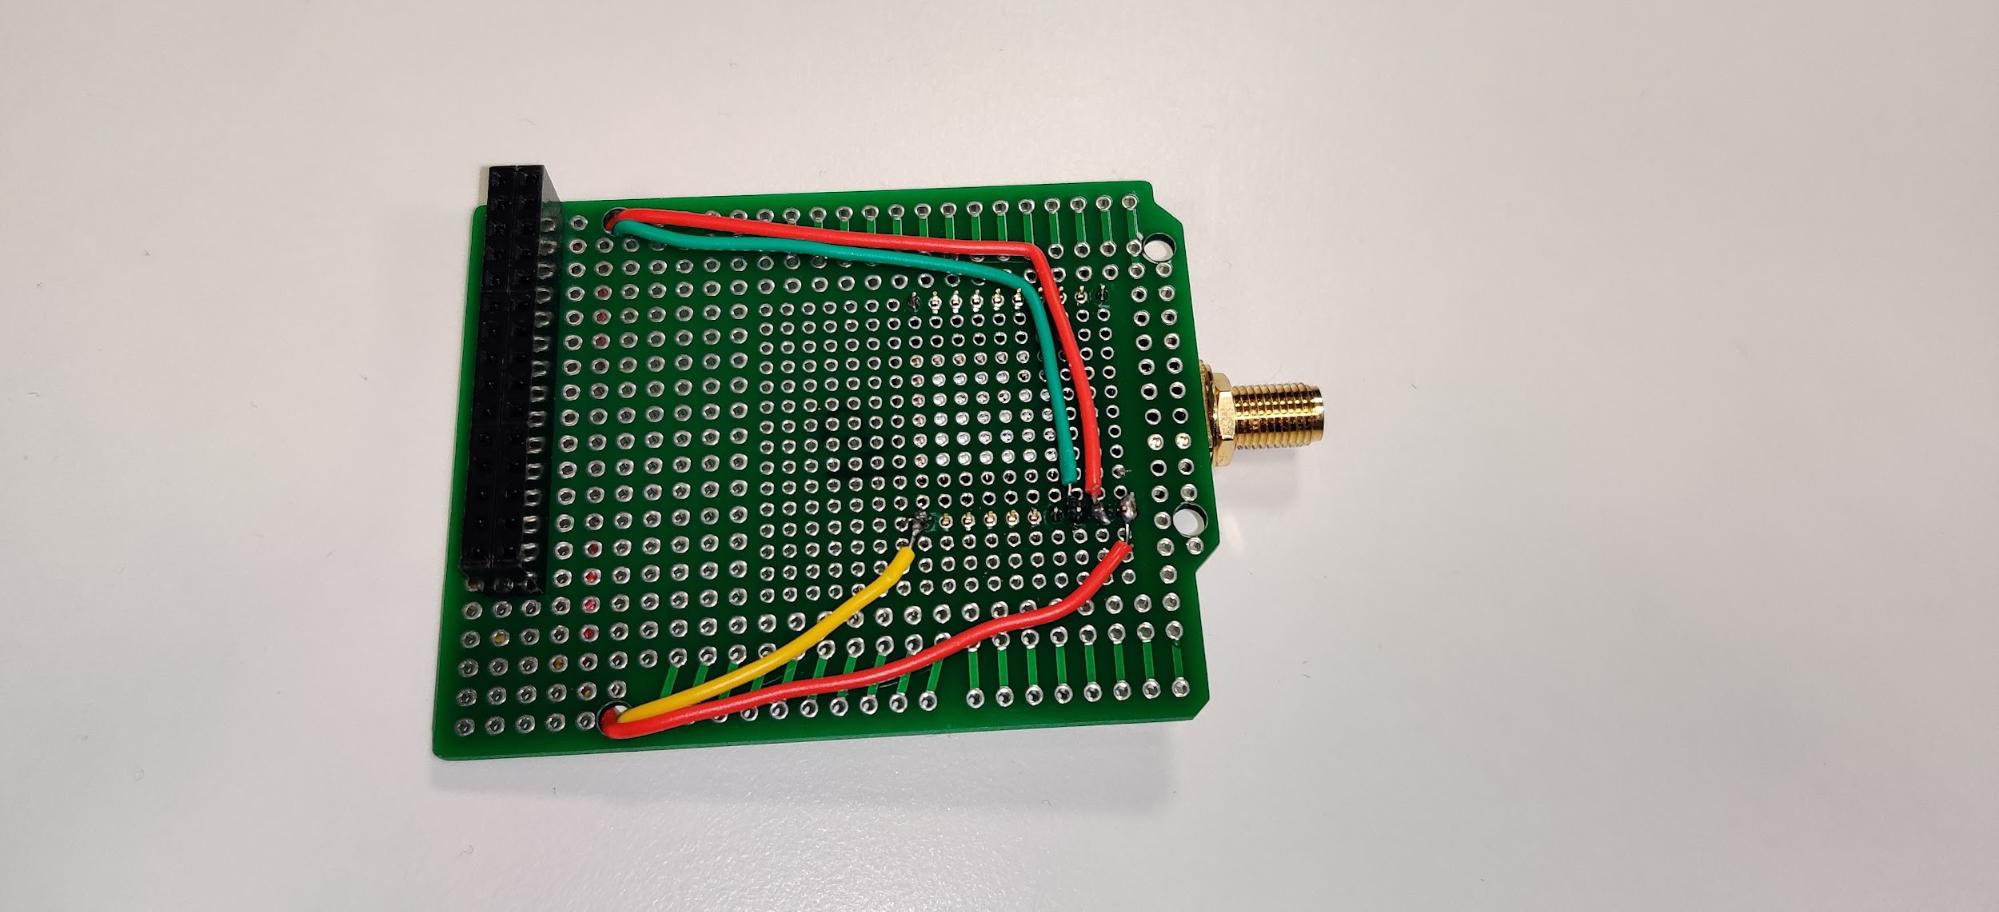
Once built, the board looks something like this
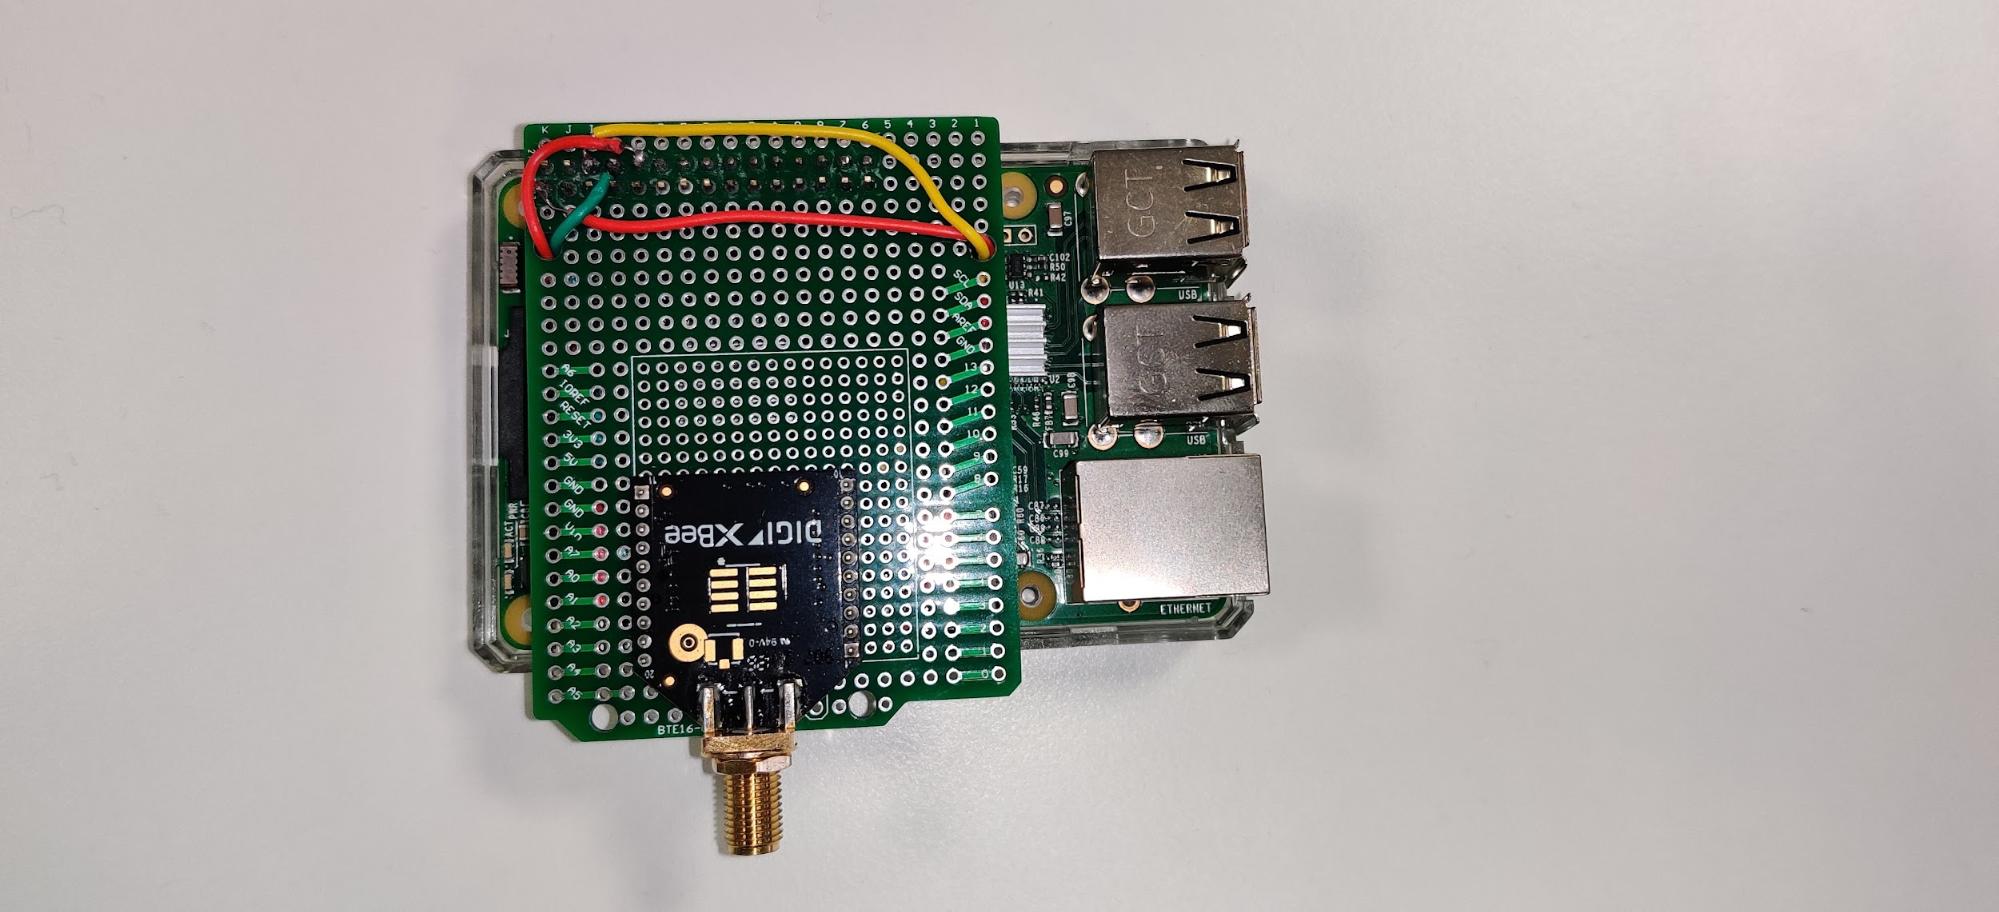
For the coordinator node, we used a Raspberry Pi equipped with Raspbian, AWS IoT Greengrass, and a simple shield we made to power and connect the XBee module to the GPIO header. We used the built-in hardware serial port.
The shield
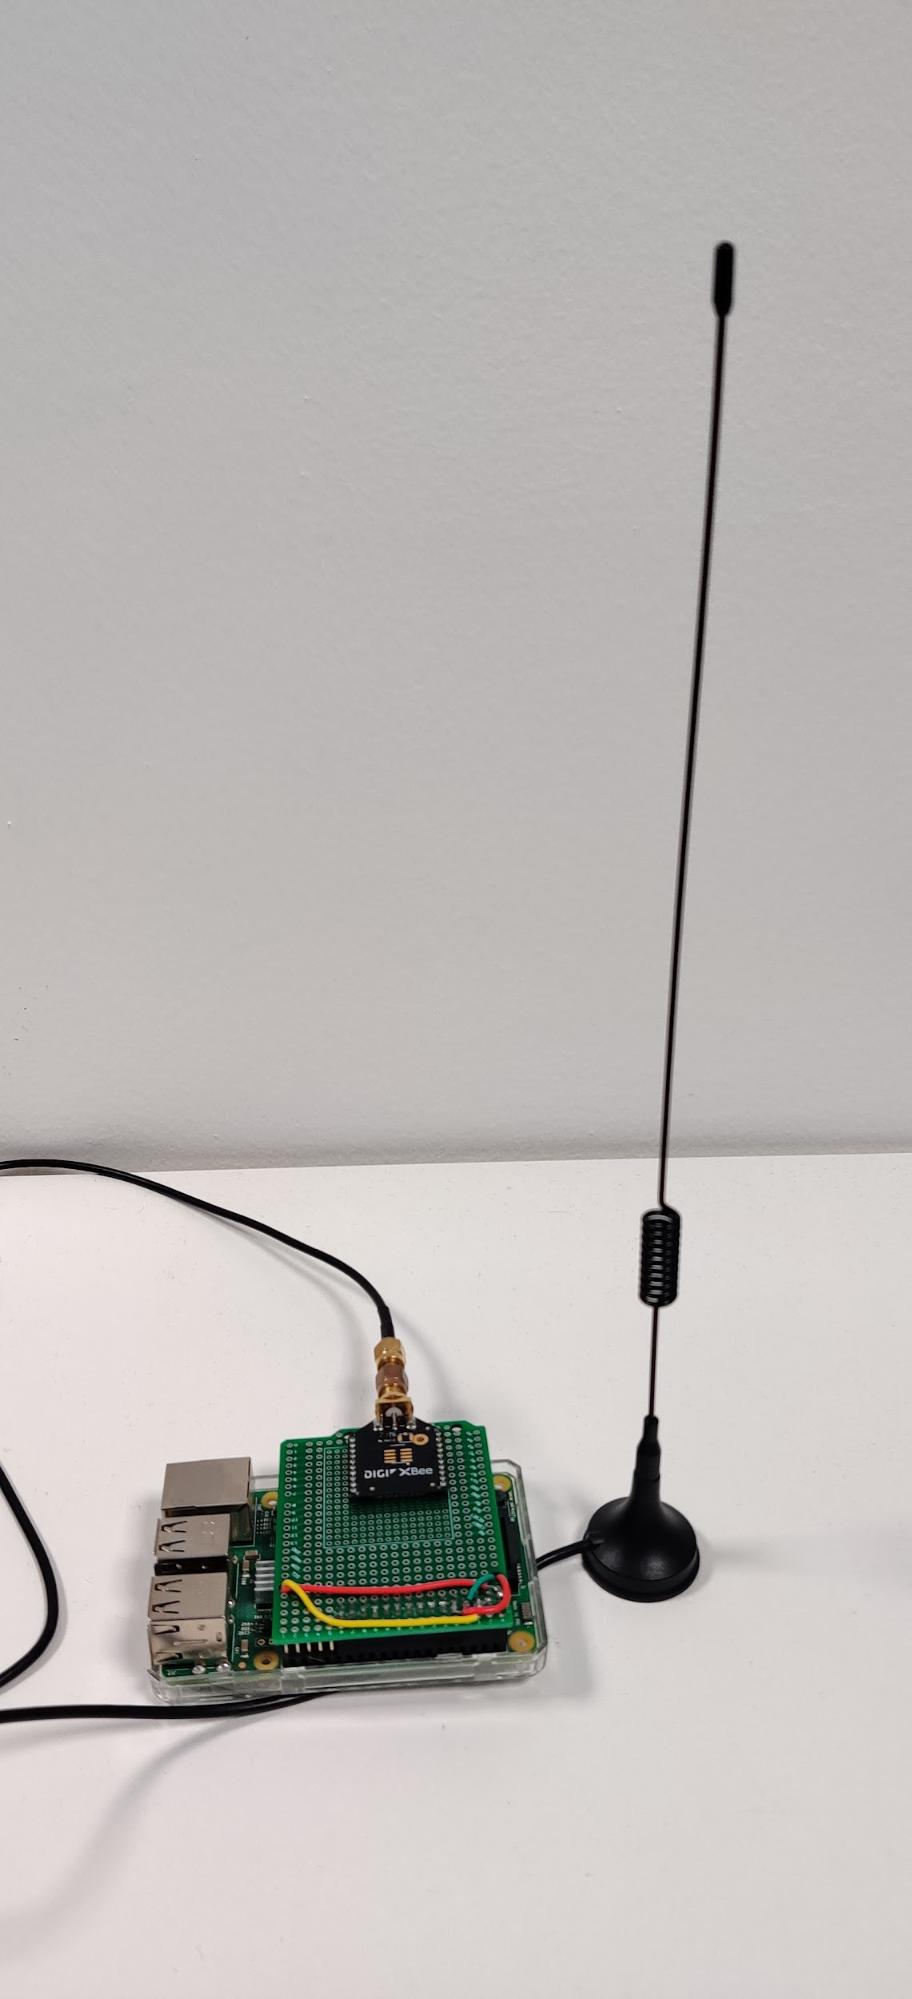
The coordinator fully assembled
After installing AWS IoT greengrass to the Raspberry pi (you can follow the official documentation or our article that should set you up in a few steps), we can develop our source code.
The task of our Raspberry pi is to gather messages received via ZigBee, parse them, and finally send the value that was read by the sensor via MQTT on a dedicated AWS IoT Core named shadow. Fortunately, as mentioned earlier, we can read this data easily by connecting to the Linux serial device and poll for bytes. The code is a pretty straightforward Python script:
import json
import time
from serial import Serial, PARITY_NONE
import awsiot.greengrasscoreipc
import awsiot.greengrasscoreipc.client as client
from awsiot.greengrasscoreipc.model import UpdateThingShadowRequest

LIGHT_TOPIC = "$aws/things/<your_iot_device_name>/shadow/name/<named_shadow>"
QOS = QOS.AT_LEAST_ONCE
ipc_client = awsiot.greengrasscoreipc.connect()


def send_light_value(payload):
	update_thing_shadow_request = UpdateThingShadowRequest()
	update_thing_shadow_request.thing_name = "p2bc-core-device"
	update_thing_shadow_request.shadow_name = "light"
	update_thing_shadow_request.payload = json.dumps(
    	{"state": {"reported": payload}})
	op = ipc_client.new_update_thing_shadow()
	op.activate(update_thing_shadow_request)
	fut = op.get_response()

	result = fut.result(10)
	return result.payload


with Serial('/dev/ttyS0', 9600, timeout=None, parity=PARITY_NONE, rtscts=1) as ser:
	while True:
    	s = ser.read(1)
    	buff = list(s)
    	if len(buff) == 0 or buff[0] != 126:
        	print("continuing")
        	continue
    	buff = buff + list(ser.read(2))
    	frame_length = buff[1] * 255 + buff[2]
    	buff = buff + list(ser.read(frame_length + 1))
	print(f"Buffer: {buff}")
    	print("Sending to IoT core")
	light = get_light_intensity(buffer) # The implementation depends on the board you chose
    	send_light_value({"light": light})
We can package this script and deploy it thanks to AWS IoT Greengrass’ strongest feature: Lambda functions automated deployments.
To do so, we just need to create a new Lambda function in our AWS account, and enable versioning.
After doing so, in order to send the package to our AWS IoT Greengrass core device, we need to create a custom component and link it to the latest version of the Lambda function we’ve just created. Remember that your AWS IoT Greengrass Lambda components can be of two types:
Our choice was, of course, the latter, since we want to continuously gather and forward information read from the serial device.
Finally (these steps are quite a few, but after doing them a couple of times you get used to the process, and it becomes almost mechanical) you need to create, or update if you already did the process once, a deployment, and select which components to deploy with that deployment. In our case we want to package our Lambda function and aws.greengrass.ShadowManager public component, which enables our core devices to publish messages and subscribe to AWS IoT Core shadow topic.
The core device should then receive a new job notification and install or update the components selected with that deployment. This should take a couple of minutes, and after the installation phase has finished, the Lambda function should automatically start and stream data to the selected named Shadow.
There’s a problem though…
After installing and deploying our test lambda, something took an unexpected turn: no data was sent to AWS IoT core.
After a quick investigation, we found a pretty self-explanatory error message in the device logs (you can find them in /greengrass/v2/logs/)
could not open port /dev/ttyS0: [Errno 1] Operation not permitted: '/dev/ttyS0'.
No problem, we thought: we made a little mistake in the device permission in the deployment configuration. We thought that the Lambda component needs permissions to access the serial device, and this can be set in the “Linux process configuration” under the “Device” section, but setting it didn’t help us fix the issue.
After double-checking everything, the error persisted. Even if the deployment specified to allow the user to access the devices, we added our AWS IoT Greengrass linux user (ggc_user) to the dialout group to be sure. (sudo usermod -a -G dialout pi)
Nothing changed again.
"Operation not permitted" is a different error than "permission denied". The first time I saw that kind of error was when I was experimenting with Docker containers, trying to edit /etc/hosts/: even if you are root you will get this error.
After exploring our installation, we found out that greengrass.service is running in its own linux cgroup slice, and it didn't get permission to access the serial port device.
Many things have changed under the hood in Linux systems after systemd adoption, even if, most of the time, they are completely invisible to end users and system administrators. Linux cgroups should have their own article to explain them but, in brief, they are the key technology that allows Docker and other containerization solutions to run.
With cgroups you can run processes and control resource usage (like CPU, memory, and device access), even if a program runs as root. If you are an old system administrator like me, you can think about them as new, more usable, and modern chroot jails.
With that in mind, we first tried to validate our hypothesis.
When a daemon starts in a slice, you can find its configuration under the directory /sys/fs/cgroup/system.slice/daemon-name/
(/sys/fs/cgroup/systemd/system.slice/greengrass.service)
A write-only file, called devices.allow contains devices and permissions that our program is allowed to access.
Every process (even in containers) that is started gets its directory with its file for permissions. For example, our lambda had its configuration in sys/fs/cgroup/systemd/system.slice/greengrass.service/D79cAW6fOnnzHB9J4flf5rRNTphoM0KFRxiZY0-89ck from the Linux kernel documentation we saw that writing the "magic" string c *:* rwm in the process's directory devices.allow everything to work finally.
"we need a more permanent solution to our problems" - Caiaphas - Jesus Christ superstar
Ok, let's configure our systemd unit to allow our lambdas to access the serial port!
From the systemd documentation we found that adding the line DeviceAllow=/dev/ttyS0 rw in our unit (etc/systemd/system/greengrass.service) should be enough.
It didn't work. Additionally, we got another problem:
unable to create start process: failed to run container sandbox: container_linux.go:380: starting container process caused: process_linux.go:545: container init caused: process_linux.go:508: setting cgroup config for procHooks process caused: failed to write "b *:* m": write /sys/fs/cgroup/devices/system.slice/greengrass.service/D79cAW6fOnnzHB9J4flf5rRNTphoM0KFRxiZY0-89ck/devices.allow: operation not permitted.
This error sounds even more strange: it means that the AWS IoT Greengrass process tries to grant access to block devices for our lambda (whereas our serial port is a character device).
Long story short: after fiddling around with permissions, we didn't find anything that could enable our process to run, so we had to implement a hacky workaround.
Please let us know in the comments if you have any suggestions.
So, we knew that setting up process permissions manually would solve our problem. We only need to automate the process of giving permissions to our lambda once it has been started.
A little hacky script with inotifywait does the trick:
#!/bin/bash
inotifywait --monitor /sys/fs/cgroup/devices/system.slice/greengrass.service --event create |
while read dir action file; do
       echo "**** $dir $action $file ***"
       if [ $action == "CREATE,ISDIR" ]; then
               sleep 1
               echo "c *:* rwm" >  $dir/$file/devices.allow
       fi
done
Putting this in /greegrass/v2/filemonitor.sh and adding a systemd unit (like /etc/systemd/system/filemonitor.service) with the content
[Unit]
Description=Filemonitor
After=greengrass.service
[Service]
Type=simple
PIDFile=/greengrass/v2/alts/filemonitor.pid
RemainAfterExit=no
Restart=on-failure
RestartSec=10
[Install]
WantedBy=multi-user.target
solved our problem! Don't forget to enable the service with systemctl daemon-reload; systemctl enable filemonitor.
This script monitors greengrass cgroup directory. When a new process starts, it will write in its device.allow file permissions, thus allowing our code to finally open and read from the serial device.
After fixing this issue (which took us longer than expected), we finally managed to read data from the serial port and then forward it to AWS IoT Core through our Lambda component. As soon as new data lands on the AWS cloud, an IoT Rule saves the new version of the shadow to our DynamoDB table.
We like AWS IoT Greengrass, we seriously do, because it simplifies a lot the process of deployments of our code to our edge devices.
We can see the benefits of having an orchestrator that has been developed and tested thoroughly, but sometimes it can get in your way when you want to do very simple tasks (like reading from a serial port, which happens a lot in the IoT world!), and you end up spend a lot of searching for the cause and possible solutions (or if you are lucky and have a Damiano as we do in beSharp, you can shorten a lot the googling time with their help).
Our searches let us learn a lot of stuff about Linux and AWS IoT Greengrass. For example, we learnt that in the first release of AWS IoT Greengrass (v1) there actually was a component that enables you to connect to serial devices in a securer way with just a few configurations on the IoT side, without any ominous bash scripts that run on your device, but as of the day we are writing this article, this has not been ported to the newer version (v2).
We would like to find a more elegant solution, so if you are luckier or you know more than us, please leave a comment in the section below to help us and every other SysOp solve this issue!
Proud2beCloud is a blog by beSharp, an Italian APN Premier Consulting Partner expert in designing, implementing, and managing complex Cloud infrastructures and advanced services on AWS. Before being writers, we are Cloud Experts working daily with AWS services since 2007. We are hungry readers, innovative builders, and gem-seekers. On Proud2beCloud, we regularly share our best AWS pro tips, configuration insights, in-depth news, tips&tricks, how-tos, and many other resources. Take part in the discussion!