Enabling enterprise Telemetry on AWS: Handling massive data backfills using ECS and Databricks wi...
17 June 2026 - 1 min. read
Keidi Xhafa


Nowadays Flutter is becoming more and more recognized as a viable solution for making mobile cross-platform applications. Also, AWS Amplify is rapidly gaining the attention of the developer community as it makes it incredibly simple to setup applications without worrying about backend infrastructure, as the library does that for you.
Recently these two frameworks joined forces and the first release of Amplify for Flutter has been put online for developers to test out, with support for Amazon Cognito, AWS S3, and Pinpoint for logging.
Being eager to try it out, we created a Proof-of-Concept to show how well these libraries work together. Following we present how to develop an AWS S3 powered dropbox-like application with Login capabilities for mobile devices.
As a bonus, we also propose a simple configuration for managing your CI/CD pipeline using Travis CI.
The project can be created step by step following the guidelines provided or by directly downloading the entire solution from our Github repository.
Let’s get started!
In order to start developing applications in Flutter, some preliminary steps are required. You can follow the instructions provided below to set up your environment with all the required tools.
Before doing anything else be sure to create an appropriate account on AWS. Amplify needs access to the following cloud resources:
Therefore here is a simple AWS Policy with the set of rules you need in order to run Amplify:
{
    "Version": "2012-10-17",
    "Statement": [
        {
            "Sid": "VisualEditor0",
            "Effect": "Allow",
            "Action": [
                "appsync:*",
                "apigateway:POST",
                "apigateway:DELETE",
                "apigateway:PATCH",
                "apigateway:PUT",
                "cloudformation:CreateStack",
                "cloudformation:CreateStackSet",
                "cloudformation:DeleteStack",
                "cloudformation:DeleteStackSet",
                "cloudformation:DescribeStackEvents",
                "cloudformation:DescribeStackResource",
                "cloudformation:DescribeStackResources",
                "cloudformation:DescribeStackSet",
                "cloudformation:DescribeStackSetOperation",
                "cloudformation:DescribeStacks",
                "cloudformation:UpdateStack",
                "cloudformation:UpdateStackSet",
                "cloudfront:CreateCloudFrontOriginAccessIdentity",
                "cloudfront:CreateDistribution",
                "cloudfront:DeleteCloudFrontOriginAccessIdentity",
                "cloudfront:DeleteDistribution",
                "cloudfront:GetCloudFrontOriginAccessIdentity",
                "cloudfront:GetCloudFrontOriginAccessIdentityConfig",
                "cloudfront:GetDistribution",
                "cloudfront:GetDistributionConfig",
                "cloudfront:TagResource",
                "cloudfront:UntagResource",
                "cloudfront:UpdateCloudFrontOriginAccessIdentity",
                "cloudfront:UpdateDistribution",
                "cognito-identity:CreateIdentityPool",
                "cognito-identity:DeleteIdentityPool",
                "cognito-identity:DescribeIdentity",
                "cognito-identity:DescribeIdentityPool",
                "cognito-identity:SetIdentityPoolRoles",
                "cognito-identity:UpdateIdentityPool",
                "cognito-idp:CreateUserPool",
                "cognito-idp:CreateUserPoolClient",
                "cognito-idp:DeleteUserPool",
                "cognito-idp:DeleteUserPoolClient",
                "cognito-idp:DescribeUserPool",
                "cognito-idp:UpdateUserPool",
                "cognito-idp:UpdateUserPoolClient",
                "dynamodb:CreateTable",
                "dynamodb:DeleteItem",
                "dynamodb:DeleteTable",
                "dynamodb:DescribeTable",
                "dynamodb:PutItem",
                "dynamodb:UpdateItem",
                "dynamodb:UpdateTable",
                "iam:CreateRole",
                "iam:DeleteRole",
                "iam:DeleteRolePolicy",
                "iam:GetRole",
                "iam:GetUser",
                "iam:PassRole",
                "iam:PutRolePolicy",
                "iam:UpdateRole",
                "lambda:AddPermission",
                "lambda:CreateFunction",
                "lambda:DeleteFunction",
                "lambda:GetFunction",
                "lambda:GetFunctionConfiguration",
                "lambda:InvokeAsync",
                "lambda:InvokeFunction",
                "lambda:RemovePermission",
                "lambda:UpdateFunctionCode",
                "lambda:UpdateFunctionConfiguration",
                "s3:*",
                "amplify:*"
            ],
            "Resource": "*"
        }
    ]
}
Attach the policy to a user with Programmatic Access, take note of the access and secret key. If you are not confident creating an AWS Policy on your own, check this link or choose one of the many guides available online.
A side note: it is advisable to remove the user as soon as Amplify has completed creating all the resources, to avoid leaving potential security breaches.
The next step is to configure AWS CLI on your computer. Download it choosing the appropriate installer for your OS. Install it and then in your terminal of choice type: aws configure.
Use the Access and Secret keys you’ve taken note of when prompted and the rest leave it as default.
With all this information filled up, you are now able to install Flutter and Amplify correctly.
We managed to install and launch Flutter without any difficulty by following this guide. We chose MacOS and followed the instructions, setting up everything for working with Android Studio, but you can use IntelliJ as well. After installing the framework, we connect a test phone and run flutter devices in the terminal to verify that it’s found correctly.
Create a new Flutter project from the Android Studio menu and select Flutter Application. Compile the required options and let the IDE create the boilerplate for you.
Select your phone and main.dart file and press play like in figure:

After compiling you’ll see the demo app working. Now let’s continue by configuring AWS Amplify.
Amplify has now released a specific version of its library to work directly with Flutter, written in Dart, and modularized so you can download and use only the module you need.
We followed the official Amplify guide for Flutter:
This guide helps configuring Amplify and complete all preliminary steps (installing the library, configuring the user, etc.) in order to do an amplify push in the terminal to obtain amplifyconfiguration.dart. This file is fundamental as it contains all the sensitive information and the configuration for your Amplify solution and also all the data we need when adding Amplify plugins to the Flutter solution. Keep it always safe!
When installing amplify with the intention of using Cognito SignIn and SignUp procedures pay attention to these details to avoid having unwanted behaviors:
To do a preliminary check we tried their demo on top of our existing project to be sure that everything was defined as it should. After that, we started developing our Proof-of-Concept!
First thing first: when we first tried Flutter and Dart, we found that it is very similar to how ReactNative works, in terms of structuring applications, that is pretty much no structure at all ? .
In order to keep the project as structured as possible, we wrote our project with Angular in mind: we opted to divide code by functionalities following directives of Domain Driven Design. Removing the UI part of the dart files from the main widgets and moving it in some specialized classes to keep code more DRY and Clean. Let’s see it with a simplified example:
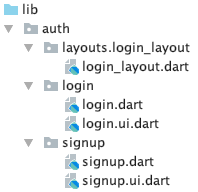
Like for Angular, we defined a package for a Domain, in this case Auth. Inside we have defined a package for a layout file and one for every “component” (login and signup). For every component, we defined 2 files: one for the actual logic and another one suffixed with .ui to contain the graphical composition.
Let’s check some code; inside login.dart we have:
// Call this when drawing component graphics
@override
Widget build(BuildContext context) {
 return loginUi(this);
}
We can see that there is no graphic here, instead, we call the loginUi class passing our State<Login> class LoginState with this. Now let’s see login.ui.dart:
UiBuilderloginUi = (state) => Container( child: Stack( children: [ ... ] ) );
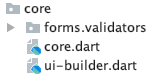
We declared our “graphical file” as UiBuilder<LoginState> loginUi = (state) => Container(child: … where UiBuilder is another helper we defined (and we’ll see it in a moment) and that “cast” to LoginState passing the state variable to the method. With this approach, we can build the graphics separately from the logic file with also having access to all the variables we declare in login.dart inside the LoginState class!We have also declared for this purpose a core package which contains the UiBuilder implementation:
Let’s see inside ui-builder.dart:
import 'package:flutter/material.dart'; typedef UiBuilder= Widget Function(T context);
Nothing more than defining a new type (UiBuilder) which refers to a function that returns a Widget (for the graphics) with a context that depends explicitly on the generic T, with this we have created a clean way to separate logic from graphics!Just for completeness here is the layout file login_layout.dart:
import 'package:flutter/material.dart';

class LoginLayout extends StatefulWidget {

 final Widget child;

 LoginLayout({ this.child, });

 }

class LoginLayoutState extends State {
 @override
 Widget build(BuildContext context) {
   return Container(
…
        appBar: null,
       body:
...
                     this.widget.child
...
   );
 }
}
Here the 2 important elements are the constructor LoginLayout({ this.child, }); where we ask for a final Widget child; (The Login class), then we inject this variable into the body of the layout with this.widget.child to include its graphics. Finally, when we want to show this component with its layout we can use LoginLayout(child: Login()).
We decided to make an application where a user can sign up in order to gain access to a personal space on S3 to upload and download files; therefore we have defined 2 domains: Authentication and S3 management.
The first one contains login and signup components, while the second one is a component that manages upload, download, delete, and list actions over our application’s bucket.
At first, we wanted to build the login and signup features to let users register and then log in to use the application. As a prerequisite, we followed the amplify guide about analytics first and then for authorization as mentioned before.
Inside the project’s directory we simply executed:
amplify add analytics
With the default parameters. After that, we configured login and signup capabilities with
amplify add auth
Due to the nature of the POC we left the default parameters like below:
? Do you want to use the default authentication and security configuration?
    `Default configuration`
? How do you want users to be able to sign in?
    `Username`
? Do you want to configure advanced settings?
    `No, I am done.`
Then we pushed the configuration online using the user we prepared in the preliminary phase with:
amplify push
In this phase, it is advisable to run a flutter clean and a redeploy of the application on the phone to be sure that the configuration is updated on the device.
Having the configuration pushed online means that we have an S3 bucket with the amplify application, a user pool, and an identity pool on AWS Cognito. Those can be left untouched as they are.
Now for the code part, we’ll show you the most interesting pieces, given that the entire project is available on our Github repository.
First of all we use this piece of code to identify the login form:
final formKey = GlobalKey();
This is necessary so we can validate all the form controls with a single line of code:
// Validate the form with this line...
if (formKey.currentState.validate()) {
To access form controls’ data we define objects of type TextEditingController like these:
final usernameController = TextEditingController();
final passwordController = TextEditingController();
To log the user in we use the standard Amplify’s method as per documentation:
SignInResult res = await Amplify.Auth.signIn(
    username: usernameController.text.trim(),
    password: passwordController.text.trim(),
);
And to navigate to the signup or the s3 page we use:
Navigator.push(context, MaterialPageRoute(builder: (context) => LoginLayout(child: Signup())));
Navigator.push(context, MaterialPageRoute(builder: (context) => S3ViewerLayout(child: S3Viewer())));
As we said before we pass the correct layout to the MaterialPageRoute specifying the component we want.Also in order to notify the graphic that the state of the application is changed we use Flutter’s method setState:
setState(() {
    loggingIn = false;
});
For the Ui part, let’s take a look at login.ui.dart; we assign the formKey to the Form object:
child: Form(
    key: state.formKey,
We have also defined two shared components to help standardize the graphics around the application: roundedTextFormField and roundedRectButton; they are defined in a shared namespace. Just for the sake of curiosity let’s see one of these:
import 'package:flutter/material.dart';

Widget roundedTextFormField(TextEditingController controller, String hintText, Color mainColor, Color backColor, Function validation, obscured) {
 return Padding(
     padding: EdgeInsets.only(bottom: 10, left: 50, right: 50),
     child: TextFormField(
         obscureText: obscured,
         controller: controller,
         validator: (value) => validation(value),
         style: TextStyle(color: mainColor),
         decoration: new InputDecoration(
           border: new OutlineInputBorder(borderRadius: BorderRadius.circular(100.0),),
           filled: true,
           hintStyle: new TextStyle(color: mainColor.withOpacity(0.5)),
           hintText: hintText,
           fillColor: backColor
         ),
     )
 );
}
In Dart, we code similar to Javascript in the sense that we just need to define a widget and import it in the file where we need to use it, just like we did for the roundedTextFormField above.
For the Signup process, we applied the default parameters of Amplify’s configuration wizard and we ask for email, username (that will be used to identify the personal space in the S3 bucket), and a valid password. After the signup process, there is the confirmation process. A mail will be sent to the user with a confirmation code to insert in order to complete the registration.
Let’s see the code inside signup.dart. There are two main methods: signupNewUser and confirmNewUser; the approach is similar to the login method:
if (formKey.currentState.validate()) {We define a formKey and we use it for the page’s form, then we use Amplify to signup:
// Create a map attributes dictionary for holding extra information for the user MapuserAttributes = { 'email': emailController.text.trim(), // additional attributes as needed: we set email because is a common way // to define a unique value to use for S3 folders }; // Signup using Amplify with Cognito SignUpResult res = await Amplify.Auth.signUp( username: usernameController.text.trim(), password: passwordController.text.trim(), options: CognitoSignUpOptions( userAttributes: userAttributes ) );
Then we change the state of the application with setState, altering the visibility of different components in the signup.ui.dart file using the Visibility Widget:
Visibility(
   visible: state.registering,
…
To keep the code clean we also use setState in signup.dart to define which widget we want to see: signup or confirm.
@override
Widget build(BuildContext context) {
 return this.isSignUpComplete ? confirmUi(this) : signupUi(this);
}
Basically we are using the state variable isSignUpComplete to decide which widget we want to show (both in signup.ui.dart).
To complete the registration we use:
SignUpResult res = await Amplify.Auth.confirmSignUp(
   username: usernameController.text.trim(),
   confirmationCode: confirmController.text.trim()
);
After that, we send the user back to the login page.
The S3 manager widget has four main purposes:
Let’s take a look at what we have done to achieve that.
// Storage Item list Listitems = []; // Check if the app is uploading something bool isUploading = false; // Check if a file is being removed bool isRemoving = false; // Check if a file is being downloaded bool isDownloading = false; // Check if the app is retrieving the list of files bool isListing = false;
We have defined an array to store the listed items, and four boolean values to manage the changing of application state for every action: this way is very easy to use setState method to block user interaction on buttons during the execution of long running tasks. At the init state of the component we run listFiles(), which request our authenticated user:
AuthUser user = await Core.getUser();
And list all files with Amplify using default options:
ListResult res = await Amplify.Storage.list();
Before showing the files we filter them by user to prevent listing unwanted ones:
items = res.items.where((e) => e.key.split('/').first.contains(user.username)).toList();
To upload a file we need to recover it from the phone and to do it the easy way we have used the File Picker library which also handles permissions:
import 'package:file_picker/file_picker.dart';
File picker let us retrieve the file, and with the connected user we can create a unique key for the upload:
// We put this outside of try to avoid logging user cancel
File file = await FilePicker.getFile();
AuthUser user = await Core.getUser();

try {
 if(file.existsSync()) {

   setState(() {
     isUploading = true;
   });

   final key = user.username + '/' + file.path.split('/').last;

   // Upload the file
   UploadFileResult result = await Amplify.Storage.uploadFile(
     key: key,
     local: file
   );

...
To remove a file we simply call the Amplify method passing the item key:
RemoveResult res = await Amplify.Storage.remove(
   key: item.key,
);
Finally to download a file we need to do two things: check user’s permissions as new android versions require them at runtime:
import 'package:permission_handler/permission_handler.dart'; FuturecheckPermission() async { final status = await Permission.storage.status; if (status != PermissionStatus.granted) { final result = await Permission.storage.request(); if (result == PermissionStatus.granted) { return true; } } else { return true; } return false; }
And actually download the file:
var dir = await DownloadsPathProvider.downloadsDirectory;
var url = await Amplify.Storage.getUrl(key: item.key, options: GetUrlOptions(expires: 3600));

await checkPermission();

final taskId = await FlutterDownloader.enqueue(
   url: url.url,
   fileName: item.key.split('/').last,
   savedDir: dir.path,
   showNotification: true, // show download progress in status bar (for Android)
   openFileFromNotification: true, // click on notification to open downloaded file (for Android)
);
As a side note, we had difficulties downloading the actual file with Amplify’s download method so we managed to do it with a combination of Amplify’s getUrl and FlutterDownloader.enqueue.
For the design part just take a look at the s3viewer.ui.dart file, nothing fancy there.
The core component just contains some static methods that serve as utilities all around the application as well as some validation functions for the forms. Let’s have a quick look at some examples:
// Static method to get the current logged user static FuturegetUser() async { return Amplify.Auth.getCurrentUser(); }
The previous one for returning the Amplify user, and a simple email validator below:
static emailValidator(value) {
 if (value.isEmpty) {
   return 'Please fill the field';
 }
 if (!RegExp(r"^[a-zA-Z0-9.a-zA-Z0-9.!#$%&'*+-/=?^_`{|}~]+@[a-zA-Z0-9]+\.[a-zA-Z]+").hasMatch(value)) {
   return 'Please insert a valid email';
 }
 return null;
}
It receives a string value and returns an error message or null if the input is valid; this can be passed to a TextFormField for the validator property (please refer to the source code for completeness).
To develop the application directly on a real device, Flutter allows you to deploy and test your code on it with hot reload functionality. There are two ways to do this:1) Press play on the top-right corner of Android Studio like in figure:

2) first type in your terminal flutter devices and take note of your device id. Then you can call in the terminal flutter run -d <DEVICE_ID> -t ./lib/main.dart, being in the project directory.
When in testing mode a debug flag will be automatically put on top of your appbar, and by pressing r in the terminal you can force the hot reload functionality.
To complete the build preliminaries you need to do these two steps:
1) in the android directory go to app/src/build.gradle and verify that you have the following values for the SDK:
minSdkVersion 23
targetSdkVersion 29
compiledSdkVersion 29
This is to avoid building problems with the libraries we have in the demo.
2) in the android directory go to app/src/main/AndroidManifest.xml and add these permissions:
<uses-permission android:name="android.permission.INTERNET" />
<uses-permission android:name="android.permission.WRITE_EXTERNAL_STORAGE" />
<uses-permission android:name="android.permission.READ_EXTERNAL_STORAGE" />
Directly inside the manifest tag and android:requestLegacyExternalStorage="true" as an attribute of the application tag.
Finally, let’s see our app in action:

Travis CI is a CI/CD service that you can use to test, build and deploy your application, and it can be easily integrated with your GitHub repository, in our case a public one. For the sake of this article, we will focus on how to automate the Android APK generation from the code pushed on our public GitHub repository through Travis CI.
Once you’ve signed up yourself to Travis CI - we signed up through our GitHub account - you need to activate your repository, in order to make Git push events to trigger the pipeline under specific conditions defined in Travis CI configuration file.
From the Travis CI console, move to the Settings section that is listed in the menu that appears when you click on your avatar. Now, from the left sidebar select the organization that contains the repository you want to integrate with Travis CI. From the list of repositories associated with the given organization, click the toggle that corresponds to the repository that should be activated.
Once you’ve activated the repository you can focus on the Travis CI configuration file, the one that describes the CI/CD process, in our case how to build the Android APK.
Create a file named .travis.yml in the root of the project’s folder.
In the first part of the .travis.yml file we will define the operating system on which the pipeline should run, the supported language and the JDK that is needed for build purposes.
language: android
os: linux
dist: xenial
jdk: oraclejdk8
Specifying android as the supported language makes the CI/CD environment implicitly include the Android SDK, needed to build the solution. Xenial is an Ubuntu Distro that corresponds to the 16.04 version. oraclejdk8 should be configured as SDK in order to use the sdkmanager, a command line tool used to install Android’s platform and build tools. After this initial block we have to define all the Android’s main modules that are needed throughout the build process.
android:
 components:
   - tools
   - platform-tools
   - build-tools-28.0.3
   - android-29
The third main block regards the installation of Android’s platform and build tools, and the installation of Flutter inside the CI/CD environment.
install:
 - yes | sdkmanager "platform-tools" "platforms;android-29" "build-tools;28.0.3"
 - git clone https://github.com/flutter/flutter.git -b flutter-1.22-candidate.9
Note: the -b option allows you to specify the exact version of Flutter you’re gonna clone in the CI/CD environment. To have an overview of all flutter branches, visit this page. Flutter-1.22-candidate.9 branch refers to version 1.22.0-9.0.pre.
Let’s now focus on the script block of the .travis.yml configuration file. Here we define the command needed to build our Android APK.
script:
 - ./flutter/bin/flutter build apk --debug
As you can notice, we are using the --debug flag. As described here, in debug mode, the app is set up for debugging on the physical device, emulator, or simulator.
Once the artifact - i.e. the Android APK - is available, it has to be released in the form of GitHub release. To automate the release creation, you need to add the following configuration block.
deploy:
 provider: releases
 api_key: $API_KEY
 file: build/app/outputs/apk/debug/app-debug.apk
 skip_cleanup: true
 name: $TRAVIS_TAG
 on:
   tags: true
This configuration makes Travis CI create a release only if a tag is present in the last commit. Using the TRAVIS_TAG environment variable, we are able to define the name that we want to assign to the release.
To add a file to the release, you have to specify its path after the file key.
Last important thing to specify is the api_key, i.e. your GitHub personal access token, needed for authentication.
You should finally be able to browse your newly created release in your GitHub repository.
This is the entire .travis.yml configuration file:
language: android
os: linux
dist: xenial
jdk: oraclejdk8
android:
 components:
   - tools
   - platform-tools
   - build-tools-28.0.3
   - android-29
install:
 - yes | sdkmanager "platform-tools" "platforms;android-29" "build-tools;28.0.3"
 - git clone https://github.com/flutter/flutter.git -b flutter-1.22-candidate.9
script:
 - ./flutter/bin/flutter build apk --debug
deploy:
 provider: releases
 api_key: $API_KEY
 file: build/app/outputs/apk/debug/app-debug.apk
 skip_cleanup: true
 name: $TRAVIS_TAG
 on:
   tags: true
Here we present all the references we used to build this solution:
And here is our repository for downloading and testing the demo application:
Note: at the time of writing it seems that Amplify for Flutter can’t compile for release mode, therefore the app can be tried only in debug mode.
In this article we have seen how simple it is to create a mobile application with Flutter using AWS Amplify to cover all the complexity of managing AWS infrastructure for us and for keeping data synchronized between our app and the Cloud. At the moment of this article only 3 services have been ported to Flutter: Cognito, S3 and Pinpoint, but seeing how well this is working, we sincerely hope to see more and more updates to this library.
As a final note, feel free to refer to our simple demo to expand and explore all the possibilities of this solution. If you have any questions or ideas we encourage you to reach and discuss with us!
Until our next article, thank you for taking your time to read and see you again! ?
#Proud2beCloud