This is the last part of our 3-article series explaining how to set up a Serverless File Sharing Platform. In this article, we are going to focus on the code we need to build both the front- and the back-end of our software. Moreover, we will dive deep into the software architecture; we will learn the reason why of such planning and we will understand more about triggers through AWS which are essential elements to make our solution work.
As disclosed in the first article, we will also examine in depth Continuous Integration and Continuous Delivery Pipelines so that we will able to run trusted and repeatable deploys, simply pushing on the repository.
In our second article, we built an infrastructure similar to one we are about to fine-tune and define in the current article: we first need to remove the API Gateway created as a test; the back-end resources deploy, in fact, will be managed by the automatic pipeline.
To complete the deploy of our solution:
Download the back-end and for the front-end source code;
Set up 2 CodeCommit repositories for the back-end and 2 CodeCommit repositories for the front-end;
Configure the Pipelines;
Push the code on the repositories to start the automatic deploy.
Here are the links to the repositories you will need in order to clone the source code:
Let’s have a look at the software development best practices.
Front-end
The front-end, written in React.js language, is an essential part of our application. It allows users to log in to a secure space so that they can upload, share and download documents.
Follow the steps below to integrate the front-end with a serverless back-end. In this way, the user’s action on the interface will actually reflect on Amazon S3 and on DynamoDB tables.
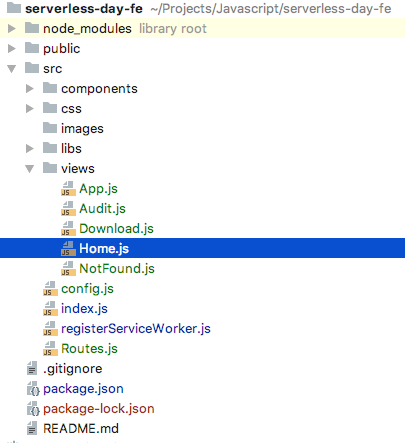
Let’s start cloning the source code from the repository or downloading the zip file. The packet structure should be similar to the following:
Make sure to be in the project root to be able to launch the following commands:
npm install
npm start
We can now go on and configure AWS Amplify library.
Amplify is a library suggested by AWS to free developers from tasks closely related to Amazon AWS, in this particular case, you won’t need to take care of Cognito, S3 and API Gateway anymore.
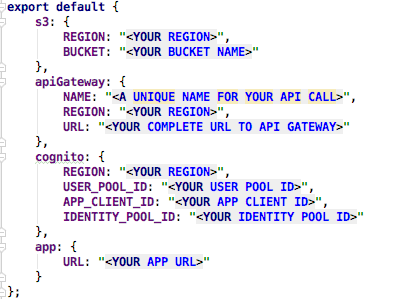
To properly configure the library, we created a simple custom component we will use later as a configuration file
All the AWS Amplify configuration parameters must be replaced by the IDs, and the ARNs created before (see our previous article).
Once the setup is completed and all the prerequisites and dependencies are installed, you can start the application and get the following login page:
By manually adding users to the CognitoUserPool, you will be able to log in and to get the main application view:
The code we made available is extensively commented, to make it as clear as possible.
An interesting trait of React.js is the auto reload. The advantage is: each change and/or update made to the code, to the CSS or even to the libraries is immediately visible in the application shown in the browser.
The approach of React.js to the DOM is another useful feature; in a traditional Javascript front-end, it is up to the developers to take care of DOM changes. When using React.js, instead, this is a task which is completely managed by the Framework.
Each React.js component is similar to a complex Javascript object which related context, represented by “this”, allows the user to access to a public key called “state”. This public key represents the current state of the component. Every time a component attribute changes the render method changes, too. That is to say: the developer’s direct intervention on the DOM is not needed anymore. For each “state” change, the framework takes care of everything by itself.
It is simple to notice that, in such a context, in the Table.js there are modals displayed which are not manageable in any other traditional way.
Back-end
The back-end is served through API Gateway and Lambda.
It could be necessary to make changes both on API Gateway and on Lambda at each deploy (depending on the changes made to the source code or to the back-end structure). For this reason, we found a way to get a simple and effective automated management of the AWS stack.
Our choice is related to the Framework we used: Chalice
Chalice is a Python framework designed for AWS which incorporates a router similar to Flask router and a decorator system which implements integrations with the supported AWS services.
It is possible (and simple!) to add AWS triggers to our back-end through simple declarations in order to invoke methods responding to specific events or to configure complex integrations in a completely managed way (e.g., CognitoUserPool integration or API Gateway integrations).
You will find the complete solution in the repository, complete with all the code and the configuration and utility files.
You won’t need to set up an environment or to install dependencies thanks to the Dockerfile and the docker-compose we included. In this way, the application will start automatically.
To start the application using Docker, just access to the solution root and invoke
docker-compose up
If you prefer to avoid Docker and to install dependencies on your own system, you first need to install Python 3.6, pip and then all the dependencies contained in requirements.txt.
If it is not possible to use Docker, we suggest you use a dedicated VirtualEnv:
pip3 install -r requirements.txt --user
The project structure should be similar to the one in the following picture:
Let’s say a few words about “chalicelib” folder, used to add custom classes to the project so that they will be recognized by the framework in use.
The file named “config.py” will be used to configure all the parameters dependent on AWS account that Chalice and the application need to know.
To maintain order and to keep the code as simple as possible, we divided the modules into services, controllers, and connectors. With such an organization it is possible to keep the app.py code — containing the properly decorated back-end roots — DRY.
All the working logic is contained into “controllers” and “services” folders, except for the roots and for the output management tasks.
We decided to implement the interface aimed to communicate with the database in a separated module (a connector) so that it would be easy to optimize, modify or replace it.
Chalice takes care of both the deploy and the setup of API Gateway and Lambda on his own. Configurations are expressed idiomatically in the code.
Once the project is ready, we can start the automatic deploy by invoking the following command
chalice deploy
Let’s focus on the most interesting part of our project: decorators.
Thanks to the decorators we will be able to integrate AWS services in a simple way by using triggers and API Gateway configurations.
The whole root and triggers definition takes place in the main back-end file: the app.py file.
As you can see from the code, there is a great number of decorators. They are used by the framework to declare roots and integrations with AWS.
The decorators used in this project are @app.route, @app.on_s3_event, @app.schedule.
@app.route
Chalice takes care of the deploy of the back-end — except for methods regarding reactions to the events — through a single Lambda. The framework includes the router which invokes the right method for each request. @app.route decorator refers to the router: it gives instructions to create and manage a route on API Gateway responding to one or more HTTP verbs. The just decorated method will be invoked by the router every time a request — corresponding to the defined route — occurs.
In addition to the route creation, the decorator is the designated element to accept a given number of parameters in order to maximize the integration with API Gateway. For example, it is possible to define CORS setting or an integration with a CognitoUserPool for the API authentication
Here is an example of the definition of an authenticated method with authorizer and CORS settings:
It’s now time to discover how to tell the framework to invoke a specific method when an S3 event occurs. We take advantage of this trigger in our project in order to transform users’ uploaded files. @app.on_s3_event decorator uses the event we are interested in and the bucket in which the event is taking place as an input.
In the meanwhile, a deploy of a Lambda — separated from the main one — starts. The trigger of the deploy of the Lambda is an upload to S3. This separated Lambda is automatically invoked by AWS every time an
s3:ObjectCreated:*
event takes place on the specified S3 bucket.
@app.schedule
As the name “@app.schedule” evokes, this decorator defines a scheduling or a time interval for the method to be run. It creates a CloudWatch events ruleand then it manages it to start a specific Lambda containing the method to be run
At this point, it is already possible theoretically to upload the compiled Front-end to the S3 bucket created in our 2 previous articles and to run a Chalice deploy to make sure everything is properly configured. Anyway, we really wanted to conclude our architecture touching upon automatic code deploy pipelines.
Anyway, the solution we are going to focus on today is a little bit different.
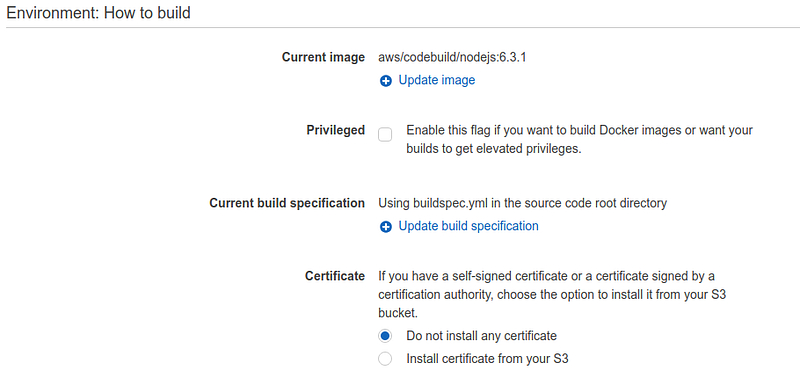
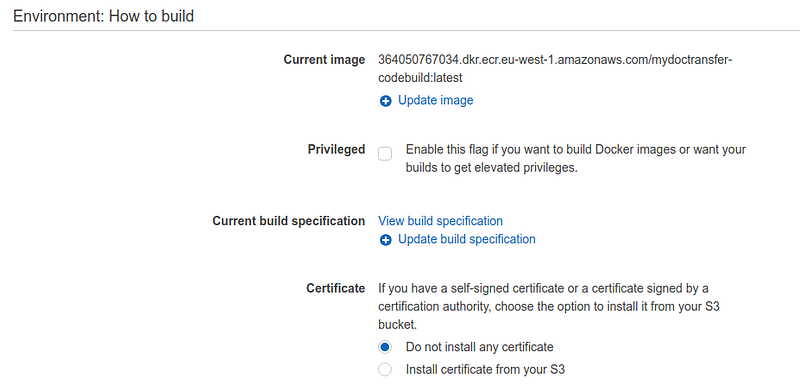
Let’s create, first, a CodeBuild application for the front-end and a CodeBuild application for the back-end. We need to set up CodeBuild so that it can use the buildspec.yml file contained in the repository root.
The front-end CodeBuild can be based on a nodejs standard image, while the back-end one can be based on a Python3.6 image.
There is a buildspec.yml file in each repository; they define CodeBuild steps to produce the packet to be deployed and also the related deploy instructions.
Once the two applications are provisioned, the only thing to do is creating 2 Pipelines (one for each application created). They will have the task to download the source code from CodeCommit and to pass it to the corresponding CodeBuild. In neither of the two Pipelines, you need to specify the deploy stage: the deploy instructions, in fact, are already contained in the buildspec.yml file. In this way, they will be started automatically after the build process.
Consequently, the IAM roles associated with the CodeBuilds must have the following permissions:
Upload and delete files from S3;
Manage API Gateway and Lambda;
Invalidate the CloudFront distribution.
Let’s start analyzing in details the front-end buildspec:
The most relevant part of the process is the build.sh script which contains a minimal configuration of the shell and the chalice deploy command.
The remaining steps prepare the local environment. They install the dependencies and they keep the deployments’ state which is saved in
/.chalice/deployed
through a designated S3 bucket.
Just push the code in the repository; at this point, the Pipelines will start automatically the deployments of both front- and back-end.
You are ready to enjoy your File Sharing application up&running :)
We are at the end of our 3-articles series about Serverless. We hope you enjoyed it! Feel free to ask questions and to tell us about your final solution. We will be happy to hear from you!
Head of software development at beSharp and Full-Stack Developer, I keep all our codebases up-to-date. I write code in almost any language, but Typescript is my favorite. I live for IT, Game design, Cinema, Comics, and... good food. Drawing is my passion!